If you have an active SketchUp Subscription with Professional CAD Systems then you are entitled to free support from one of our SketchUp Gurus – just download AnyDesk then submit a support request with the form below.
Local NZ SketchUp Support
SketchUp + Trimble Account FAQs
Instructions for Windows:
- Download the SketchUp installation .exe file for Windows HERE. (Scroll down for MacOS instructions)
- Right click the downloaded install file and select “Run as administrator”. You may see a security prompt and if so, you will need to give the SketchUp installer permission to make changes on the computer.
- During the installation process, you can choose if you want to install Scan Essentials or the Revit Importer.
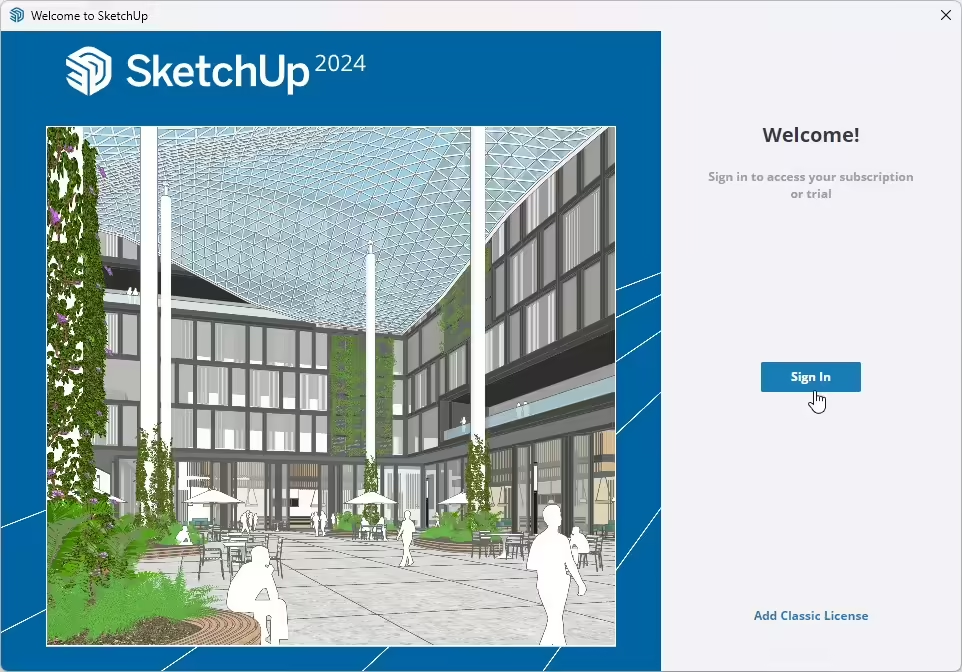
- Once the installer is complete you can launch SketchUp. Sign In at the welcome screen to access your subscription or free trial.
- See below on how to access included apps like V-Ray. If you are still stuck you can checkout an access guide video HERE.
Instructions for MacOS:
- Download the SketchUp installation .dmg file for Mac HERE.
- Make sure you’re logged into your computer as a user who has administrative privileges.
- Locate and double-click on the downloaded .dmg file. This will mount the installer and open a window with a SketchUp icon on it.
- You’ll see a progress bar as the files are copied, once this is complete you’ll have a new SketchUp folder under Applications.
- To launch SketchUp you need to navigate to the Applications > SketchUp folder and double click on the SketchUp icon.
- The first time you launch the software, you may be prompted with a security message, if so, click open.
- You can now close the installer window and delete the .dmg install file by dragging it to the trash can.
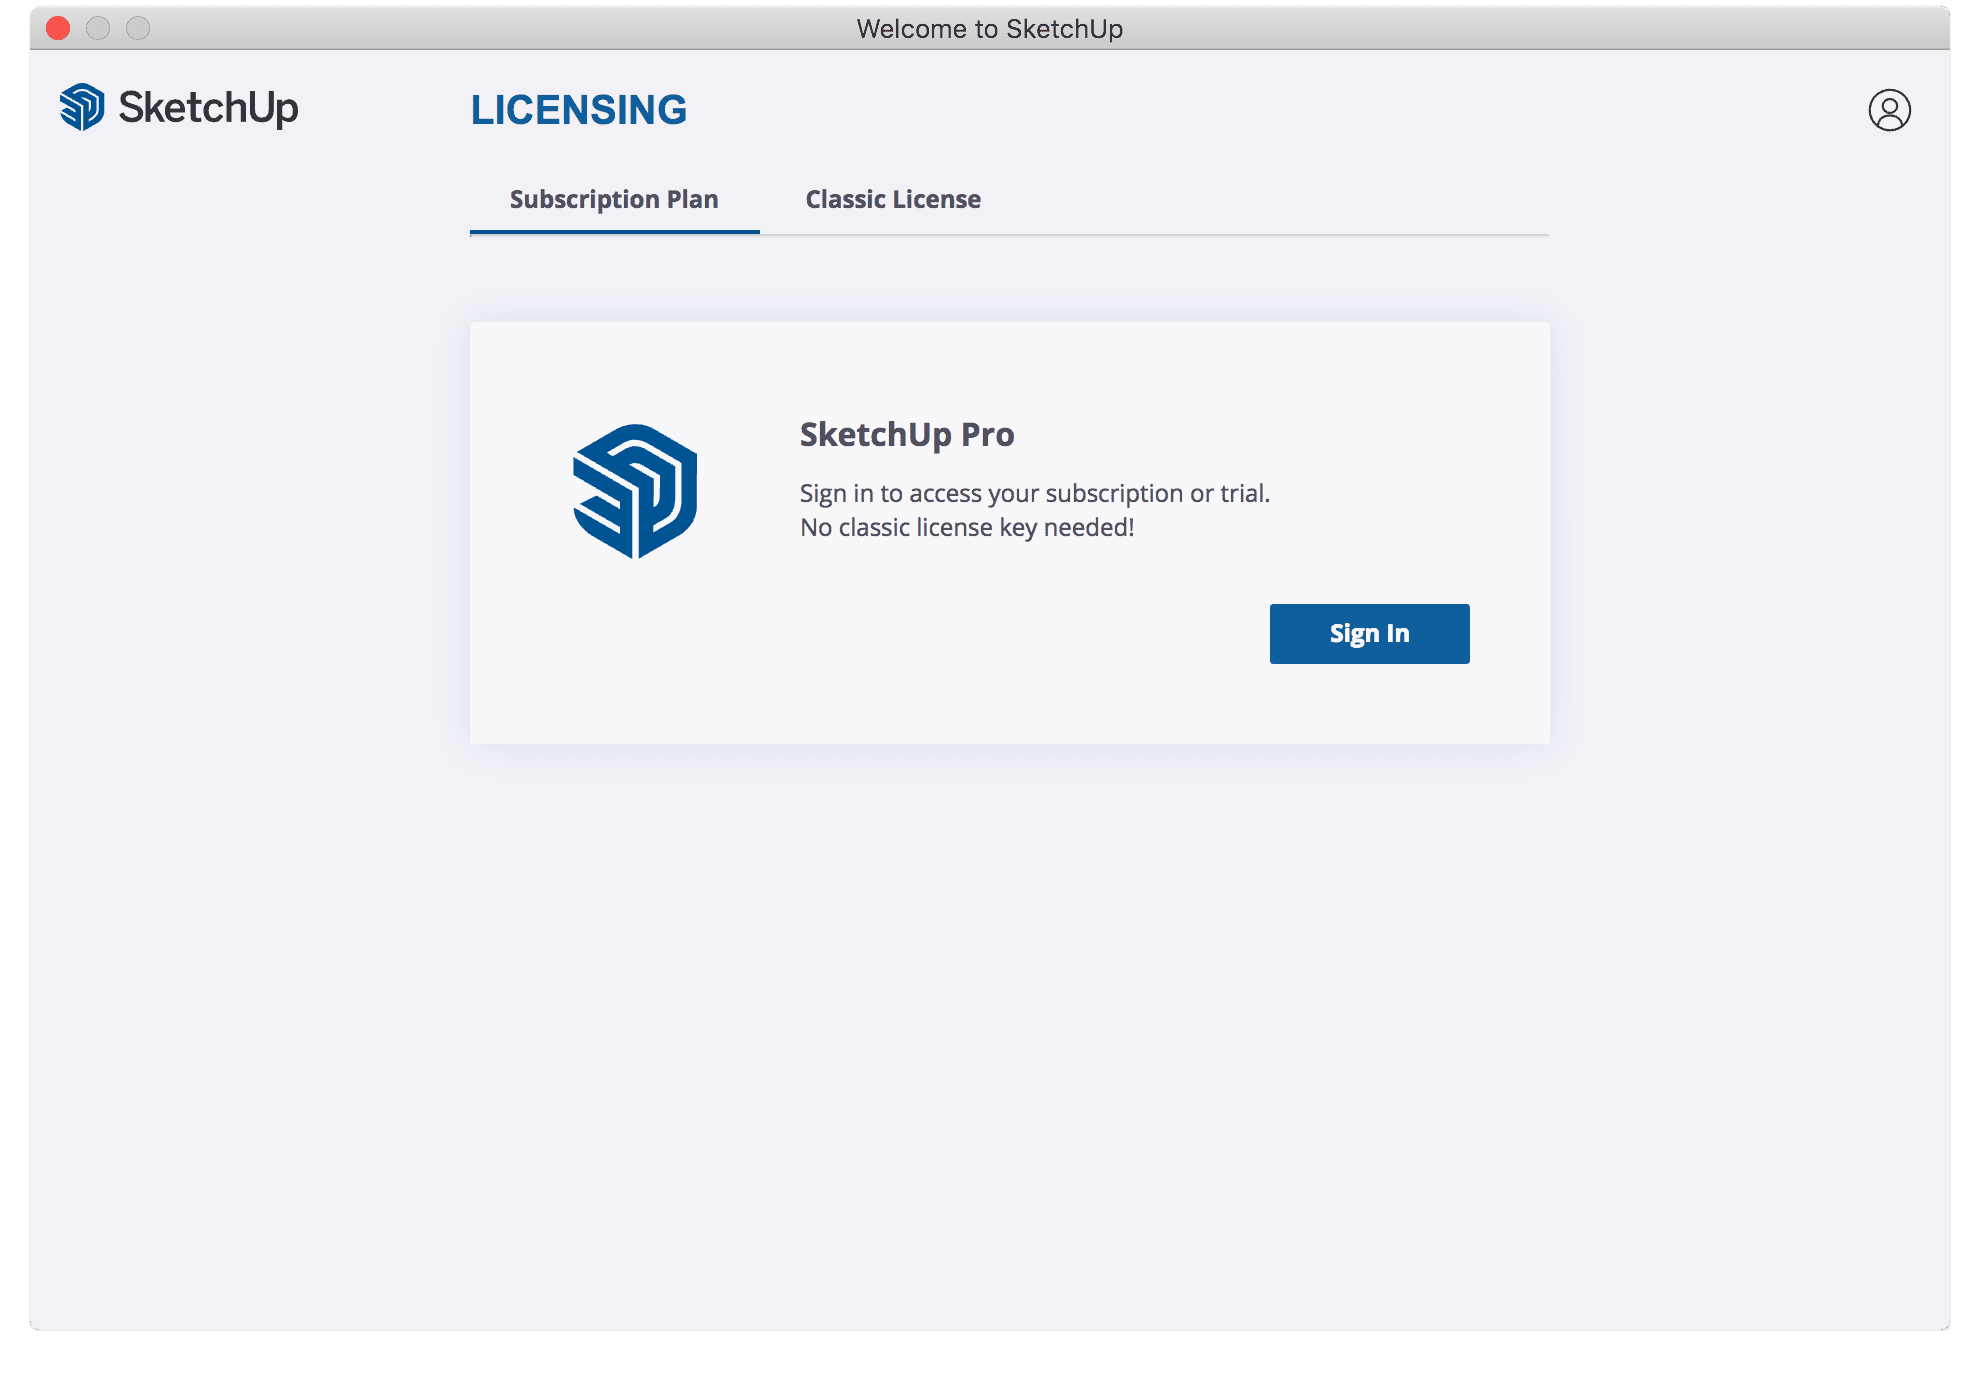
- Launch SketchUp and Sign in at the welcome screen to access your subscription or free trial.
- If you are still stuck you can checkout an access guide video HERE.
SketchUp Pro & Studio subscriptions can be authorised on up to two devices. Only one authorised devices can actively use SketchUp at the same time, and each subscription can only be used by one person. SketchUp Go subscriptions can only be authorised on one iPad. To deauthorise an activation you need to logout of SketchUp, you can then sign in on another device or a new version of SketchUp. If you exceed your activations and can no longer access your subscription, CLICK HERE for instructions on how to deauthorise all your logged in sessions.
Windows
Migrating Templates in SketchUp
- Make sure hidden files is turned on in file explorer options
- Navigate to
C:\Users\YOURUSERNAME\AppData\Roaming\SketchUp\SketchUp 2023\SketchUp
– if you’re migrating from an earlier version than 2023 go into that folder instead i.e. replace the “2023” in the path above with whatever version you are migrating from. - Select the Templates folder and press CTRL+C to copy it.
- Navigate to
C:\Users\YOURUSERNAME\AppData\Roaming\SketchUp\SketchUp 2024\SketchUp
– then press CTRL+V to paste the Templates folder you copied in the step before.
Migrating Plugins in SketchUp
- Open your new installation of SketchUp.
- Open the Extension Warehouse Window and sign in.
- Navigate to your “My Extensions” page by hovering over your username in the top right corner, and selecting “My Extensions”. The My Extensions page lists extensions that you have installed in the past, on other versions and installations of SketchUp.
- Scroll through the list and install any extensions that you wish to access in this SketchUp installation.
- Determine what extensions you use but are not available through Extension Warehouse. You will need to discover where to download the current version of those extensions and reinstall them. Typically this is the extension developer’s website.
- Very often this will include any renderers (Enscape, V-Ray etc.) or hardware extensions you may be using with SketchUp.
- Open a new Windows Explorer window.
- Navigate to the root folder for the older version of SketchUp;
eg.
C:\Users\USERNAME\AppData\Roaming\SketchUp\SketchUp 2023\SketchUp\Plugins
- Select the files in the Plugins folder and press Ctrl+C to copy the items.
- Navigate to
C:\Users\USERNAME\AppData\Roaming\SketchUp\SketchUp 2024\SketchUp\Plugins
- Press Ctrl+V on your keyboard to paste the files.
- Open SketchUp 2024 and access the plugins as you have in the past. Note that there may be some older plugins that are not compatible with your current version of SketchUp. In this case, please contact the plugin developer for additional assistance.
Migrating LayOut
You can define the location where Templates, Scrapbooks and Pattern-Fills are stored with each version of LayOut in the Preferences dialog box under the Folders section. By default any newly created Templates and Scrapbooks are stored in the paths below. When upgrading from an older version of SketchUp just locate the appropriate folder below, copy the contents and paste them into the new folder. Alternatively you may wish to create a folder in a location of your choosing, such as in your Documents folder, and then point LayOut to that location under the Preferences dialog box.Templates
-
C:\Users\USERNAME\AppData\Roaming\SketchUp\SketchUp 2023\LayOut\Templates
C:\Users\USERNAME\AppData\Roaming\SketchUp\SketchUp 2023\LayOut\Scrapbooks
- There is no default user folder
MacOS
Migrating Materials & Components in SketchUp
Watch the video- Open a new Finder window.
- Open the Go menu and choose “Go to Folder”
- Enter the following and click Go
eg.
~/Library/Application Support/SketchUp 2023/SketchUp
If you’re migrating from an earlier version, just substitute that version number for the “2022” in the suggested path. - Select the files in the Materials folder and press Command+C to copy the items.
- Open the Go menu and choose “Go to Folder”
- Enter the following and click Go
~/Library/Application Support/SketchUp 2024/SketchUp
Note: If there is no Materials folder, you will need to create one. - Press Command+V on your keyboard to paste the files.
Migrating Plugins in SketchUp
- Open your new installation of SketchUp.
- Open the Extension Warehouse Window and sign in.
- Navigate to your “My Extensions” page by hovering over your username in the top right corner, and selecting “My Extensions”. The My Extensions page lists extensions that you have installed in the past, on other versions and installations of SketchUp.
- Scroll through the list and install any extensions that you wish to access in this SketchUp installation.
- Determine what extensions you use but are not available through Extension Warehouse. You will need to discover where to download the current version of those extensions and reinstall them. Typically this is the extension developer’s website.
- Very often this will include any renderers or hardware extensions (like special mouse controllers) you may be using with SketchUp.
- Open a new Finder window.
- Open the Go menu and choose “Go to Folder”
- Enter the following and click Go
eg.
~/Library/Application Support/SketchUp 2023/SketchUp/
- Select the files in the Plugins folder and press Command+C to copy the items.
- Open the Go menu and choose “Go to Folder”
- Enter the following and click Go
~/Library/Application Support/SketchUp 2024/SketchUp
- Press Command+V on your keyboard to paste the files.
- Open SketchUp 2024 and access the plugins as you have in the past. Note that there may be some older plugins that are not compatible with your current version of SketchUp. In this case, please contact the plugin developer for additional assistance.
SketchUp Go, Pro, Studio + Educational Subscriptions have access to SketchUp for Web, Sketchup for iPad, Trimble Connect, & more.. SketchUp Studio commercial subscribers also have access to Trimble Scan Essentials, the Revit Importer, and V-Ray for SketchUp.
Here is how you can access these extra features:
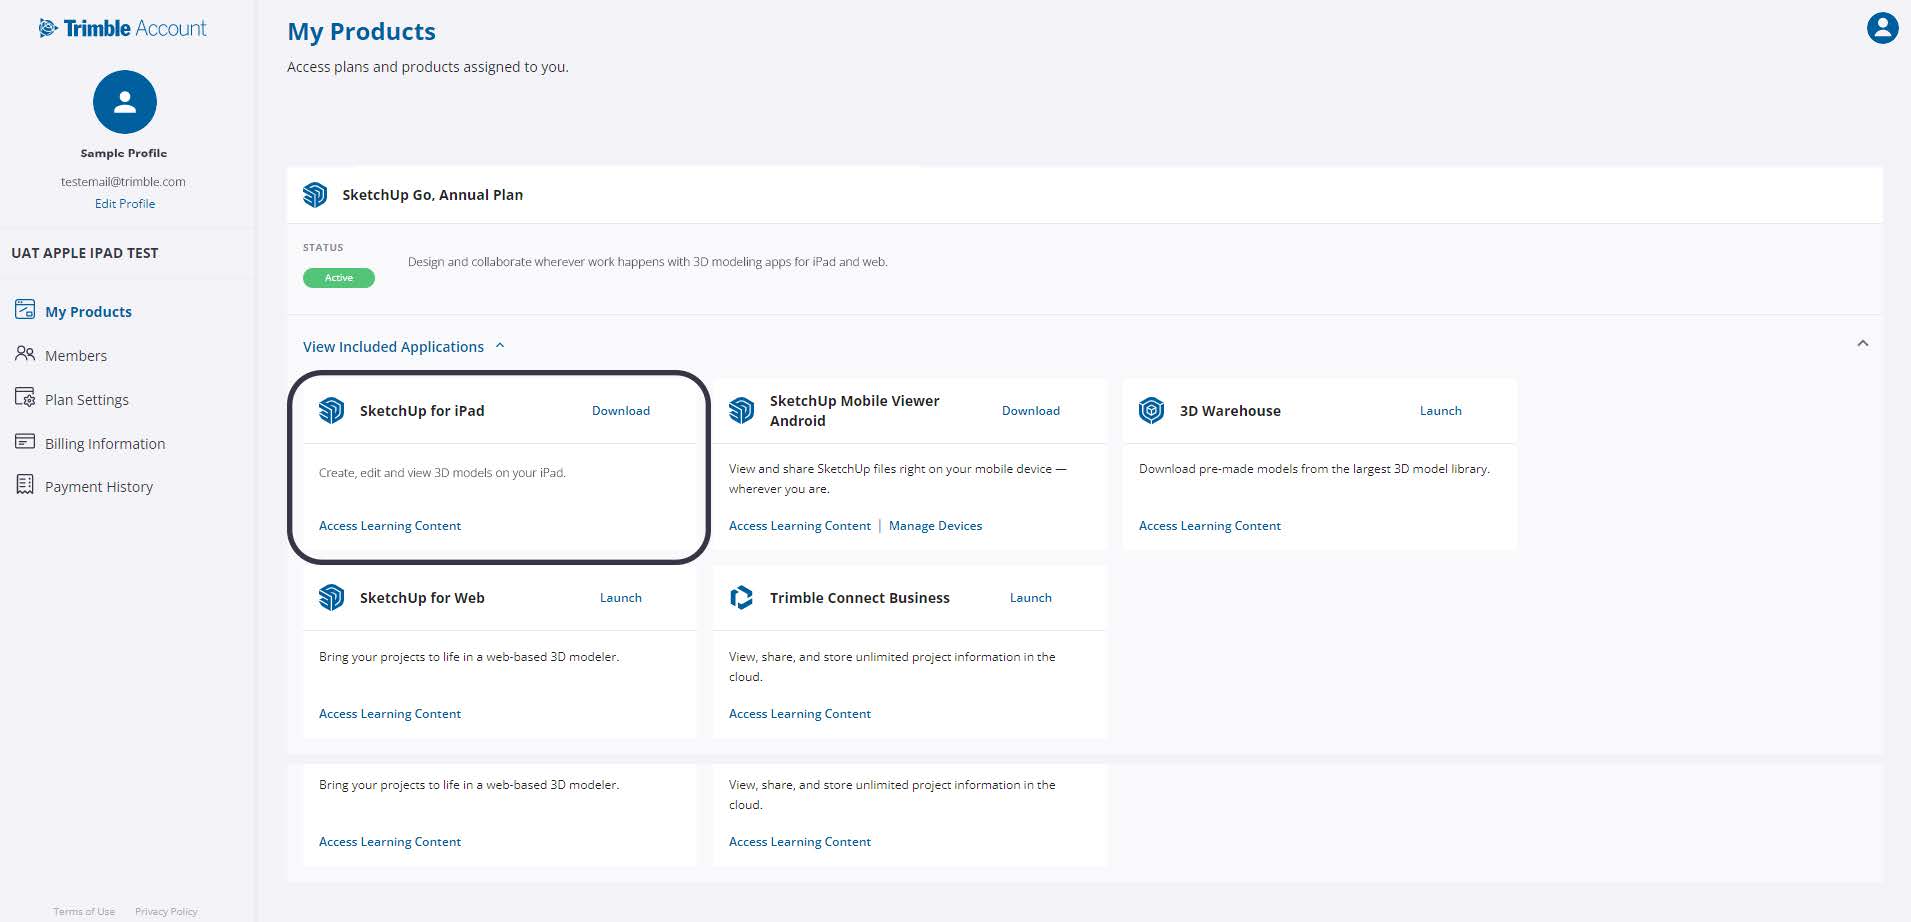
- Please Login Here to enter your Trimble Account area.
- Select the account with Purchased via Professional CAD Systems under it.
- Click on My Products in the menu on the left.
- Click View Included Applications under your SketchUp Subscription Plan.
- Download or launch the extra feature you want to use.
- SketchUp for iPad: To download SketchUp for iPad, you’ll need to go directly to the Apple App Store. You can access this link from your Trimble Account (as seen above), but it’s easiest to launch the app from your iPad. Navigate to the Apple App Store from your iPad, search for ‘SketchUp,’ and install it from the App Listing Page. You will be prompted to sign in with your Trimble ID when installing the app. Ensure that you login using the email associated with your subscription, or you might enroll in a trial by default.
- V-Ray for SketchUp: To gain access to V-Ray you need to link your TrimbleID with Chaos:
- Install V-Ray for SketchUp Studio from the My Products > View Included applications page in your Trimble Account.
- Sign in to the Chaos licensing server with your Trimble ID on this page – https://accounts.chaos.com/trimble/login
- Check the Chaos license server and make sure that you are signed in with the correct email address.
- You should now have access and can use V-Ray for SketchUp.
A common issue that Studio users encounter is a failure to checkout a V-Ray for SketchUp license. If you experience this error, you’ll need to follow these steps:
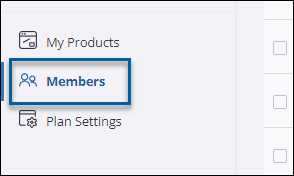
- Open your Trimble Account Management Portal. If you have more than one account, choose the appropriate account and click Members:
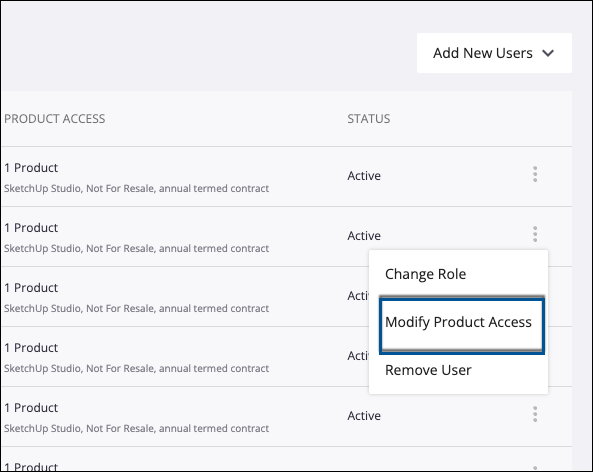
- Open the context menu () next to the user’s name and select Modify Product Access:
- In the list of products, deselect SketchUp Studio. Click Save Product Access.
- Wait 5 minutes and select Modify Product Access again for that same user. Select SketchUp Studio and click Save Product Access.
- Open your preferred web browser and navigate to http://localhost:30304 to open the Chaos License Server.
- Click Online Licensing at the top of the page and if you are signed in click on Sign Out.
- Navigate to https://accounts.chaosgroup.com/trimble/login and click Continue with Trimble and sign in using your Trimble ID.
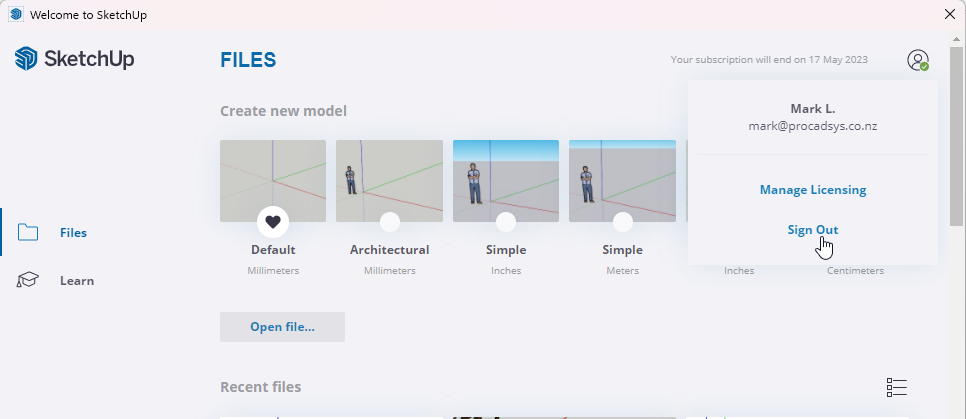
- Sign out of SketchUp by clicking the user icon in the top right of the welcome screen or hover the Help menu and click Sign Out.
- Sign back into SketchUp. Your V-Ray license should now be ready to use in SketchUp Studio!
If this didn’t solve the issue, follow these steps:
- Uninstall V-Ray.
- Open your File Explorer and navigate to Program files\Common files\ChaosGroup.
- Delete the folder named “ssl” if it exists.
- Download V-Ray for SketchUp Studio by clicking HERE.
- Install V-Ray for SketchUp Studio.
- After installation is complete, return to step 5 above.
- If you are still having issues, please contact us using the support form at the bottom of this page.
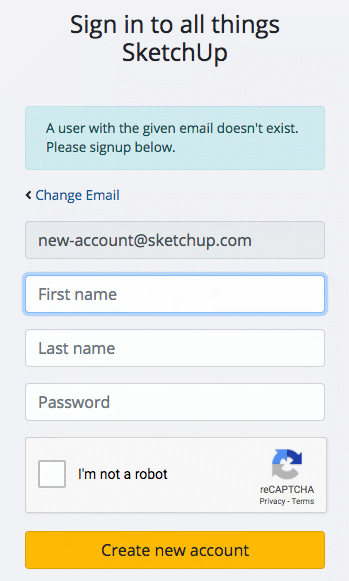
If you are seeing an error that says: “Sorry, we didn’t recognise this user. Please enter a valid Email address.” Make sure the spelling of the email address is correct and matches the one you used on your order. This means that you don’t currently have a Trimble ID (this can happen even if it’s the email you have used in the past for SketchUp.) Enter your email address on the sign in page, proceed and it will take you to a window you can use to create your Trimble ID manually.
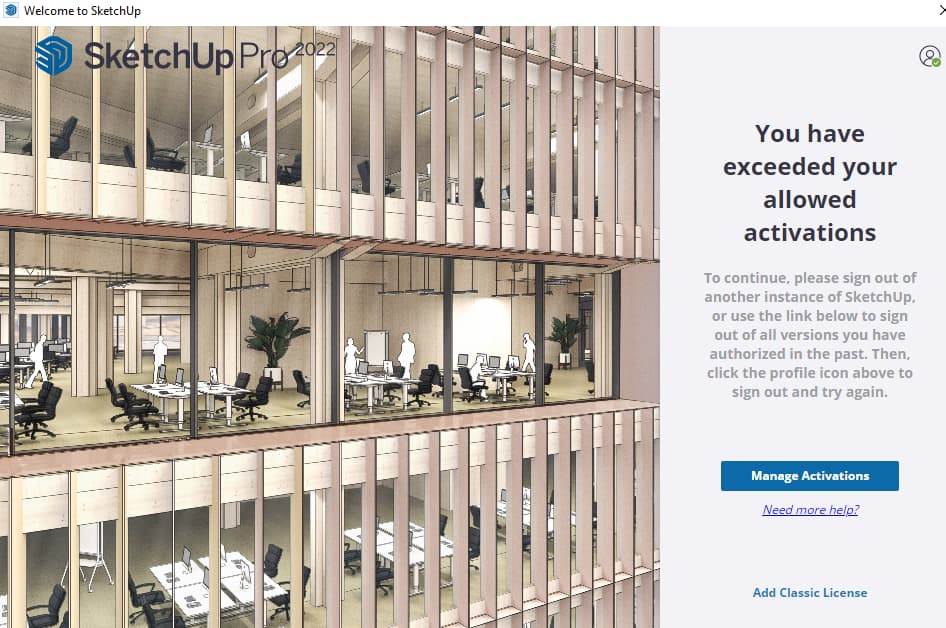
If SketchUp is saying that “You have exceeded your allowed activations” please either sign out of an older version of SketchUp or click on the “Manage Activations” button:
After clicking “Manage Activations”, select your “Purchased via Professional CAD Systems” account. Click on My Products on the left, then click on View Included Applications, you should then see a page like the following:
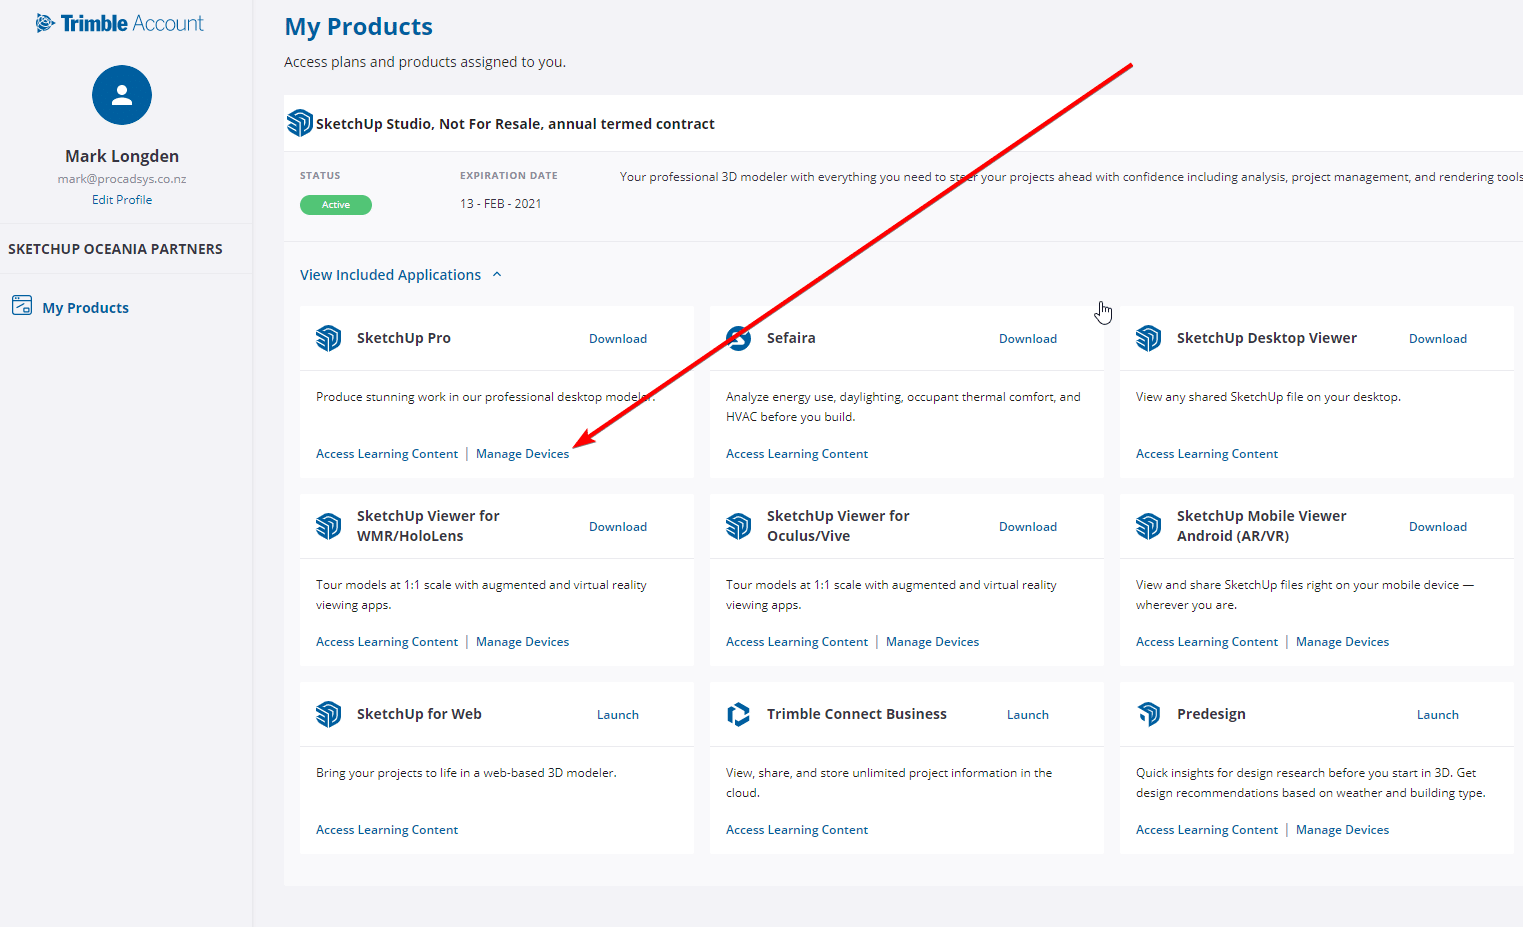
Under your SketchUp Pro/Studio Subscription click on “Manage Devices” as shown in the image above. Click Deauthorize All.
You now need to sign out of the SketchUp Welcome Screen and back in again, as shown in the image below.
- From the Trimble sign in screen, enter your email, then click “Next”.
- Enter your password, then click “Sign In”.
- With MFA enabled, you will be asked to provide a verification code. If you are unable to access your code, click “Can’t access your code?”
- Clicking the “Can’t access your code?” link will direct you to the MFA reset page. Click “Reset MFA”.
- You will be redirected to a verification page and a new verification code will be sent to your registered email address.
- Check your email inbox for the code – check your junk/spam folder if you can’t find it.
- Enter the verification code into the field and click “Submit”.
- You will then be redirected to the MFA reset confirmation page. Click “done”.
- You will then receive a MFA reset confirmation email.
- You can now sign in to Trimble/SketchUp.
First please try signing out of SketchUp and then signing back in again.
To do this on the SketchUp Welcome screen, click on your account picture in the top right then click on “Sign Out”.
To do this in SketchUp navigate to “Help > Sign Out“, then back to “Help > Sign In” to log back in.
If SketchUp still shows that you only have a 30 day trial, please check your order confirmation email you received after purchase and make sure the spelling of the email address is correct and that the email you have signed into SketchUp with matches the one you used on your order.
- Remove your license from the computer by navigating to Select Help > License inside SketchUp.
- Click the Remove License link. A confirmation dialog box appears.
- Click the Remove License button to confirm that you want to remove your license.
- Now one of your two authorisations is available to use.
A sign-in subscription is associated with one person. That individual can install the license on up to 2 computers he or she is using, but only one computer can run SketchUp Pro at a particular time. To use your subscription on another computer, follow these steps:
- Sign out of SketchUp on the computer you’ll no longer be using by clicking on “Account” in the top right corner, then clicking on “Sign Out”
- Install SketchUp on the new computer. Please visit the download page to get the latest version of the install file
- Start SketchUp and sign in with the same email address on the new computer.
- If you’re no longer going to use SketchUp on the original computer, you should uninstall it.
You’ll need to be connected to the internet to login and activate your SketchUp subscription (and other desktop applications like LayOut) for the first time. After this initial login, you can work in the desktop applications offline for up to 28 days before we’ll ask you to sign in again.
SketchUp Student & Teacher Licenses last for one year. They must be reordered every year so that we can verify that users are still enrolled or employed at an approved NZ educational institution. If you need to renew/reorder a SketchUp Education License CLICK HERE
There are plenty of reasons to share your models with others. Maybe your stakeholders need a progress report, or maybe you want to send a copy to a client. Sometimes sending a .skp file isn’t ideal. What if they accidentally erase some of your work? What if they end up sending it to someone you didn’t want to share it with? With Link Sharing, SketchUp makes it easy to show off your awesome models without worrying about accidental edits, unexpected downloads, or your document ending up in the wrong hands.
Link Sharing generates a view-only link you can share with anyone. Your collaborators can open and view your model in SketchUp for Web without logging in or installing any apps. Don’t want folks viewing that version of your model anymore? You can deactivate the link at any time, restricting access immediately.
Note: Link Sharing only works with models published to Trimble Connect.
You can share a model from within the modeling window using the Sharing () icon located in the top navigation bar. Click the icon and activate the toggle in the Sharing window to generate a link.
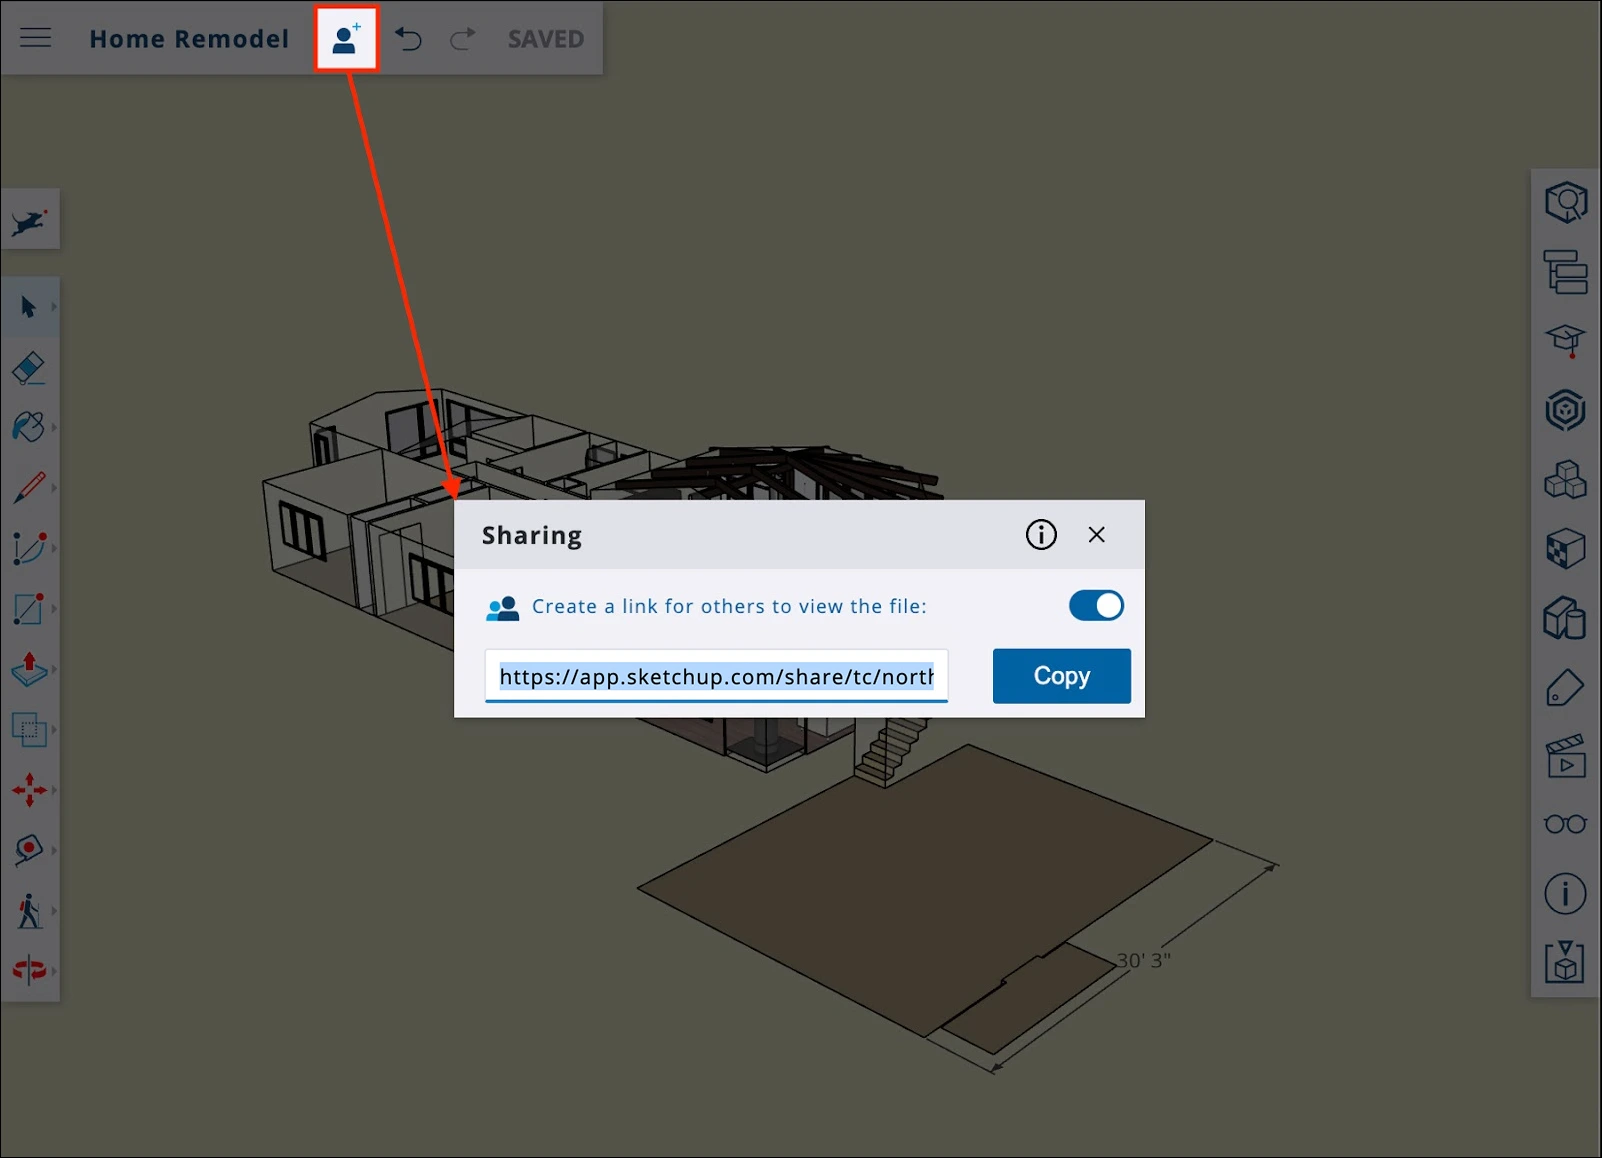
Once you’ve generated a link you can share it with your collaborators, stakeholders, or even your family and friends! If you want to restrict access, open the Sharing window and move the toggle to the off position.
Support Request
Please make sure your issue is not already answered in the Frequently Asked Questions above before submitting your support request!