Introduction Image preview: Image management: Image editing and post processing: Scene editing: Render management: User Interface Menu
Menu Options
File
Save current channel – Saves the currently loaded channel to an image file format.
Save all image channels to separate files – Saves all the render elements to separate files.
Save all image channels to single file – Saves the image to a single multi-channel EXR or .vrimg file.
Load image – Opens an image file to be previewed in the V-Ray Frame Buffer.
Batch image processing – Allows processing of multiple .vrimg files with the same layer tree changes at the same time.
Batch Image Processing
Input folder – Specifies a path to start images.
Output folder – Specifies a path for the output images.
Layer preset – Specifies a layer tree corrections preset.
Output filenames suffix – Specifies a suffix added to the output image filenames.
Overwrite existing – Enables overwrite of existing files with the same name in the output folder.
Render
Start interactive rendering – Calls the VFBRenderInteractive callback. Requires showVfbButtonInteractiveStart to be set to true in RendererOptions.
Abort rendering – Stops the current rendering.
Render – Starts rendering. If the VFBRenderLast callback is set, it will not start rendering, only call the callback.
Image
Follow mouse – Renders the closest bucket found to the mouse pointer, when using the bucket image sampler. If the progressive sampler is used, V-Ray samples the closest pixels to the mouse pointer.
Follow mouse – Drag the mouse over the VFB while rendering to change what part of the image is sampled first;
Copy current channel to clipboard – Copies the current channel to the clipboard.
Clear image – Clears the contents of the frame buffer. This is useful when starting a new render to prevent confusion with the previous image.
View
Display color space –Specifies the color space, in which the image is displayed.
None – Does not specify a color space;
Zoom VFB – Zooms in/out the rendered image in the VFB.
Zoom 50% – Zooms out to 50%;
Channels – Chooses which channels to see.
View red channel – Displays the red channel;
Color clamping – Opens the color clamping submenu options:
Force color clamping – Forces color clamping;
Use pixel aspect – Enables visualization of the pixel aspect ratio.
Panorama View – Shows the image in 360° view.
Show History – Shows the History panel.
Show Layers – Shows the Layers panel.
Options
VFB settings – Opens the VFB Settings window where you can adjusts settings for Render View, Render Region, History and Layers.
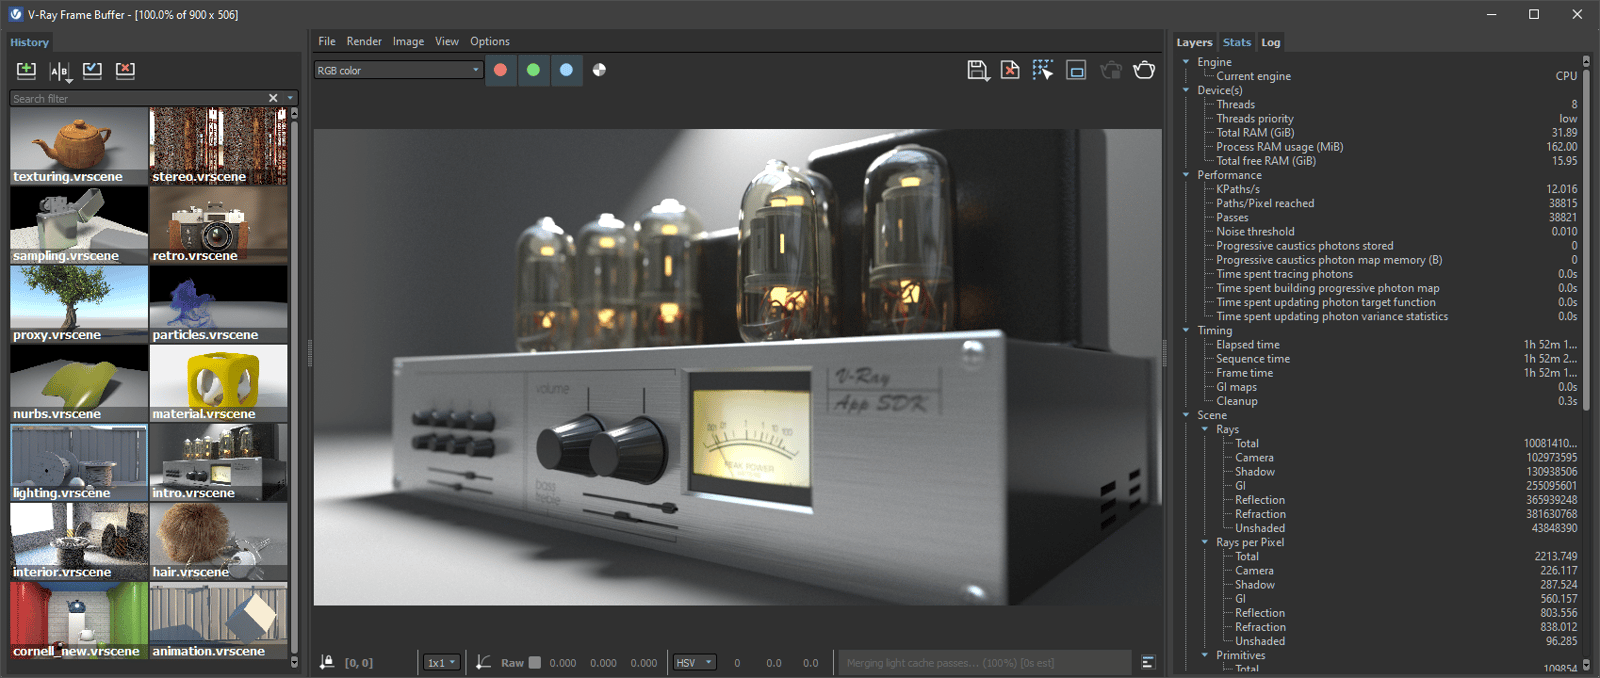
This dropdown gives access to render elements rendered for the scene. The selected render element is displayed in the VFB. By default, the RGB color and Alpha render elements are available. Any additional render elements that have been added to the scene also appear in the drop-down.
This dropdown gives access to render elements rendered for the scene. The selected render element is displayed in the VFB. By default, the RGB color and Alpha render elements are available. Any additional render elements that have been added to the scene also appear in the drop-down.
Displays the coordinates of the mouse pointer.
Specifies the sampled area size. Click on the arrow to open a context menu with the available sampled area sizes: 1x1, 3x3, 5x5, and 7x7.
Specifies whether color and display corrections are applied (RGB) or not (Raw) when showing the sampled pixel values at the current mouse pointer position.
Displays the RGB pixel values at the current mouse pointer position before applying any color corrections.
Specifies RGB values. Click on the arrow to open a context menu with the available option.
None – Does not specify the RGB value.
Displays the Hue, Saturation and Value of the pixel under the current mouse position when HSV is selected.
Displays the HEX of the pixel under the current mouse position when Web is selected.
Displays the 8bit color palette of the pixel under the current mouse position when 8bit is selected.
Locks the mouse pointer coordinates and displays information for the selected pixel.
Locks the mouse pointer coordinates and displays information for the selected pixel.
Shows corrected colors.
Shows the V-Ray log.
Displays the Alpha channel.
Displays the red channel.
Displays the green channel.
Displays the blue channel.
Saves the image to disk. Press and hold the icon to bring up the submenu:
Save current channel – Saves the current channel to an image file format;
Clears the contents of the frame buffer. This is useful when starting a new render to prevent confusion with the previous image.
Renders the closest bucket found to the mouse pointer, when using the bucket image sampler. If the progressive sampler is used, V-Ray samples the closest pixels to the mouse pointer. With this option enabled, you can right-click on the image and select Lock bucket starting point to lock the bucket (or sampling) starting point.
Allows you to render regions in the VFB. See the Render Region section for more information.
Starts IPR.
Stops the current rendering.
Starts rendering.
Render History Enables or disables image A/B vertical comparison. Select images A and B from the render history.
Enables or disables image A/B vertical comparison. Select images A and B from the render history.
Enables or disables image A/B horizontal comparison. Select images A and B from the render history.
Enables or disables image A/B/C/D comparison. Select images A, B, C and D from the render history.
Saves the current image from the VFB to the render history. The image is placed at the top of the render history list.
Loads the selected image from the render history to the VFB.
Removes the selected image from the render history.
A search field where you can filter the images based on the scene paths and notes.
A search field where you can filter the images based on the scene paths and notes.
The keyboard keys from 1 to 9 can be used to quickly load the first 9 images from the history to the VFB.
Edit note – Allows you to add a text comment to the image; the comment appears below the image.
Set A – Sets the render as A image for A/B comparison.
Set B – Sets the render as B image for A/B comparison.
Load to VFB – Loads the selected image in the VFB (same as double-clicking on the image).
Delete – Deletes the selected image from history. The image is moved to the system's Recycle Bin and can be restored from there if needed.
Load layers – Loads the layer tree preset of the selected image.
Reload history – Re-reads the history image list. This may be needed if the history folder is updated outside of Cinema 4D(e.g. from another Cinema 4D session).
Manually saved .vrimg files can also be added to the History folder, but they need to be saved with all image channels in one .vrimg file to keep the complete image info.
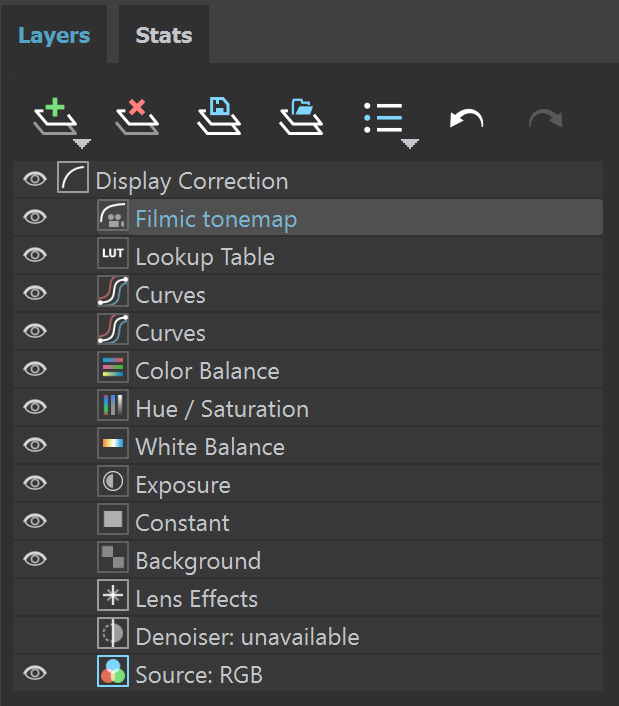
Layers Creates a layer. Multiple layers of the same type can be added.
Folder – Allows grouping multiple layers;
For more information, see the Layers page.
Creates a layer. Multiple layers of the same type can be added.
Folder – Allows grouping multiple layers;
For more information, see the Layers page.
Deletes the selected layer(s).
Saves a layer tree preset.
Loads a layer tree preset.
Quick access to custom layer presets. You must set the path to it in the VFB Settings.
Undo create layer.
Redo create layer.
Command
Description
Reset
Resets all changes done to the selected layer.
Save
Saves the layer as a preset.
Load
Loads a preset for the selected layer.
Delete
Deletes the selected layer.
Save all CCs as LUT
Bakes all the color corrections to a LUT file.
New Layer
Creates a new layer.
Duplicate
Duplicates the selected layer.
Blend Modes
Specifies how the selected layer blends with the result from all layers below it.
Stats Render Region VFB Shortcuts Mouse
Description
Mouse wheel
Zoom in/Zoom out
Double-click left button
Zoom to 100%
Middle button dragging
Pan (hand tool)
Ctrl+Shift+Left click
Zoom in the rendered image
Ctrl+Shift+Right click
Zoom out the rendered image
Keyboard
Description
Ctrl+Shift+left click, + / =
Zoom in
Ctrl+Shift+right click, -/_
Zoom out
Double click, *
Zoom to 100%
Arrow keys
Pan left, up, right, down
F
Fit region or whole image in the VFB
Esc
Abort render
Q
Set history A/B vertical compare mode
W
Set history A/B horizontal compare mode
E
Enable history A/B/C/D compare mode
1-9
Load the respective image from the VFB history
H
Show/hide history
Ctrl+L
Show/hide whole right panel
P
Show/hide only layers tree
L
Locks the mouse pointer coordinates and displays information for the selected pixel, i.e. activates the Lock pixel info coordinates button.
Camera control for interactive (RT) rendering Shift & mouse wheel scroll
Move the camera forward or backward
Shift & mouse wheel scroll
Move the camera forward or backward
Ctrl & mouse wheel scroll
Change camera FoV, effectively zooming in/out
Shift & drag with left mouse button
Orbit the camera around the scene
Ctrl & drag with left mouse button
Pan the camera
Control from code Python <code data-v-c2b1f83f=""><span data-v-c2b1f83f="" class="line">with vray.VRayRenderer(showFrameBuffer=False) as renderer:</span></code>
C++ <code data-v-c2b1f83f=""><span data-v-c2b1f83f="" class="line">RendererOptions options;</span><span data-v-c2b1f83f="" class="line">options.showFrameBuffer = false;</span><span data-v-c2b1f83f="" class="line">VRayRenderer renderer(options);</span></code>
C#.NET <code data-v-c2b1f83f=""><span data-v-c2b1f83f="" class="line">RendererOptions options = new RendererOptions();</span><span data-v-c2b1f83f="" class="line">options.ShowFrameBuffer = false;</span><span data-v-c2b1f83f="" class="line"> </span><span data-v-c2b1f83f="" class="line">using (VRayRenderer renderer = new VRayRenderer(options))</span><span data-v-c2b1f83f="" class="line">{</span><span data-v-c2b1f83f="" class="line">}</span></code>
Node.js <code data-v-c2b1f83f=""><span data-v-c2b1f83f="" class="line">var renderer = vray.VRayRenderer({</span><span data-v-c2b1f83f="" class="line"> showFrameBuffer: false</span><span data-v-c2b1f83f="" class="line">})</span></code>
The VFB class Python <code data-v-c2b1f83f=""><span data-v-c2b1f83f="" class="line">with vray.VRayRenderer() as renderer:</span><span data-v-c2b1f83f="" class="line"> vfb = renderer.vfb</span><span data-v-c2b1f83f="" class="line"> vfb.shown = True # Can be used to hide and show the window</span><span data-v-c2b1f83f="" class="line"> vfb.interactivity = True # Whether camera mouse control is enabled</span><span data-v-c2b1f83f="" class="line"> vfb.position = (0,0) # Position of the window in screen-space coordinates</span><span data-v-c2b1f83f="" class="line"> vfb.size = (800, 600) # Size of the window in pixels</span><span data-v-c2b1f83f="" class="line"> vfb.alwaysOnTop = True # Toggles always-on-top window behavior</span><span data-v-c2b1f83f="" class="line"> stateBuffer = vfb.getState() # Can be used to save serialized window state</span><span data-v-c2b1f83f="" class="line"> vfb.setState(stateBuffer) # Can be used to restore serialized window state</span></code>
C++ <code data-v-c2b1f83f=""><span data-v-c2b1f83f="" class="line">VRayRenderer renderer;</span><span data-v-c2b1f83f="" class="line">VRayRenderer::VFB& vfb = renderer.vfb;</span><span data-v-c2b1f83f="" class="line">vfb.show(true /*show*/, true /*setFocus*/); // The window is visible and auto focused</span><span data-v-c2b1f83f="" class="line">vfb.enableInteractivity(true); // Whether camera mouse control is enabled</span><span data-v-c2b1f83f="" class="line">vfb.setPositionAndSize(0, 0, 800, 600); // Position in screen-space and size in pixels</span><span data-v-c2b1f83f="" class="line">vfb.setAlwaysOnTop(true); // Toggles always-on-top window behavior</span><span data-v-c2b1f83f="" class="line">size_t numBytes = 0;</span><span data-v-c2b1f83f="" class="line">VFBState *stateBuffer = vfb.getState(numBytes); // Can be used to save serialized window state</span><span data-v-c2b1f83f="" class="line">vfb.setState(stateBuffer, numBytes); // Can be used to restore serialized window state</span></code>
C#.NET <code data-v-c2b1f83f=""><span data-v-c2b1f83f="" class="line">using (VRayRenderer renderer = new VRayRenderer())</span><span data-v-c2b1f83f="" class="line">{</span><span data-v-c2b1f83f="" class="line"> VFB vfb = renderer.Vfb;</span><span data-v-c2b1f83f="" class="line"> vfb.Shown = true; // Can be used to hide and show the window</span><span data-v-c2b1f83f="" class="line"> vfb.Interactivity = true; // Whether camera mouse control is enabled</span><span data-v-c2b1f83f="" class="line"> vfb.SetPositionAndSize(0, 0, 800, 600); // Position in screen-space and size in pixels</span><span data-v-c2b1f83f="" class="line"> vfb.AlwaysOnTop = true; // Toggles always-on-top window behavior</span><span data-v-c2b1f83f="" class="line"> byte[] stateBuffer = vfb.GetState(); // Can be used to save serialized window state</span><span data-v-c2b1f83f="" class="line"> vfb.SetState(stateBuffer); // Can be used to restore serialized window state</span><span data-v-c2b1f83f="" class="line">}</span></code>
Node.js <code data-v-c2b1f83f=""><span data-v-c2b1f83f="" class="line">var renderer = vray.VRayRenderer();</span><span data-v-c2b1f83f="" class="line">var vfb = renderer.vfb;</span><span data-v-c2b1f83f="" class="line">vfb.shown = true; // Can be used to hide and show the window</span><span data-v-c2b1f83f="" class="line">vfb.interactivity = true; // Whether camera mouse control is enabled</span><span data-v-c2b1f83f="" class="line">vfb.position = { x: 0, y: 0 }; // Position of the window in screen-space coordinates</span><span data-v-c2b1f83f="" class="line">vfb.size = { width: 800, height: 600 }; // Size of the window in pixels</span><span data-v-c2b1f83f="" class="line">vfb.alwaysOnTop = true; // Toggles always-on-top window behavior</span><span data-v-c2b1f83f="" class="line">stateBuffer = vfb.getState(); // Can be used to save serialized window state</span><span data-v-c2b1f83f="" class="line">vfb.setState(stateBuffer); // Can be used to restore serialized window state</span></code>
VFB Progress Bar Python <code data-v-c2b1f83f=""><span data-v-c2b1f83f="" class="line"># VFB Context menu entries</span><span data-v-c2b1f83f="" class="line">contextMenuItems = [</span><span data-v-c2b1f83f="" class="line"> {'id': 0, 'type': 'normal', 'text': 'Custom option'},</span><span data-v-c2b1f83f="" class="line"> {'id': 1, 'type': 'normal', 'text': 'Custom disabled option', 'enabled': False},</span><span data-v-c2b1f83f="" class="line"> {'id': 2, 'type': 'checkbox', 'text': 'Custom checkbox'},</span><span data-v-c2b1f83f="" class="line"> {'id': 3, 'type': 'checkbox', 'text': 'Custom checkbox 2', 'defaultValue': 1}</span><span data-v-c2b1f83f="" class="line">]</span><span data-v-c2b1f83f="" class="line"></span><span data-v-c2b1f83f="" class="line"></span><span data-v-c2b1f83f="" class="line"># VFB Context menu callback</span><span data-v-c2b1f83f="" class="line">def onContextMenu(renderer, command, x, y):</span><span data-v-c2b1f83f="" class="line"> if command == 0:</span><span data-v-c2b1f83f="" class="line"> print("Custom option clicked")</span><span data-v-c2b1f83f="" class="line"> elif command == 1:</span><span data-v-c2b1f83f="" class="line"> print("This is disabled")</span><span data-v-c2b1f83f="" class="line"> elif command == 2:</span><span data-v-c2b1f83f="" class="line"> print("Value of Custom checkbox is", renderer.getVFBContextMenuItemValue(command))</span><span data-v-c2b1f83f="" class="line"> # Note that the value will not change automatically, you must change it yourself</span><span data-v-c2b1f83f="" class="line"> elif command == 3:</span><span data-v-c2b1f83f="" class="line"> value = renderer.getVFBContextMenuItemValue(command)</span><span data-v-c2b1f83f="" class="line"> renderer.setVFBContextMenuItemValue(command, 1 - value)</span><span data-v-c2b1f83f="" class="line"> print("Value of Custom checkbox 2 changed from", value, "to", 1 - value)</span><span data-v-c2b1f83f="" class="line"> else:</span><span data-v-c2b1f83f="" class="line"> print('Command %d not implemented' % command)</span><span data-v-c2b1f83f="" class="line"></span><span data-v-c2b1f83f="" class="line"></span><span data-v-c2b1f83f="" class="line">renderer.setVFBContextMenuItems(contextMenuItems)</span><span data-v-c2b1f83f="" class="line">renderer.setOnVFBContextMenuSelected(onContextMenu)</span></code>
C++ <code data-v-c2b1f83f=""><span data-v-c2b1f83f="" class="line">// Context menu callback</span><span data-v-c2b1f83f="" class="line">void onContextMenu(VRayRenderer& renderer, int command, int x, int y, void*) {</span><span data-v-c2b1f83f="" class="line"> int value = 0;</span><span data-v-c2b1f83f="" class="line"> switch (command) {</span><span data-v-c2b1f83f="" class="line"> case 0:</span><span data-v-c2b1f83f="" class="line"> printf("Custom option clicked\</span><span data-v-c2b1f83f="" class="line">");</span><span data-v-c2b1f83f="" class="line"> break;</span><span data-v-c2b1f83f="" class="line"> case 1:</span><span data-v-c2b1f83f="" class="line"> printf("This is disabled\</span><span data-v-c2b1f83f="" class="line">");</span><span data-v-c2b1f83f="" class="line"> break;</span><span data-v-c2b1f83f="" class="line"> case 2:</span><span data-v-c2b1f83f="" class="line"> renderer.getVFBContextMenuItemValue(command, value);</span><span data-v-c2b1f83f="" class="line"> printf("Value of Custom checkbox is %d\</span><span data-v-c2b1f83f="" class="line">", value);</span><span data-v-c2b1f83f="" class="line"> // Note that the value will not change automatically, you must change it yourself</span><span data-v-c2b1f83f="" class="line"> break;</span><span data-v-c2b1f83f="" class="line"> case 3:</span><span data-v-c2b1f83f="" class="line"> renderer.getVFBContextMenuItemValue(command, value);</span><span data-v-c2b1f83f="" class="line"> renderer.setVFBContextMenuItemValue(command, 1 - value);</span><span data-v-c2b1f83f="" class="line"> printf("Value of Custom checkbox 2 changed from %d to %d\</span><span data-v-c2b1f83f="" class="line">", value, 1 - value);</span><span data-v-c2b1f83f="" class="line"> break;</span><span data-v-c2b1f83f="" class="line"> default:</span><span data-v-c2b1f83f="" class="line"> printf("Command %d not implemented\</span><span data-v-c2b1f83f="" class="line">", command);</span><span data-v-c2b1f83f="" class="line"> }</span><span data-v-c2b1f83f="" class="line">}</span><span data-v-c2b1f83f="" class="line"> </span><span data-v-c2b1f83f="" class="line">void setupContextMenu(VRayRenderer& renderer) {</span><span data-v-c2b1f83f="" class="line"> vector<VFBContextMenuItem> contextMenuItems;</span><span data-v-c2b1f83f="" class="line"> </span><span data-v-c2b1f83f="" class="line"> // Context menu items</span><span data-v-c2b1f83f="" class="line"> contextMenuItems.push_back({ 0, VFBMenuItemType::normal, 0, true, "Custom option" });</span><span data-v-c2b1f83f="" class="line"> contextMenuItems.push_back({ 1, VFBMenuItemType::normal, 0, false, "Custom disabled option" });</span><span data-v-c2b1f83f="" class="line"> contextMenuItems.push_back({ 2, VFBMenuItemType::checkbox, 0, true, "Custom checkbox" });</span><span data-v-c2b1f83f="" class="line"> contextMenuItems.push_back({ 3, VFBMenuItemType::checkbox, 1, true, "Custom checkbox 2"});</span><span data-v-c2b1f83f="" class="line"></span><span data-v-c2b1f83f="" class="line"> renderer.setVFBContextMenuItems(contextMenuItems);</span><span data-v-c2b1f83f="" class="line"> renderer.setVFBContextMenuSelectedCallback(onContextMenu);</span><span data-v-c2b1f83f="" class="line">}</span></code>
C#.NET <code data-v-c2b1f83f=""><span data-v-c2b1f83f="" class="line">using (VRayRenderer renderer = new VRayRenderer())</span><span data-v-c2b1f83f="" class="line">{</span><span data-v-c2b1f83f="" class="line"> // Context menu items</span><span data-v-c2b1f83f="" class="line"> List<VFBContextMenuItem> contextMenuItems = new List<VFBContextMenuItem>();</span><span data-v-c2b1f83f="" class="line"> contextMenuItems.Add(new VFBContextMenuItem(0, VFBMenuItemType.normal, "Custom option"));</span><span data-v-c2b1f83f="" class="line"> contextMenuItems.Add(new VFBContextMenuItem(1, VFBMenuItemType.normal, "Custom disabled option", false));</span><span data-v-c2b1f83f="" class="line"> contextMenuItems.Add(new VFBContextMenuItem(2, VFBMenuItemType.checkbox, "Custom checkbox"));</span><span data-v-c2b1f83f="" class="line"> contextMenuItems.Add(new VFBContextMenuItem(3, VFBMenuItemType.checkbox, "Custom checkbox 2", true, 1));</span><span data-v-c2b1f83f="" class="line"></span><span data-v-c2b1f83f="" class="line"> renderer.SetVFBContextMenuItems(contextMenuItems);</span><span data-v-c2b1f83f="" class="line"></span><span data-v-c2b1f83f="" class="line"> // Context menu callback</span><span data-v-c2b1f83f="" class="line"> renderer.VFBContextMenuSelected += new EventHandler<VFBContextMenuSelectedEventArgs>((source, e) =></span><span data-v-c2b1f83f="" class="line"> {</span><span data-v-c2b1f83f="" class="line"> int value = 0;</span><span data-v-c2b1f83f="" class="line"> switch (e.CommandId)</span><span data-v-c2b1f83f="" class="line"> {</span><span data-v-c2b1f83f="" class="line"> case 0:</span><span data-v-c2b1f83f="" class="line"> Console.WriteLine("Custom option clicked");</span><span data-v-c2b1f83f="" class="line"> break;</span><span data-v-c2b1f83f="" class="line"> case 1:</span><span data-v-c2b1f83f="" class="line"> Console.WriteLine("This is disabled");</span><span data-v-c2b1f83f="" class="line"> break;</span><span data-v-c2b1f83f="" class="line"> case 2:</span><span data-v-c2b1f83f="" class="line"> renderer.GetVFBContextMenuItemValue(e.CommandId, out value);</span><span data-v-c2b1f83f="" class="line"> Console.WriteLine(String.Format("Value of Custom checkbox is {0}", value));</span><span data-v-c2b1f83f="" class="line"> // Note that the value will not change automatically, you must change it yourself</span><span data-v-c2b1f83f="" class="line"> break;</span><span data-v-c2b1f83f="" class="line"> case 3:</span><span data-v-c2b1f83f="" class="line"> renderer.GetVFBContextMenuItemValue(e.CommandId, out value);</span><span data-v-c2b1f83f="" class="line"> renderer.SetVFBContextMenuItemValue(e.CommandId, 1 - value);</span><span data-v-c2b1f83f="" class="line"> Console.WriteLine(String.Format("Value of Custom checkbox 2 changed from {0} to {1}", value, 1 - value));</span><span data-v-c2b1f83f="" class="line"> break;</span><span data-v-c2b1f83f="" class="line"> default:</span><span data-v-c2b1f83f="" class="line"> Console.WriteLine(String.Format("Command {0} note implemented", e.CommandId));</span><span data-v-c2b1f83f="" class="line"> break;</span><span data-v-c2b1f83f="" class="line"> }</span><span data-v-c2b1f83f="" class="line"> });</span><span data-v-c2b1f83f="" class="line"></span><span data-v-c2b1f83f="" class="line"> renderer.Vfb.Shown = true;</span><span data-v-c2b1f83f="" class="line"> renderer.WaitForVFBClosed();</span><span data-v-c2b1f83f="" class="line">}</span></code>
Node.js <code data-v-c2b1f83f=""><span data-v-c2b1f83f="" class="line">// VFB Context menu entries</span><span data-v-c2b1f83f="" class="line">contextMenuItems = [</span><span data-v-c2b1f83f="" class="line"> {'id': 0, 'type': 'normal', 'text': 'Custom option'},</span><span data-v-c2b1f83f="" class="line"> {'id': 1, 'type': 'normal', 'text': 'Custom disabled option', 'enabled': false},</span><span data-v-c2b1f83f="" class="line"> {'id': 2, 'type': 'checkbox', 'text': 'Custom checkbox'},</span><span data-v-c2b1f83f="" class="line"> {'id': 3, 'type': 'checkbox', 'text': 'Custom checkbox 2', 'defaultValue': 1}</span><span data-v-c2b1f83f="" class="line">]</span><span data-v-c2b1f83f="" class="line"></span><span data-v-c2b1f83f="" class="line">renderer.setVFBContextMenuItems(contextMenuItems)</span><span data-v-c2b1f83f="" class="line">// VFB Context menu callback</span><span data-v-c2b1f83f="" class="line">renderer.on('vfbContextMenuSelected', function (command, x, y) {</span><span data-v-c2b1f83f="" class="line"> switch(command){</span><span data-v-c2b1f83f="" class="line"> case 0:</span><span data-v-c2b1f83f="" class="line"> console.log("Custom option clicked")</span><span data-v-c2b1f83f="" class="line"> break</span><span data-v-c2b1f83f="" class="line"> case 1:</span><span data-v-c2b1f83f="" class="line"> console.log("This is disabled")</span><span data-v-c2b1f83f="" class="line"> break</span><span data-v-c2b1f83f="" class="line"> case 2:</span><span data-v-c2b1f83f="" class="line"> console.log("Value of Custom checkbox is", renderer.getVFBContextMenuItemValue(command))</span><span data-v-c2b1f83f="" class="line"> // Note that the value will not change automatically, you must change it yourself</span><span data-v-c2b1f83f="" class="line"> break</span><span data-v-c2b1f83f="" class="line"> case 3:</span><span data-v-c2b1f83f="" class="line"> value = renderer.getVFBContextMenuItemValue(command)</span><span data-v-c2b1f83f="" class="line"> renderer.setVFBContextMenuItemValue(command, 1 - value)</span><span data-v-c2b1f83f="" class="line"> console.log("Value of Custom checkbox 2 changed from", value, "to", 1 - value)</span><span data-v-c2b1f83f="" class="line"> break</span><span data-v-c2b1f83f="" class="line"> default:</span><span data-v-c2b1f83f="" class="line"> console.log('Command', command, 'not implemented')</span><span data-v-c2b1f83f="" class="line"> }</span><span data-v-c2b1f83f="" class="line">})</span></code>
Light Mix and Transfer to scene Python <code data-v-c2b1f83f=""><span data-v-c2b1f83f="" class="line"># Compatibility with Python 2.7.</span><span data-v-c2b1f83f="" class="line">from __future__ import print_function</span><span data-v-c2b1f83f="" class="line"></span><span data-v-c2b1f83f="" class="line"># The directory containing the vray shared object should be present in the PYTHONPATH environment variable.</span><span data-v-c2b1f83f="" class="line"># Try to import the vray module from VRAY_SDK/python, if it is not in PYTHONPATH</span><span data-v-c2b1f83f="" class="line">import sys, os</span><span data-v-c2b1f83f="" class="line">VRAY_SDK = os.environ.get('VRAY_SDK')</span><span data-v-c2b1f83f="" class="line">if VRAY_SDK:</span><span data-v-c2b1f83f="" class="line"> sys.path.append(os.path.join(VRAY_SDK, 'python'))</span><span data-v-c2b1f83f="" class="line">import vray</span><span data-v-c2b1f83f="" class="line">import threading</span><span data-v-c2b1f83f="" class="line"></span><span data-v-c2b1f83f="" class="line">SCENE_PATH = os.path.join(os.environ.get('VRAY_SDK'), 'scenes')</span><span data-v-c2b1f83f="" class="line"># Change process working directory to SCENE_PATH in order to be able to load relative scene resources.</span><span data-v-c2b1f83f="" class="line">os.chdir(SCENE_PATH)</span><span data-v-c2b1f83f="" class="line"># An event used for waiting on the callback</span><span data-v-c2b1f83f="" class="line">event = threading.Event()</span><span data-v-c2b1f83f="" class="line"></span><span data-v-c2b1f83f="" class="line"># Create an instance of VRayRenderer.</span><span data-v-c2b1f83f="" class="line"># The renderer is automatically closed after the `with` block.</span><span data-v-c2b1f83f="" class="line">with vray.VRayRenderer() as renderer:</span><span data-v-c2b1f83f="" class="line"> # Usually it's a good idea to have a log callback handler, but we will not add one for this example.</span><span data-v-c2b1f83f="" class="line"> # Load scene from a file.</span><span data-v-c2b1f83f="" class="line"> renderer.load(os.path.join(SCENE_PATH, 'cornell_new.vrscene'))</span><span data-v-c2b1f83f="" class="line"> # Add the LightMix plugin. No need to keep the reference, because you can't do anything with this plugin.</span><span data-v-c2b1f83f="" class="line"> # It just has to exist in the scene.</span><span data-v-c2b1f83f="" class="line"> renderer.classes.RenderChannelLightMix()</span><span data-v-c2b1f83f="" class="line"> # Environment light select</span><span data-v-c2b1f83f="" class="line"> ls_env = renderer.classes.RenderChannelLightSelect('LSEnvironment')</span><span data-v-c2b1f83f="" class="line"> ls_env.light_select_mode = 10 # 10 is a special, undocumented value used for environment light</span><span data-v-c2b1f83f="" class="line"> ls_env.name = 'Environment'</span><span data-v-c2b1f83f="" class="line"> # Self illumination light select</span><span data-v-c2b1f83f="" class="line"> ls_self = renderer.classes.RenderChannelLightSelect('LSSelfIllumination')</span><span data-v-c2b1f83f="" class="line"> ls_self.light_select_mode = 11 # 11 is a special, undocumented value used for self illumination light</span><span data-v-c2b1f83f="" class="line"> ls_self.name = 'Self Illum.'</span><span data-v-c2b1f83f="" class="line"> # A full light light select</span><span data-v-c2b1f83f="" class="line"> ls_light = renderer.classes.RenderChannelLightSelect('LSCeilingLight')</span><span data-v-c2b1f83f="" class="line"> ls_light.light_select_mode = 4 # full light (direct + indirect)</span><span data-v-c2b1f83f="" class="line"> ls_light.name = 'Ceiling Light'</span><span data-v-c2b1f83f="" class="line"> # Adding a light to a light select</span><span data-v-c2b1f83f="" class="line"> light_rect = renderer.plugins['VRayLightRectShape1']</span><span data-v-c2b1f83f="" class="line"> light_rect.channels_full = [ ls_light ]</span><span data-v-c2b1f83f="" class="line"> def lightMixTransfer(r, changes, instant):</span><span data-v-c2b1f83f="" class="line"> # Each LightMixChange object contains:</span><span data-v-c2b1f83f="" class="line"> # - the render element plugin</span><span data-v-c2b1f83f="" class="line"> # - isApplied flag (bool) - This must be set by the user and it will reset the change in the VFB</span><span data-v-c2b1f83f="" class="line"> # - enabled flag (bool) - Whether the light select is enabled or not in the VFB. This is *not* reset even when isApplied is true.</span><span data-v-c2b1f83f="" class="line"> # - intensity multiplier (float)</span><span data-v-c2b1f83f="" class="line"> # - color multiplier (VRay::Color)</span><span data-v-c2b1f83f="" class="line"> for change in changes:</span><span data-v-c2b1f83f="" class="line"> if change['plugin']:</span><span data-v-c2b1f83f="" class="line"> print('\ [{}]: mult: {:.2f}, \ {}'.format(change['plugin'].name, change['intensityMult'], change['colorMult']))</span><span data-v-c2b1f83f="" class="line"> if change['plugin'].getName() == 'LSCeilingLight':</span><span data-v-c2b1f83f="" class="line"> # Apply the change to the actual light plugin and mark it as applied, so it will be reset in the VFB.</span><span data-v-c2b1f83f="" class="line"> # Note: You will need to keep track of which lights are in which light select render elements.</span><span data-v-c2b1f83f="" class="line"> light_rect = r.plugins['VRayLightRectShape1']</span><span data-v-c2b1f83f="" class="line"> # Don't forget the changes are multipliers, not overrides.</span><span data-v-c2b1f83f="" class="line"> light_rect.color *= change['colorMult']</span><span data-v-c2b1f83f="" class="line"> light_rect.intensity *= change['intensityMult']</span><span data-v-c2b1f83f="" class="line"> # Mark this change as applied.</span><span data-v-c2b1f83f="" class="line"> change['isApplied'] = True</span><span data-v-c2b1f83f="" class="line"> else:</span><span data-v-c2b1f83f="" class="line"> # The plugin being empty, means that it's the special "Rest" channel.</span><span data-v-c2b1f83f="" class="line"> # It contains all the lights that were not added in other light selects.</span><span data-v-c2b1f83f="" class="line"> print('\ [Rest]: mult: {:.2f}, \ {}'.format(change['intensityMult'], change['colorMult']))</span><span data-v-c2b1f83f="" class="line"> # Save the image with the corrections applied.</span><span data-v-c2b1f83f="" class="line"> r.vfb.saveImage('lightmix_vfb.png', {'singleChannel':True, 'applyColorCorrections':True})</span><span data-v-c2b1f83f="" class="line"> # Notify the main thread that the callback is done.</span><span data-v-c2b1f83f="" class="line"> event.set()</span><span data-v-c2b1f83f="" class="line"> # Set the callback</span><span data-v-c2b1f83f="" class="line"> renderer.setOnLightMixTransferToScene(lightMixTransfer)</span><span data-v-c2b1f83f="" class="line"></span><span data-v-c2b1f83f="" class="line"> # Avoid getting stuck if VFB is closed</span><span data-v-c2b1f83f="" class="line"> def vfbClosed(r, _):</span><span data-v-c2b1f83f="" class="line"> r.stop()</span><span data-v-c2b1f83f="" class="line"> event.set()</span><span data-v-c2b1f83f="" class="line"> renderer.setOnVFBClosed(vfbClosed)</span><span data-v-c2b1f83f="" class="line"></span><span data-v-c2b1f83f="" class="line"> # Start rendering</span><span data-v-c2b1f83f="" class="line"> renderer.startSync()</span><span data-v-c2b1f83f="" class="line"> print('Choose Source: LightMix from the layers panel and change the color and intensity of the lights.\</span><span data-v-c2b1f83f="" class="line">')</span><span data-v-c2b1f83f="" class="line"> print('Please note, that those are multipliers, not overrides.\</span><span data-v-c2b1f83f="" class="line">')</span><span data-v-c2b1f83f="" class="line"> print('When you are done, stop the rendering (if it hasn\'t completed) from the VFB button')</span><span data-v-c2b1f83f="" class="line"> print('and press the "To Scene" button. This will call the callback function.\</span><span data-v-c2b1f83f="" class="line">')</span><span data-v-c2b1f83f="" class="line"> print('Note: The LC pass must end, before the Light Select render elements take effect.\</span><span data-v-c2b1f83f="" class="line">')</span><span data-v-c2b1f83f="" class="line"> # Wait for the callback to be executed</span><span data-v-c2b1f83f="" class="line"> event.wait()</span><span data-v-c2b1f83f="" class="line"> # Start rendering again, this time with some of the changes applied to the lights in the scene</span><span data-v-c2b1f83f="" class="line"> renderer.startSync()</span><span data-v-c2b1f83f="" class="line"> renderer.vfb.shown=1</span><span data-v-c2b1f83f="" class="line"> print("\</span><span data-v-c2b1f83f="" class="line">Now, some of the changes are applied to the scene and reset in the LightMix layer.")</span><span data-v-c2b1f83f="" class="line"> print("The rendered image should look the same.")</span><span data-v-c2b1f83f="" class="line"> # Wait for rendering to end.</span><span data-v-c2b1f83f="" class="line"> renderer.waitForRenderEnd()</span><span data-v-c2b1f83f="" class="line"> # Save the new image.</span><span data-v-c2b1f83f="" class="line"> renderer.vfb.saveImage('lightmix_scene.png', {'singleChannel':True, 'applyColorCorrections':True})</span></code>
C++ <code data-v-c2b1f83f=""><span data-v-c2b1f83f="" class="line">#define VRAY_RUNTIME_LOAD_PRIMARY</span><span data-v-c2b1f83f="" class="line">#include <condition_variable></span><span data-v-c2b1f83f="" class="line">#include "vraysdk.hpp"</span><span data-v-c2b1f83f="" class="line">#include "vrayplugins.hpp"</span><span data-v-c2b1f83f="" class="line">#include "utils.h"</span><span data-v-c2b1f83f="" class="line"></span><span data-v-c2b1f83f="" class="line">using namespace VRay;</span><span data-v-c2b1f83f="" class="line">using namespace VRay::Plugins;</span><span data-v-c2b1f83f="" class="line">using namespace std;</span><span data-v-c2b1f83f="" class="line"></span><span data-v-c2b1f83f="" class="line">const char *BASE_PATH = getenv("VRAY_SDK");</span><span data-v-c2b1f83f="" class="line">string SCENE_PATH = (BASE_PATH ? string(BASE_PATH) : string(".")) + PATH_DELIMITER + "scenes";</span><span data-v-c2b1f83f="" class="line">mutex m;</span><span data-v-c2b1f83f="" class="line">condition_variable cv;</span><span data-v-c2b1f83f="" class="line"></span><span data-v-c2b1f83f="" class="line">// The transfer to scene callback function.</span><span data-v-c2b1f83f="" class="line">int onTransferToScene(VRayRenderer& r, const vector<LightMixChange>& changes, double instant, void*) {</span><span data-v-c2b1f83f="" class="line"> // Save the image with the corrections applied.</span><span data-v-c2b1f83f="" class="line"> ImageWriterOptions iwo;</span><span data-v-c2b1f83f="" class="line"> iwo.flags.singleChannel = true;</span><span data-v-c2b1f83f="" class="line"> iwo.flags.applyColorCorrections = true;</span><span data-v-c2b1f83f="" class="line"> r.vfb.saveImage("lightmix_vfb.png", iwo);</span><span data-v-c2b1f83f="" class="line"> printf("Transfer to scene callback called:");</span><span data-v-c2b1f83f="" class="line"> for (auto& change : changes) {</span><span data-v-c2b1f83f="" class="line"> // The LightMixChange object contains:</span><span data-v-c2b1f83f="" class="line"> // - the render element plugin</span><span data-v-c2b1f83f="" class="line"> // - isApplied flag (bool) - This must be set by the user and it will reset the change in the VFB</span><span data-v-c2b1f83f="" class="line"> // - enabled flag (bool) - Whether the light select is enabled or not in the VFB. This is *not* reset even when isApplied is true.</span><span data-v-c2b1f83f="" class="line"> // - intensity multiplier (float)</span><span data-v-c2b1f83f="" class="line"> // - color multiplier (VRay::Color)</span><span data-v-c2b1f83f="" class="line"> if (change.plugin.isNotEmpty()) {</span><span data-v-c2b1f83f="" class="line"> printf("\ [%s]: mult: %f.2,\ %s\</span><span data-v-c2b1f83f="" class="line">", change.plugin.getName(), change.intensityMult, change.colorMult.toString().c_str());</span><span data-v-c2b1f83f="" class="line"> if (!strcmp(change.plugin.getName(), "LSCeilingLight")) {</span><span data-v-c2b1f83f="" class="line"> // Apply the change to the actual light plugin and mark it as applied, so it will be reset in the VFB.</span><span data-v-c2b1f83f="" class="line"> // Note: You will need to keep track of which lights are in which light select render elements.</span><span data-v-c2b1f83f="" class="line"> LightRectangle light_rect = r.getPlugin<LightRectangle>("VRayLightRectShape1");</span><span data-v-c2b1f83f="" class="line"> // Don't forget the changes are multipliers, not overrides.</span><span data-v-c2b1f83f="" class="line"> light_rect.set_color(light_rect.get_color() * AColor(change.colorMult));</span><span data-v-c2b1f83f="" class="line"> light_rect.set_intensity(light_rect.get_intensity() * change.intensityMult);</span><span data-v-c2b1f83f="" class="line"> // Mark this change as applied.</span><span data-v-c2b1f83f="" class="line"> change.isApplied = true;</span><span data-v-c2b1f83f="" class="line"> }</span><span data-v-c2b1f83f="" class="line"> }</span><span data-v-c2b1f83f="" class="line"> // The plugin being empty, means that it's the special "Rest" channel.</span><span data-v-c2b1f83f="" class="line"> // It contains all the lights that were not added in other light selects.</span><span data-v-c2b1f83f="" class="line"> else</span><span data-v-c2b1f83f="" class="line"> printf("\ [Rest]\</span><span data-v-c2b1f83f="" class="line">");</span><span data-v-c2b1f83f="" class="line"> }</span><span data-v-c2b1f83f="" class="line"> // Notify the main thread that the callback is complete.</span><span data-v-c2b1f83f="" class="line"> cv.notify_all();</span><span data-v-c2b1f83f="" class="line"> return 0;</span><span data-v-c2b1f83f="" class="line">}</span><span data-v-c2b1f83f="" class="line"></span><span data-v-c2b1f83f="" class="line">// On VFB closed callback function.</span><span data-v-c2b1f83f="" class="line">void onVfbClosed(VRayRenderer& r, double instant, void*) {</span><span data-v-c2b1f83f="" class="line"> r.stop();</span><span data-v-c2b1f83f="" class="line"> cv.notify_all();</span><span data-v-c2b1f83f="" class="line">}</span><span data-v-c2b1f83f="" class="line"></span><span data-v-c2b1f83f="" class="line">int main() {</span><span data-v-c2b1f83f="" class="line"> // Change process working directory to SCENE_PATH in order to be able to load relative scene resources.</span><span data-v-c2b1f83f="" class="line"> changeCurrentDir(SCENE_PATH.c_str());</span><span data-v-c2b1f83f="" class="line"> VRayInit init(NULL, true);</span><span data-v-c2b1f83f="" class="line"> VRayRenderer renderer;</span><span data-v-c2b1f83f="" class="line"> // It's recommended to always have a console log, but we will not set it for this example</span><span data-v-c2b1f83f="" class="line"> // Set the transfer to scene callback. Called when the "To Scene" button is pressed in the VFB</span><span data-v-c2b1f83f="" class="line"> renderer.setOnLightMixTransferToScene(onTransferToScene);</span><span data-v-c2b1f83f="" class="line"> // Avoid getting stuck if VFB is closed</span><span data-v-c2b1f83f="" class="line"> renderer.setOnVFBClosed(onVfbClosed);</span><span data-v-c2b1f83f="" class="line"> // Load a scene from file.</span><span data-v-c2b1f83f="" class="line"> renderer.load("cornell_new.vrscene");</span><span data-v-c2b1f83f="" class="line"> // Add the LightMix plugin. No need to keep the reference, because you can't do anything with this plugin.</span><span data-v-c2b1f83f="" class="line"> // It just has to exist in the scene.</span><span data-v-c2b1f83f="" class="line"> renderer.newPlugin<RenderChannelLightMix>();</span><span data-v-c2b1f83f="" class="line"> // Environment light select</span><span data-v-c2b1f83f="" class="line"> RenderChannelLightSelect ls_env = renderer.newPlugin<RenderChannelLightSelect>("LSEnvironment");</span><span data-v-c2b1f83f="" class="line"> ls_env.set_light_select_mode(10); // 10 is a special, undocumented value used for environment light</span><span data-v-c2b1f83f="" class="line"> ls_env.set_name("Environment");</span><span data-v-c2b1f83f="" class="line"> // Self illumination light select</span><span data-v-c2b1f83f="" class="line"> RenderChannelLightSelect ls_self = renderer.newPlugin<RenderChannelLightSelect>("LSSelfIllumination");</span><span data-v-c2b1f83f="" class="line"> ls_self.set_light_select_mode(11); // 11 is a special, undocumented value used for self illumination light</span><span data-v-c2b1f83f="" class="line"> ls_self.set_name("Self Illum.");</span><span data-v-c2b1f83f="" class="line"> // A full light light select</span><span data-v-c2b1f83f="" class="line"> RenderChannelLightSelect ls_light = renderer.newPlugin<RenderChannelLightSelect>("LSCeilingLight");</span><span data-v-c2b1f83f="" class="line"> ls_light.set_light_select_mode(4); // full light (direct + indirect)</span><span data-v-c2b1f83f="" class="line"> ls_light.set_name("Celiling Light");</span><span data-v-c2b1f83f="" class="line"> // Adding a light to a light select</span><span data-v-c2b1f83f="" class="line"> LightRectangle light_rect = renderer.getPlugin<LightRectangle>("VRayLightRectShape1");</span><span data-v-c2b1f83f="" class="line"> light_rect.set_channels_full({ Value(ls_light) });</span><span data-v-c2b1f83f="" class="line"> // Start rendering</span><span data-v-c2b1f83f="" class="line"> renderer.startSync();</span><span data-v-c2b1f83f="" class="line"> printf("Choose Source: LightMix from the layers panel and change the color and intensity of the lights.\</span><span data-v-c2b1f83f="" class="line">\</span><span data-v-c2b1f83f="" class="line">");</span><span data-v-c2b1f83f="" class="line"> printf("Please note, that those are multipliers, not overrides.\</span><span data-v-c2b1f83f="" class="line">\</span><span data-v-c2b1f83f="" class="line">");</span><span data-v-c2b1f83f="" class="line"> printf("When you are done, stop the rendering (if it hasn't completed) from the VFB button\</span><span data-v-c2b1f83f="" class="line">");</span><span data-v-c2b1f83f="" class="line"> printf("and press the \"To Scene\" button. This will call the callback function.\</span><span data-v-c2b1f83f="" class="line">\</span><span data-v-c2b1f83f="" class="line">");</span><span data-v-c2b1f83f="" class="line"> printf("Note: The LC pass must end, before the Light Select render elements take effect.\</span><span data-v-c2b1f83f="" class="line">");</span><span data-v-c2b1f83f="" class="line"> // Wait for the callback to complete.</span><span data-v-c2b1f83f="" class="line"> // This can only happen after the rendering is stopped, because the button is disabled while rendering.</span><span data-v-c2b1f83f="" class="line"> {</span><span data-v-c2b1f83f="" class="line"> unique_lock<mutex> lk(m);</span><span data-v-c2b1f83f="" class="line"> cv.wait(lk);</span><span data-v-c2b1f83f="" class="line"> }</span><span data-v-c2b1f83f="" class="line"> printf("\</span><span data-v-c2b1f83f="" class="line">Now, some of the changes are applied to the scene and reset in the LightMix layer.\</span><span data-v-c2b1f83f="" class="line">");</span><span data-v-c2b1f83f="" class="line"> printf("The rendered image should look the same.\</span><span data-v-c2b1f83f="" class="line">");</span><span data-v-c2b1f83f="" class="line"> // Render again, this time with the lights changed in the scene.</span><span data-v-c2b1f83f="" class="line"> renderer.startSync();</span><span data-v-c2b1f83f="" class="line"> renderer.vfb.show(true);</span><span data-v-c2b1f83f="" class="line"> renderer.waitForRenderEnd();</span><span data-v-c2b1f83f="" class="line"> // Save the image with the corrections applied.</span><span data-v-c2b1f83f="" class="line"> ImageWriterOptions iwo;</span><span data-v-c2b1f83f="" class="line"> iwo.flags.singleChannel = true;</span><span data-v-c2b1f83f="" class="line"> iwo.flags.applyColorCorrections = true;</span><span data-v-c2b1f83f="" class="line"> renderer.vfb.saveImage("lightmix_scene.png", iwo);</span><span data-v-c2b1f83f="" class="line"></span><span data-v-c2b1f83f="" class="line"> return 0;</span><span data-v-c2b1f83f="" class="line">}</span></code>
C#.NET <code data-v-c2b1f83f=""><span data-v-c2b1f83f="" class="line">using System;</span><span data-v-c2b1f83f="" class="line">using System.IO;</span><span data-v-c2b1f83f="" class="line">using System.Threading;</span><span data-v-c2b1f83f="" class="line">using System.Collections.Generic;</span><span data-v-c2b1f83f="" class="line">using VRay;</span><span data-v-c2b1f83f="" class="line">using VRay.Plugins;</span><span data-v-c2b1f83f="" class="line"></span><span data-v-c2b1f83f="" class="line">namespace _09_lightmix</span><span data-v-c2b1f83f="" class="line">{</span><span data-v-c2b1f83f="" class="line"> class Program</span><span data-v-c2b1f83f="" class="line"> {</span><span data-v-c2b1f83f="" class="line"> static void Main(string[] args)</span><span data-v-c2b1f83f="" class="line"> {</span><span data-v-c2b1f83f="" class="line"> AutoResetEvent autoResetEvent = new AutoResetEvent(false);</span><span data-v-c2b1f83f="" class="line"> string SCENE_PATH = Path.Combine(Environment.GetEnvironmentVariable("VRAY_SDK"), "scenes");</span><span data-v-c2b1f83f="" class="line"> // Change process working directory to SCENE_PATH in order to be able to load relative scene resources.</span><span data-v-c2b1f83f="" class="line"> Directory.SetCurrentDirectory(SCENE_PATH);</span><span data-v-c2b1f83f="" class="line"> // Create an instance of VRayRenderer with default options. The renderer is automatically closed after the `using` block.</span><span data-v-c2b1f83f="" class="line"> using (VRayRenderer renderer = new VRayRenderer())</span><span data-v-c2b1f83f="" class="line"> {</span><span data-v-c2b1f83f="" class="line"> // It's usually a good idea to have a listener for any type of log message, but we will not add one for this example.</span><span data-v-c2b1f83f="" class="line"> ImageWriterOptions iwo = new ImageWriterOptions();</span><span data-v-c2b1f83f="" class="line"> iwo.SingleChannel = true;</span><span data-v-c2b1f83f="" class="line"> iwo.ApplyColorCorrections = true;</span><span data-v-c2b1f83f="" class="line"> // Avoid getting stuck if VFB is closed</span><span data-v-c2b1f83f="" class="line"> renderer.VFBClosed += new EventHandler<VRayEventArgs>((source, e) =></span><span data-v-c2b1f83f="" class="line"> {</span><span data-v-c2b1f83f="" class="line"> renderer.Stop();</span><span data-v-c2b1f83f="" class="line"> autoResetEvent.Set();</span><span data-v-c2b1f83f="" class="line"> });</span><span data-v-c2b1f83f="" class="line"> renderer.LightMixTransferToScene += new EventHandler<LightMixTransferToSceneEventArgs>((source, e) =></span><span data-v-c2b1f83f="" class="line"> {</span><span data-v-c2b1f83f="" class="line"> // Save the image with the corrections applied.</span><span data-v-c2b1f83f="" class="line"> renderer.Vfb.SaveImage("lightmix_vfb.png", iwo);</span><span data-v-c2b1f83f="" class="line"> Console.WriteLine("Transfer to scene callback called:");</span><span data-v-c2b1f83f="" class="line"> foreach (var change in e.Changes)</span><span data-v-c2b1f83f="" class="line"> {</span><span data-v-c2b1f83f="" class="line"> // The LightMixChange object contains:</span><span data-v-c2b1f83f="" class="line"> // - The render element plugin</span><span data-v-c2b1f83f="" class="line"> // - IsApplied flag (bool) - This must be set by the user and it will reset the change in the VFB</span><span data-v-c2b1f83f="" class="line"> // - Enabled flag (bool) - Whether the light select is enabled or not in the VFB. This is *not* reset even when isApplied is true.</span><span data-v-c2b1f83f="" class="line"> // - Intensity multiplier (float)</span><span data-v-c2b1f83f="" class="line"> // - Color multiplier (VRay::Color)</span><span data-v-c2b1f83f="" class="line"> if (change.Plugin != null)</span><span data-v-c2b1f83f="" class="line"> {</span><span data-v-c2b1f83f="" class="line"> Console.WriteLine(String.Format("\ [{0}]: mult: {1:F2},\ {2}", change.Plugin.GetName(), change.IntensityMult, change.ColorMult.ToString()));</span><span data-v-c2b1f83f="" class="line"> if (change.Plugin.GetName() == "LSCeilingLight")</span><span data-v-c2b1f83f="" class="line"> {</span><span data-v-c2b1f83f="" class="line"> // Apply the change to the actual light plugin and mark it as applied, so it will be reset in the VFB.</span><span data-v-c2b1f83f="" class="line"> // Note: You will need to keep track of which lights are in which light select render elements.</span><span data-v-c2b1f83f="" class="line"> LightRectangle lightRect = renderer.GetPlugin<LightRectangle>("VRayLightRectShape1");</span><span data-v-c2b1f83f="" class="line"> // Don't forget the changes are multipliers, not overrides.</span><span data-v-c2b1f83f="" class="line"> lightRect.Color = lightRect.Color * new AColor(change.ColorMult, 1);</span><span data-v-c2b1f83f="" class="line"> lightRect.Intensity = lightRect.Intensity * change.IntensityMult;</span><span data-v-c2b1f83f="" class="line"> // Mark this change as applied.</span><span data-v-c2b1f83f="" class="line"> change.IsApplied = true;</span><span data-v-c2b1f83f="" class="line"> }</span><span data-v-c2b1f83f="" class="line"> }</span><span data-v-c2b1f83f="" class="line"> // The plugin being empty, means that it's the special "Rest" channel.</span><span data-v-c2b1f83f="" class="line"> // It contains all the lights that were not added in other light selects.</span><span data-v-c2b1f83f="" class="line"> else</span><span data-v-c2b1f83f="" class="line"> Console.WriteLine("\ [Rest]\</span><span data-v-c2b1f83f="" class="line">");</span><span data-v-c2b1f83f="" class="line"> }</span><span data-v-c2b1f83f="" class="line"> // Notify the main thread that the callback is complete.</span><span data-v-c2b1f83f="" class="line"> autoResetEvent.Set();</span><span data-v-c2b1f83f="" class="line"> });</span><span data-v-c2b1f83f="" class="line"> // Load scene from a file.</span><span data-v-c2b1f83f="" class="line"> renderer.Load("cornell_new.vrscene");</span><span data-v-c2b1f83f="" class="line"> // Add the LightMix plugin. No need to keep the reference, because you can't do anything with this plugin.</span><span data-v-c2b1f83f="" class="line"> // It just has to exist in the scene.</span><span data-v-c2b1f83f="" class="line"> renderer.NewPlugin<RenderChannelLightMix>();</span><span data-v-c2b1f83f="" class="line"> // Environment light select</span><span data-v-c2b1f83f="" class="line"> RenderChannelLightSelect ls_env = renderer.NewPlugin<RenderChannelLightSelect>("LSEnvironment");</span><span data-v-c2b1f83f="" class="line"> ls_env.LightSelectMode = 10; // 10 is a special, undocumented value used for environment light</span><span data-v-c2b1f83f="" class="line"> ls_env.SetName("Environment");</span><span data-v-c2b1f83f="" class="line"> // Self illumination light select</span><span data-v-c2b1f83f="" class="line"> RenderChannelLightSelect ls_self = renderer.NewPlugin<RenderChannelLightSelect>("LSSelfIllumination");</span><span data-v-c2b1f83f="" class="line"> ls_self.LightSelectMode = 11; // 11 is a special, undocumented value used for self illumination light</span><span data-v-c2b1f83f="" class="line"> ls_self.SetName("Self Illum.");</span><span data-v-c2b1f83f="" class="line"> // A full light light select</span><span data-v-c2b1f83f="" class="line"> RenderChannelLightSelect ls_light = renderer.NewPlugin<RenderChannelLightSelect>("LSCeilingLight");</span><span data-v-c2b1f83f="" class="line"> ls_light.LightSelectMode = 4; // full light (direct + indirect)</span><span data-v-c2b1f83f="" class="line"> ls_light.SetName("Celiling Light");</span><span data-v-c2b1f83f="" class="line"> // Adding a light to a light select</span><span data-v-c2b1f83f="" class="line"> LightRectangle light_rect = renderer.GetPlugin<LightRectangle>("VRayLightRectShape1");</span><span data-v-c2b1f83f="" class="line"> light_rect.ChannelsFull = new List<object>() { ls_light };</span><span data-v-c2b1f83f="" class="line"> // Start rendering.</span><span data-v-c2b1f83f="" class="line"> renderer.StartSync();</span><span data-v-c2b1f83f="" class="line"> Console.WriteLine("Choose Source: LightMix from the layers panel and change the color and intensity of the lights.\</span><span data-v-c2b1f83f="" class="line">");</span><span data-v-c2b1f83f="" class="line"> Console.WriteLine("Please note, that those are multipliers, not overrides.\</span><span data-v-c2b1f83f="" class="line">");</span><span data-v-c2b1f83f="" class="line"> Console.WriteLine("When you are done, stop the rendering (if it hasn't completed) from the VFB button");</span><span data-v-c2b1f83f="" class="line"> Console.WriteLine("and press the \"To Scene\" button. This will call the callback function.\</span><span data-v-c2b1f83f="" class="line">");</span><span data-v-c2b1f83f="" class="line"> Console.WriteLine("Note: The LC pass must end, before the Light Select render elements take effect.\</span><span data-v-c2b1f83f="" class="line">");</span><span data-v-c2b1f83f="" class="line"> // Wait for the callback to complete.</span><span data-v-c2b1f83f="" class="line"> // This can only happen after the rendering is stopped, because the button is disabled while rendering.</span><span data-v-c2b1f83f="" class="line"> autoResetEvent.WaitOne();</span><span data-v-c2b1f83f="" class="line"> Console.WriteLine("\</span><span data-v-c2b1f83f="" class="line">Now, some of the changes are applied to the scene and reset in the LightMix layer.");</span><span data-v-c2b1f83f="" class="line"> Console.WriteLine("The rendered image should look the same.");</span><span data-v-c2b1f83f="" class="line"> // Render again, this time with the lights changed in the scene.</span><span data-v-c2b1f83f="" class="line"> renderer.StartSync();</span><span data-v-c2b1f83f="" class="line"> renderer.Vfb.Shown = true;</span><span data-v-c2b1f83f="" class="line"> renderer.WaitForRenderEnd();</span><span data-v-c2b1f83f="" class="line"> renderer.Vfb.SaveImage("lightmix_scene.png", iwo);</span><span data-v-c2b1f83f="" class="line"> }</span><span data-v-c2b1f83f="" class="line"> }</span><span data-v-c2b1f83f="" class="line"> }</span><span data-v-c2b1f83f="" class="line">}</span></code>
Node.js <code data-v-c2b1f83f=""><span data-v-c2b1f83f="" class="line">var path = require('path');</span><span data-v-c2b1f83f="" class="line">var vray = require(path.join(process.env.VRAY_SDK, 'node', 'vray'));</span><span data-v-c2b1f83f="" class="line"></span><span data-v-c2b1f83f="" class="line">var SCENE_PATH = path.join(process.env.VRAY_SDK, 'scenes');</span><span data-v-c2b1f83f="" class="line">// Change process working directory to SCENE_PATH in order to be able to load relative scene resources.</span><span data-v-c2b1f83f="" class="line">process.chdir(SCENE_PATH);</span><span data-v-c2b1f83f="" class="line"></span><span data-v-c2b1f83f="" class="line">// Create an instance of VRayRenderer.</span><span data-v-c2b1f83f="" class="line">var renderer = vray.VRayRenderer();</span><span data-v-c2b1f83f="" class="line">// It's recommended to always have a console log callback but we will not add one for this example.</span><span data-v-c2b1f83f="" class="line"></span><span data-v-c2b1f83f="" class="line">// Close the renderer when VFB is closed.</span><span data-v-c2b1f83f="" class="line">renderer.on("vfbClosed", function(instant) {</span><span data-v-c2b1f83f="" class="line"> // This call is mandatory in order to free up the event loop.</span><span data-v-c2b1f83f="" class="line"> // The renderer object is unusable after closing since its resources</span><span data-v-c2b1f83f="" class="line"> // are freed. It should be released for garbage collection.</span><span data-v-c2b1f83f="" class="line"> renderer.close();</span><span data-v-c2b1f83f="" class="line">});</span><span data-v-c2b1f83f="" class="line"></span><span data-v-c2b1f83f="" class="line">renderer.on("lightMixTransferToScene", function(changes, count) {</span><span data-v-c2b1f83f="" class="line"> // Each LightMixChange object contains:</span><span data-v-c2b1f83f="" class="line"> // - the render element plugin</span><span data-v-c2b1f83f="" class="line"> // - isApplied flag (bool) - This must be set by the user and it will reset the change in the VFB</span><span data-v-c2b1f83f="" class="line"> // - enabled flag (bool) - Whether the light select is enabled or not in the VFB. This is *not* reset even when isApplied is true.</span><span data-v-c2b1f83f="" class="line"> // - intensity multiplier (float)</span><span data-v-c2b1f83f="" class="line"> // - color multiplier (VRay::Color)</span><span data-v-c2b1f83f="" class="line"> changes.forEach(change => {</span><span data-v-c2b1f83f="" class="line"> if (change.plugin != null) {</span><span data-v-c2b1f83f="" class="line"> console.log(`\ [${change.plugin.name}]: mult: ${change.intensityMult.toFixed(2)}, \ ${change.colorMult}`);</span><span data-v-c2b1f83f="" class="line"> if (change.plugin.getName() == "LSCeilingLight") {</span><span data-v-c2b1f83f="" class="line"> // Apply the change to the actual light plugin and mark it as applied, so it will be reset in the VFB.</span><span data-v-c2b1f83f="" class="line"> // Note: You will need to keep track of which lights are in which light select render elements.</span><span data-v-c2b1f83f="" class="line"> light_rect = renderer.plugins["VRayLightRectShape1"];</span><span data-v-c2b1f83f="" class="line"> // Don't forget the changes are multipliers, not overrides.</span><span data-v-c2b1f83f="" class="line"> light_rect.color = light_rect.color.mul(vray.AColor(change.colorMult));</span><span data-v-c2b1f83f="" class="line"> light_rect.intensity *= change.intensityMult;</span><span data-v-c2b1f83f="" class="line"> // Mark this change as applied.</span><span data-v-c2b1f83f="" class="line"> change.isApplied = true;</span><span data-v-c2b1f83f="" class="line"> }</span><span data-v-c2b1f83f="" class="line"> }</span><span data-v-c2b1f83f="" class="line"> else {</span><span data-v-c2b1f83f="" class="line"> // The plugin being empty, means that it's the special "Rest" channel.</span><span data-v-c2b1f83f="" class="line"> // It contains all the lights that were not added in other light selects.</span><span data-v-c2b1f83f="" class="line"> console.log(`\ [Rest]: mult: ${change.intensityMult.toFixed(2)}, \ ${change.colorMult}`);</span><span data-v-c2b1f83f="" class="line"> }</span><span data-v-c2b1f83f="" class="line"> });</span><span data-v-c2b1f83f="" class="line"> // Save the image with the corrections applied.</span><span data-v-c2b1f83f="" class="line"> renderer.vfb.saveImageSync("lightmix_vfb.png", {singleChannel: true, applyColorCorrections: true});</span><span data-v-c2b1f83f="" class="line"> // Render again, this time with the lights changed in the scene.</span><span data-v-c2b1f83f="" class="line"> setTimeout(afterCallback, 0);</span><span data-v-c2b1f83f="" class="line">});</span><span data-v-c2b1f83f="" class="line"></span><span data-v-c2b1f83f="" class="line">// Load scene from a file asynchronously.</span><span data-v-c2b1f83f="" class="line">renderer.load("cornell_new.vrscene", function(err) {</span><span data-v-c2b1f83f="" class="line"> if (err) { throw err; } // Scene was not loaded.</span><span data-v-c2b1f83f="" class="line"> // Add the LightMix plugin. No need to keep the reference, because you can't do anything with this plugin.</span><span data-v-c2b1f83f="" class="line"> // It just has to exist in the scene.</span><span data-v-c2b1f83f="" class="line"> renderer.classes.RenderChannelLightMix();</span><span data-v-c2b1f83f="" class="line"> // Environment light select</span><span data-v-c2b1f83f="" class="line"> ls_env = renderer.classes.RenderChannelLightSelect("LSEnvironment");</span><span data-v-c2b1f83f="" class="line"> ls_env.light_select_mode = 10; // 10 is a special, undocumented value used for environment light</span><span data-v-c2b1f83f="" class="line"> ls_env.name = "Environment";</span><span data-v-c2b1f83f="" class="line"> // Self illumination light select</span><span data-v-c2b1f83f="" class="line"> ls_self = renderer.classes.RenderChannelLightSelect("LSSelfIllumination");</span><span data-v-c2b1f83f="" class="line"> ls_self.light_select_mode = 11; // 11 is a special, undocumented value used for self illumination light</span><span data-v-c2b1f83f="" class="line"> ls_self.name = "Self Illum.";</span><span data-v-c2b1f83f="" class="line"> // A full light light select</span><span data-v-c2b1f83f="" class="line"> ls_light = renderer.classes.RenderChannelLightSelect("LSCeilingLight");</span><span data-v-c2b1f83f="" class="line"> ls_light.light_select_mode = 4; // full light (direct + indirect)</span><span data-v-c2b1f83f="" class="line"> ls_light.name = "Ceiling Light";</span><span data-v-c2b1f83f="" class="line"> // Adding a light to a light select</span><span data-v-c2b1f83f="" class="line"> light_rect = renderer.plugins["VRayLightRectShape1"]</span><span data-v-c2b1f83f="" class="line"> light_rect.channels_full = [ ls_light ];</span><span data-v-c2b1f83f="" class="line"> // Start rendering.</span><span data-v-c2b1f83f="" class="line"> renderer.start(function(err) {</span><span data-v-c2b1f83f="" class="line"> if (err) { throw err; } // Couldn't start rendering.</span><span data-v-c2b1f83f="" class="line"> console.log("Choose Source: LightMix from the layers panel and change the color and intensity of the lights.\</span><span data-v-c2b1f83f="" class="line">");</span><span data-v-c2b1f83f="" class="line"> console.log("Please note, that those are multipliers, not overrides.\</span><span data-v-c2b1f83f="" class="line">");</span><span data-v-c2b1f83f="" class="line"> console.log("When you are done, stop the rendering (if it hasn't completed) from the VFB button");</span><span data-v-c2b1f83f="" class="line"> console.log("and press the \"To Scene\" button. This will call the callback function.\</span><span data-v-c2b1f83f="" class="line">");</span><span data-v-c2b1f83f="" class="line"> console.log("Note: The LC pass must end, before the Light Select render elements take effect.\</span><span data-v-c2b1f83f="" class="line">");</span><span data-v-c2b1f83f="" class="line"> });</span><span data-v-c2b1f83f="" class="line">});</span><span data-v-c2b1f83f="" class="line"></span><span data-v-c2b1f83f="" class="line">function afterCallback() {</span><span data-v-c2b1f83f="" class="line"> renderer.start(function(err) {</span><span data-v-c2b1f83f="" class="line"> if (err) { throw err; } // Couldn't start rendering.</span><span data-v-c2b1f83f="" class="line"> console.log("\</span><span data-v-c2b1f83f="" class="line">Now, some of the changes are applied to the scene and reset in the LightMix layer.");</span><span data-v-c2b1f83f="" class="line"> console.log("The rendered image should look the same.");</span><span data-v-c2b1f83f="" class="line"> renderer.waitForRenderEnd(function() {</span><span data-v-c2b1f83f="" class="line"> // Save the new image.</span><span data-v-c2b1f83f="" class="line"> renderer.vfb.saveImageSync("lightmix_scene.png", {singleChannel: true, applyColorCorrections: true});</span><span data-v-c2b1f83f="" class="line"> // Close the renderer.</span><span data-v-c2b1f83f="" class="line"> renderer.close();</span><span data-v-c2b1f83f="" class="line"> });</span><span data-v-c2b1f83f="" class="line"> });</span><span data-v-c2b1f83f="" class="line">}</span></code>
Other callbacks Python <code data-v-c2b1f83f=""><span data-v-c2b1f83f="" class="line">def onRenderLast(renderer, isRendering, instant):</span><span data-v-c2b1f83f="" class="line"> print('Starting rendering at:', instant)</span><span data-v-c2b1f83f="" class="line"> renderer.startSync()</span><span data-v-c2b1f83f="" class="line"></span><span data-v-c2b1f83f="" class="line">def onRenderInteractive(renderer, isRendering, instant):</span><span data-v-c2b1f83f="" class="line"> print('Starting Interactive rendering at:', instant)</span><span data-v-c2b1f83f="" class="line"> oldRenderMode = renderer.renderMode</span><span data-v-c2b1f83f="" class="line"> renderer.renderMode = 'interactive'</span><span data-v-c2b1f83f="" class="line"> renderer.startSync()</span><span data-v-c2b1f83f="" class="line"> renderer.renderMode = oldRenderMode # resetting the renderMode after the rendering has started will not affect the current rendering process</span><span data-v-c2b1f83f="" class="line"></span><span data-v-c2b1f83f="" class="line">def onShowVFBLog(renderer, instant):</span><span data-v-c2b1f83f="" class="line"> renderer.vfb.logMessage(vray.LOGLEVEL_INFO, 'VFB Log opened')</span><span data-v-c2b1f83f="" class="line"></span><span data-v-c2b1f83f="" class="line">def onVFBClosed(renderer, instant):</span><span data-v-c2b1f83f="" class="line"> renderer.stop()</span><span data-v-c2b1f83f="" class="line"></span><span data-v-c2b1f83f="" class="line"># called when the Render button or menu action is pressed. If not set, pressing Render will start rendering (like calling renderer.start())</span><span data-v-c2b1f83f="" class="line">renderer.setOnVFBRenderLast(onRenderLast) </span><span data-v-c2b1f83f="" class="line"># called when the Start Interactive Render button or menu action is pressed. Requires showVfbButtonInteractiveStart to be True</span><span data-v-c2b1f83f="" class="line">renderer.setOnVFBRenderInteractive(onRenderInteractive) </span><span data-v-c2b1f83f="" class="line"># called when the VFB Log tab is opened</span><span data-v-c2b1f83f="" class="line">renderer.setOnVFBShowMessagesWindow(onShowVFBLog)</span><span data-v-c2b1f83f="" class="line"># called when the VFB window is closed</span><span data-v-c2b1f83f="" class="line">renderer.setOnVFBClosed(onVFBClosed)</span></code>
C++ <code data-v-c2b1f83f=""><span data-v-c2b1f83f="" class="line">#define VRAY_RUNTIME_LOAD_PRIMARY</span><span data-v-c2b1f83f="" class="line">#include "vraysdk.hpp"</span><span data-v-c2b1f83f="" class="line">#include "utils.h"</span><span data-v-c2b1f83f="" class="line">using namespace VRay;</span><span data-v-c2b1f83f="" class="line">using namespace std;</span><span data-v-c2b1f83f="" class="line"></span><span data-v-c2b1f83f="" class="line">const char *BASE_PATH = getenv("VRAY_SDK");</span><span data-v-c2b1f83f="" class="line">string SCENE_PATH = (BASE_PATH ? string(BASE_PATH) : string(".")) + PATH_DELIMITER + "scenes";</span><span data-v-c2b1f83f="" class="line"></span><span data-v-c2b1f83f="" class="line">void onRenderLast(VRayRenderer& renderer, bool isRendering, double instant, void* userData) {</span><span data-v-c2b1f83f="" class="line"> printf("Starting rendering at: %f\</span><span data-v-c2b1f83f="" class="line">", instant);</span><span data-v-c2b1f83f="" class="line"> renderer.startSync();</span><span data-v-c2b1f83f="" class="line">}</span><span data-v-c2b1f83f="" class="line">void onRenderInteractive(VRayRenderer& renderer, bool isRendering, double instant, void* userData) {</span><span data-v-c2b1f83f="" class="line"> printf("Starting Interactive rendering at: %f\</span><span data-v-c2b1f83f="" class="line">", instant);</span><span data-v-c2b1f83f="" class="line"> VRayRenderer::RenderMode oldRenderMode = renderer.getRenderMode();</span><span data-v-c2b1f83f="" class="line"> renderer.setRenderMode(VRayRenderer::RENDER_MODE_INTERACTIVE);</span><span data-v-c2b1f83f="" class="line"> renderer.startSync();</span><span data-v-c2b1f83f="" class="line"> renderer.setRenderMode(oldRenderMode); // resetting the renderMode after the rendering has started will not affect the current rendering process</span><span data-v-c2b1f83f="" class="line">}</span><span data-v-c2b1f83f="" class="line">void onShowVFBLog(VRayRenderer& renderer, double instant, void* userData) {</span><span data-v-c2b1f83f="" class="line"> renderer.vfb.logMessage(MessageInfo, "VFB Log opened");</span><span data-v-c2b1f83f="" class="line">}</span><span data-v-c2b1f83f="" class="line">void onVFBClosed(VRayRenderer& renderer, double instant, void* userData) {</span><span data-v-c2b1f83f="" class="line"> renderer.stop();</span><span data-v-c2b1f83f="" class="line">}</span><span data-v-c2b1f83f="" class="line"></span><span data-v-c2b1f83f="" class="line">int main() {</span><span data-v-c2b1f83f="" class="line"> // Change process working directory to SCENE_PATH in order to be able to load relative scene resources.</span><span data-v-c2b1f83f="" class="line"> changeCurrentDir(SCENE_PATH.c_str());</span><span data-v-c2b1f83f="" class="line"> // Load V-Ray SDK library.</span><span data-v-c2b1f83f="" class="line"> VRayInit init(NULL, true);</span><span data-v-c2b1f83f="" class="line"> // The renderer is automatically closed at the end of the current scope.</span><span data-v-c2b1f83f="" class="line"> VRayRenderer renderer;</span><span data-v-c2b1f83f="" class="line"> // called when the Render button or menu action is pressed. If not set, pressing Render will start rendering (like calling renderer.start())</span><span data-v-c2b1f83f="" class="line"> renderer.setOnVFBRenderLast(onRenderLast);</span><span data-v-c2b1f83f="" class="line"> // called when the Start Interactive Render button or menu action is pressed. Requires showVfbButtonInteractiveStart to be true</span><span data-v-c2b1f83f="" class="line"> renderer.setOnVFBInteractiveStart(onRenderInteractive);</span><span data-v-c2b1f83f="" class="line"> // called when the VFB Log tab is opened</span><span data-v-c2b1f83f="" class="line"> renderer.setOnVFBShowMessagesWindow(onShowVFBLog);</span><span data-v-c2b1f83f="" class="line"> // called when the VFB window is closed</span><span data-v-c2b1f83f="" class="line"> renderer.setOnVFBClosed(onVFBClosed);</span><span data-v-c2b1f83f="" class="line"> // Load scene from a file.</span><span data-v-c2b1f83f="" class="line"> renderer.load("cornell_new.vrscene");</span><span data-v-c2b1f83f="" class="line"> // Start rendering.</span><span data-v-c2b1f83f="" class="line"> renderer.startSync();</span><span data-v-c2b1f83f="" class="line"> // Wait until rendering has finished.</span><span data-v-c2b1f83f="" class="line"> renderer.waitForRenderEnd();</span><span data-v-c2b1f83f="" class="line"> return 0;</span><span data-v-c2b1f83f="" class="line">}</span></code>
C#.NET <code data-v-c2b1f83f=""><span data-v-c2b1f83f="" class="line">using System;</span><span data-v-c2b1f83f="" class="line">using System.IO;</span><span data-v-c2b1f83f="" class="line">using VRay;</span><span data-v-c2b1f83f="" class="line"></span><span data-v-c2b1f83f="" class="line">namespace _other_vfb_callbacks</span><span data-v-c2b1f83f="" class="line">{</span><span data-v-c2b1f83f="" class="line"> class Program</span><span data-v-c2b1f83f="" class="line"> {</span><span data-v-c2b1f83f="" class="line"> static void Main(string[] args)</span><span data-v-c2b1f83f="" class="line"> {</span><span data-v-c2b1f83f="" class="line"> string SCENE_PATH = Path.Combine(Environment.GetEnvironmentVariable("VRAY_SDK"), "scenes");</span><span data-v-c2b1f83f="" class="line"> // Change process working directory to SCENE_PATH in order to be able to load relative scene resources.</span><span data-v-c2b1f83f="" class="line"> Directory.SetCurrentDirectory(SCENE_PATH);</span><span data-v-c2b1f83f="" class="line"> // Create an instance of VRayRenderer with default options. The renderer is automatically closed after the `using` block.</span><span data-v-c2b1f83f="" class="line"> using (VRayRenderer renderer = new VRayRenderer())</span><span data-v-c2b1f83f="" class="line"> {</span><span data-v-c2b1f83f="" class="line"> // called when the Render button or menu action is pressed. If not set, pressing Render will start rendering (like calling renderer.Start())</span><span data-v-c2b1f83f="" class="line"> renderer.VFBRenderLast += new EventHandler<RenderLastEventArgs>((source, e) =></span><span data-v-c2b1f83f="" class="line"> {</span><span data-v-c2b1f83f="" class="line"> Console.WriteLine("Starting rendering at: {0}", e.Instant);</span><span data-v-c2b1f83f="" class="line"> renderer.StartSync();</span><span data-v-c2b1f83f="" class="line"> });</span><span data-v-c2b1f83f="" class="line"> // called when the Start Interactive Render button or menu action is pressed. Requires ShowVfbButtonInteractiveStart to be true</span><span data-v-c2b1f83f="" class="line"> renderer.VFBRenderInteractive += new EventHandler<RenderInteractiveEventArgs>((source, e) =></span><span data-v-c2b1f83f="" class="line"> {</span><span data-v-c2b1f83f="" class="line"> Console.WriteLine("Starting Interactive rendering at: {0}", e.Instant);</span><span data-v-c2b1f83f="" class="line"> RenderMode oldRenderMode = renderer.RenderMode;</span><span data-v-c2b1f83f="" class="line"> renderer.RenderMode = RenderMode.INTERACTIVE;</span><span data-v-c2b1f83f="" class="line"> renderer.StartSync();</span><span data-v-c2b1f83f="" class="line"> renderer.RenderMode = oldRenderMode; // resetting the RenderMode after the rendering has started will not affect the current rendering process</span><span data-v-c2b1f83f="" class="line"> });</span><span data-v-c2b1f83f="" class="line"> // called when the VFB Log tab is opened</span><span data-v-c2b1f83f="" class="line"> renderer.VFBShowMessagesWindow += new EventHandler<VRayEventArgs>((source, e) =></span><span data-v-c2b1f83f="" class="line"> {</span><span data-v-c2b1f83f="" class="line"> renderer.Vfb.LogMessage(LogLevelType.Info, "VFB Log opened");</span><span data-v-c2b1f83f="" class="line"> });</span><span data-v-c2b1f83f="" class="line"> // called when the VFB window is closed</span><span data-v-c2b1f83f="" class="line"> renderer.VFBClosed += new EventHandler<VRayEventArgs>((source, e) =></span><span data-v-c2b1f83f="" class="line"> {</span><span data-v-c2b1f83f="" class="line"> renderer.Stop();</span><span data-v-c2b1f83f="" class="line"> });</span><span data-v-c2b1f83f="" class="line"> // Load scene from a file.</span><span data-v-c2b1f83f="" class="line"> renderer.Load("cornell_new.vrscene");</span><span data-v-c2b1f83f="" class="line"> // Start rendering.</span><span data-v-c2b1f83f="" class="line"> renderer.StartSync();</span><span data-v-c2b1f83f="" class="line"> // Wait until rendering has finished.</span><span data-v-c2b1f83f="" class="line"> renderer.WaitForRenderEnd();</span><span data-v-c2b1f83f="" class="line"> }</span><span data-v-c2b1f83f="" class="line"> }</span><span data-v-c2b1f83f="" class="line"> }</span><span data-v-c2b1f83f="" class="line">}</span></code>
Node.js <code data-v-c2b1f83f=""><span data-v-c2b1f83f="" class="line"> // called when the Render button or menu action is pressed. If not set, pressing Render will start rendering (like calling renderer.start())</span><span data-v-c2b1f83f="" class="line">renderer.on("vfbRenderLast", function(isRendering, instant) {</span><span data-v-c2b1f83f="" class="line"> console.log("Starting rendering at: ", instant);</span><span data-v-c2b1f83f="" class="line"> renderer.startSync();</span><span data-v-c2b1f83f="" class="line">});</span><span data-v-c2b1f83f="" class="line">// called when the Start Interactive Render button or menu action is pressed. Requires showVfbButtonInteractiveStart to be true</span><span data-v-c2b1f83f="" class="line">renderer.on("vfbRenderInteractive", function(isRendering, instant) {</span><span data-v-c2b1f83f="" class="line"> console.log("Starting Interactive rendering at:", instant);</span><span data-v-c2b1f83f="" class="line"> var oldRenderMode = renderer.renderMode;</span><span data-v-c2b1f83f="" class="line"> renderer.renderMode = "interactive";</span><span data-v-c2b1f83f="" class="line"> renderer.startSync();</span><span data-v-c2b1f83f="" class="line"> renderer.renderMode = oldRenderMode; // resetting the renderMode after the rendering has started will not affect the current rendering process</span><span data-v-c2b1f83f="" class="line">});</span><span data-v-c2b1f83f="" class="line">// called when the VFB Log tab is opened</span><span data-v-c2b1f83f="" class="line">renderer.on("vfbShowMessagesWindow", function(instant) {</span><span data-v-c2b1f83f="" class="line"> renderer.vfb.logMessage(vray.LOGLEVEL_INFO, "VFB Log opened");</span><span data-v-c2b1f83f="" class="line">});</span><span data-v-c2b1f83f="" class="line">// called when the VFB window is closed</span><span data-v-c2b1f83f="" class="line">renderer.on("vfbClosed", function(instant) {</span><span data-v-c2b1f83f="" class="line"> renderer.stop();</span><span data-v-c2b1f83f="" class="line"> // Closes the renderer. This call is mandatory in order to free up the event loop.</span><span data-v-c2b1f83f="" class="line"> // The renderer object is unusable after closing since its resources are freed. </span><span data-v-c2b1f83f="" class="line"> // It should be released for garbage collection.</span><span data-v-c2b1f83f="" class="line"> renderer.close();</span><span data-v-c2b1f83f="" class="line">});</span></code>
RendererOptions enableFrameBuffer - (default: true) Controls whether the VFB will be used by this renderer. Notice that this is different from the global enableFrameBuffer function that disables the V-Ray GUI for the whole life of the process. showFrameBuffer - (default: true) Controls whether the VFB is shown when rendering starts. It can still be shown later through the VFB API. noRenderLicensePreCheck - (default: false) - By default creating a V-Ray renderer engages an AppSDK license and also very briefly engages a render license and releases it in order to be able to return a license error early. You can disable this pre-check with this flag for example to reduce network communication. useDefaultVfbTheme - (default: true) If set to false the VFB theme is ignored and the parent application theme is inherited. showVfbButtonInteractiveStart - (default: false) - Show an additional Start Interactive Rendering button and menu action. When pressed, calls a user callback (does not start rendering by default). previewRenderer - (default: false) Optimize the renderer for small preview purposes. Should not be used for production. allowInvalidCharactersInPluginNames - (default: false) - Allow the use of invalid characters in plugin names. dockFrameBuffer - (default: false) - Dock the VFB window hideToSceneButton - (default: false) - Hide the Light Mix transfer <To Scene> button in VFB. If you don't plan on implementing that functionality, it's a good idea to hide the button (otherwise it will always be disabled). useVfbLog - (default: true) - Use the built-in VFB log pluginLibraryPath - This can be used optionally to define a non-default path for loading V-Ray plugins . Most users won't need to set this. It allows multiple files to be specified. vfbDrawStyle - This enum controls the style and colors of the VFB GUI. The available styles are those of the V-Ray Standalone product as well as V-Ray for 3dsMax and V-Ray for Maya.