Enscape
Cloud Export
This page provides information about exporting Enscape scenes, images, and panoramas to Chaos Cloud.
Last updated 1 September 2026
This page provides information about exporting Enscape scenes, images, and panoramas to Chaos Cloud.
Overview
Chaos Cloud provides a unified place for collaboration and editing across all Chaos products. Share Cloud projects with anyone inside or outside your organization to collaborate.
For more information, see the Chaos Cloud Collaboration documentation.
Jump to the type of project you wish to upload to Chaos Cloud:
Choose the most suitable Sharing options.
Image Export
Uploading your rendered image to Chaos Cloud helps with cross-team collaboration. Invite your colleagues to review your images and share their feedback. Speed up reviews and finish your projects faster.
Workflow

Open the Render window through the Render button in the Enscape toolbar ( ). In the Render window:
- Make sure the mode is set to Image. This is the default.
- Disable Save locally to avoid cluttering your local drive. You can keep it enabled if you wish to have a backup copy saved on your machine. See the Render an Image page for the Save locally options.
- Enable the Upload to Cloud option. Set the Destination to one of the folders in your Chaos Cloud drive.

Start enhancement – When enabled, an enhancement of the image is generated automatically when the image is uploaded to Chaos Cloud. The credits needed for the enhancement are listed. If you hover over the Balance field ( ), a pop-up appears with a breakdown of your credits and links to the Credits usage report and the additional Credits options.
- Determine a name for the uploaded image. This does not rename your current project, only the upload.
- If you wish to render and upload multiple views from the scene, enabling Batch rendering allows you to do so with a single action. See the Batch Rendering page for more information.
- When ready, click Render. The image renders and is then uploaded to Chaos Cloud for sharing, enhancement, and collaboration.

Panorama Export
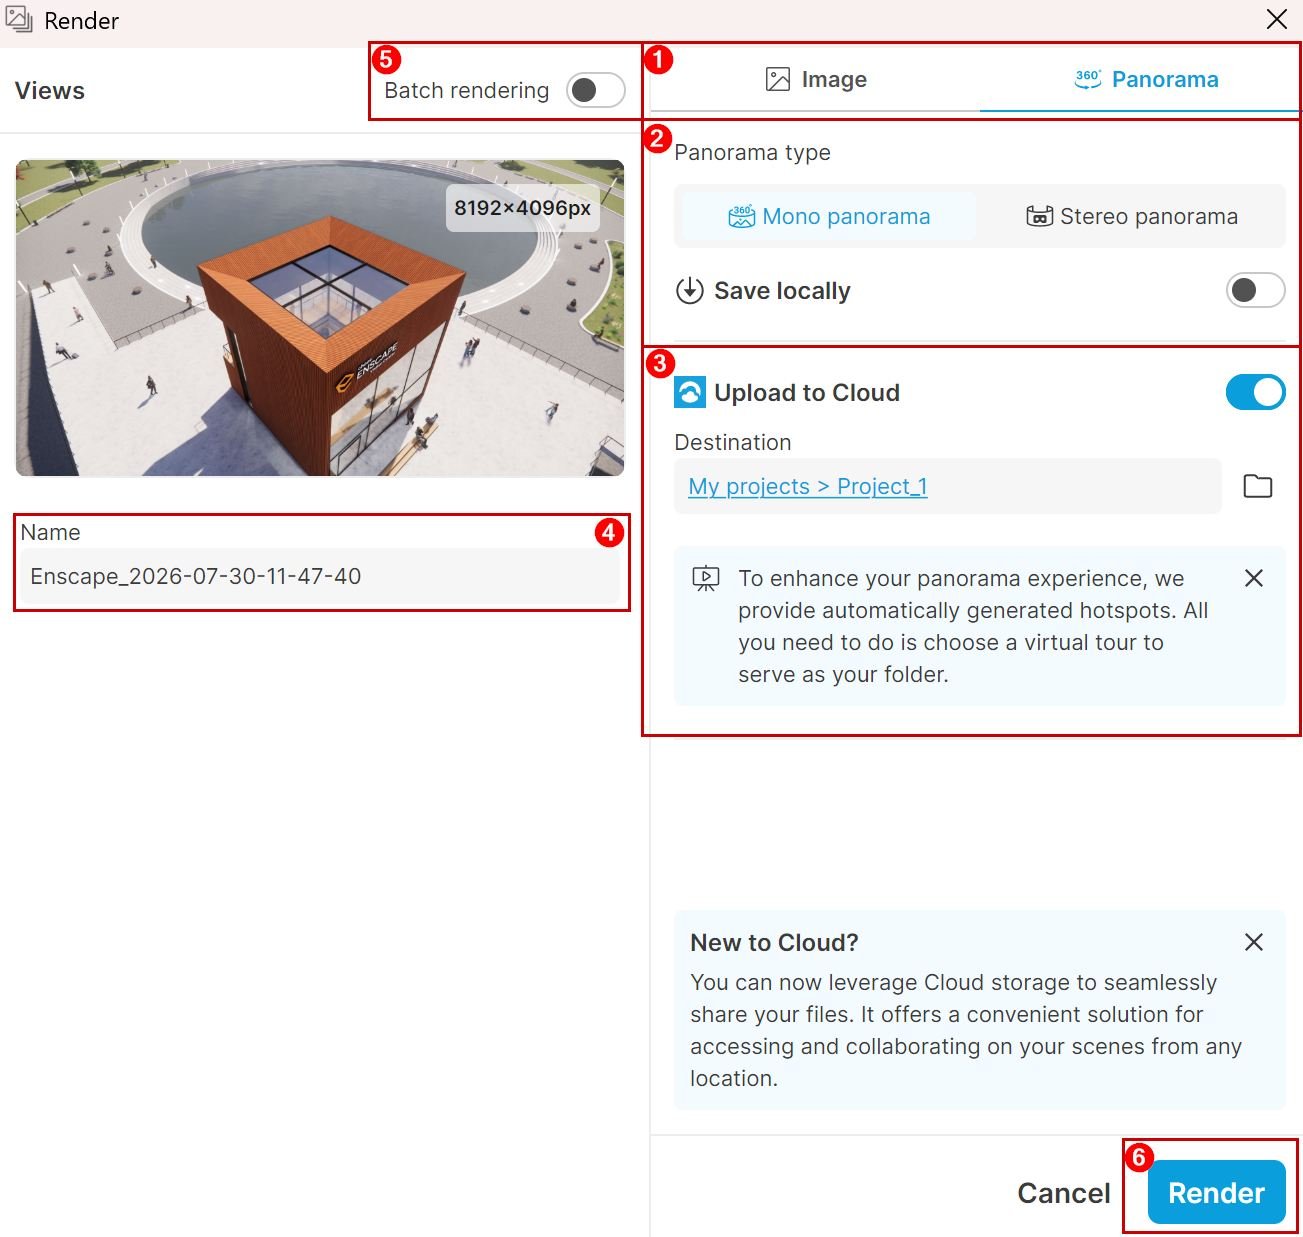
Open the Render window through the Render button in the Enscape toolbar ( ). In the Render window:
- Set the mode to Panorama.
- Determine the Panorama type. For the description of the types, see the Panorama and Cardboard page. Disable Save locally to avoid cluttering your local drive. You can keep it enabled if you wish to have a backup copy saved on your machine. See the Render an Image page for the Save locally options.
- Enable the Upload to Cloud option. Set the Destination to one of the folders in your Chaos Cloud drive. To take advantage of the automatic hotspots, make sure the Cloud folder is of the virtual tour type ( ). For more information, see the Virtual Tours page.
- Determine a name for the uploaded panorama. This does not rename your current project, only the upload.
- If you wish to render and upload multiple views from the scene, enabling Batch rendering allows you to do so with a single action. See the Batch Rendering page for more information.
- When ready, click Render. The panorama renders and is then uploaded to Chaos Cloud for sharing, presentation, and collaboration.
3D Scene Export
Chaos Cloud 3D Streaming allows you to explore and present entire 3D scenes remotely without the need for high-end hardware or software. For more information on Chaos Cloud 3D Streaming, see the Chaos Cloud page.
Workflow

Open the 3D Streaming & Standalone export window from the Enscape toolbar ( ).
- Set the export mode to Cloud 3D Scene.
- Determine the Chaos Cloud folder where you wish to upload your 3D scene in the Destination field.
- Select the views you would like to include in the 3D scene.
- When ready, click Upload. If no views are selected, the button is greyed out.
For information on how to navigate your 3D scene within Chaos Cloud, see the Chaos Cloud Workflow page.

Sharing
Successful upload ends with a message.
For scene export, it provides also documentation links to:
- Cloud Mobile (with offline support)
- 3D Streaming
The View in Cloud button opens the Chaos Cloud link in a browser directly to examine the upload.
Click the Share button to open the Share menu.
Email address – Adds an email address for the collaborator invitation. Select the user permission rights as Viewer or Editor.
Members with access – Displays a list of members the content has been shared with and their access type.
Comments – Locks or unlocks comments for this item. If you lock comments, no new comments can be added, but people can still see the comment section. Set the comments option to Same as parent to match the parent folder or project settings.
Access – Sets the access type for this item.
Same as parent – The item inherits the same setting as the folder or project has.
Invited only – Only invited people can access the item.
Anyone can view – Anyone who has the link can view the item.
Anyone can comment – Anyone who has the link can view and comment on the item.
For more information, see the User Permissions comparison table.
Link - Provides link sharing options.
Copy – Copies the link to the shared item.
QR – Opens the Scan QR code pop-up window. Download and send the code to provide a direct link to your Collaboration content.
For more information, see the Sharing page.

