Enscape
Materials
This page provides information about the materials available in Enscape.
Last updated 1 September 2026
This page provides information about the materials available in Enscape.
Overview
Enscape includes a native Material Editor that integrates with SketchUp, Revit, Rhino, Archicad, and Vectorworks PBR Materials to create visually stunning images.
Use the Material Library to import pre-built PBR materials directly into the Enscape Material Editor. This process eliminates the need to create materials in the host platforms before bringing them into the Material Editor.

Accessing the Material Editor

Use the Enscape Materials Toolbar icon () to access the Material Editor.


Enscape Toolbar for SketchUp, Rhino, Archicad, and Vectorworks

Enscape Toolbar Revit

Click the Menu button () at the top to Batch Import *.mattpkg files, or import materials from the Enscape Material Library.

Click the gear icon () at the bottom to set a location folder for your materials.

Enscape for Revit Specific
Additional Render Appearance Paths
Make sure to add your textures folder as a path under Additional render appearance paths in Revit.
Open the Revit File tab, then select Options > Rendering. Under Additional render appearance paths, use the green plus button to add a path.
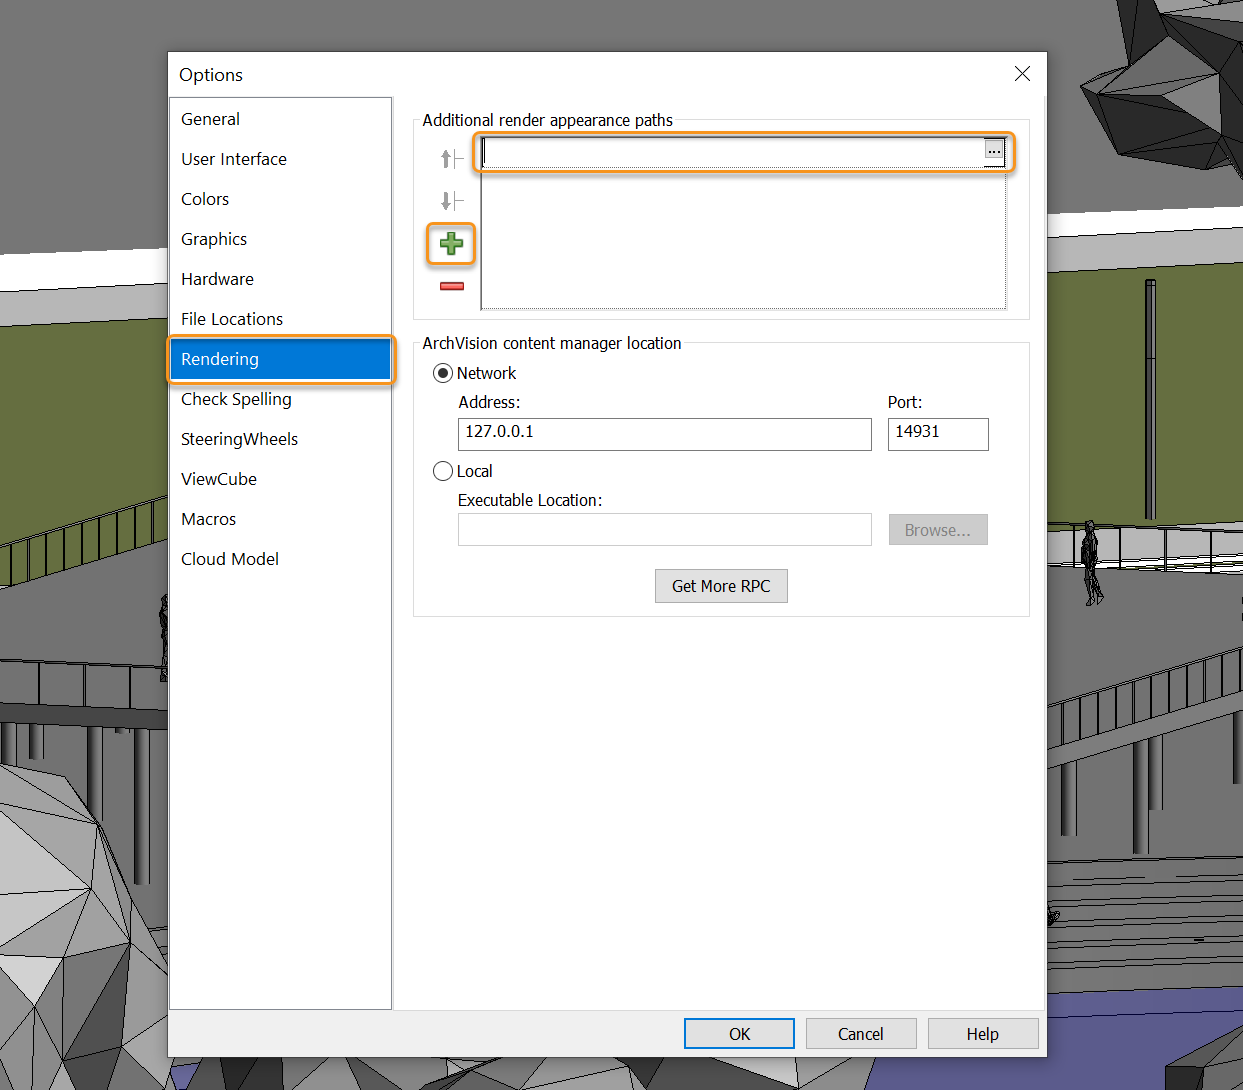
Additional render appearance paths
If the materials are not displaying properly, check if your material selection is set to Appearance.
Go to the Enscape General Settings window in Revit’s Enscape menu.
Click the Revit tab, then select Appearance from the Material Selection dropdown menu.

Material Selection as Appearance
Display Revit Graphics Overrides in Enscape
Use the Graphics Overrides in Revit to apply filters and define how objects are displayed. Set custom display settings in Revit for Enscape to visualize objects accordingly by Host View or Linked View, as well as by visibility settings such as background patterns (solid color only).
This is useful for displaying all north-facing walls in green, MEP drawings with drainage lines shown in different colors, or HVAC drawings with entry and exit systems represented in specific colors or display styles. The display properties of different objects can be controlled so that overrides apply custom settings. Refer to the documentation on the official Autodesk website for more details on setting up override rules in Revit.
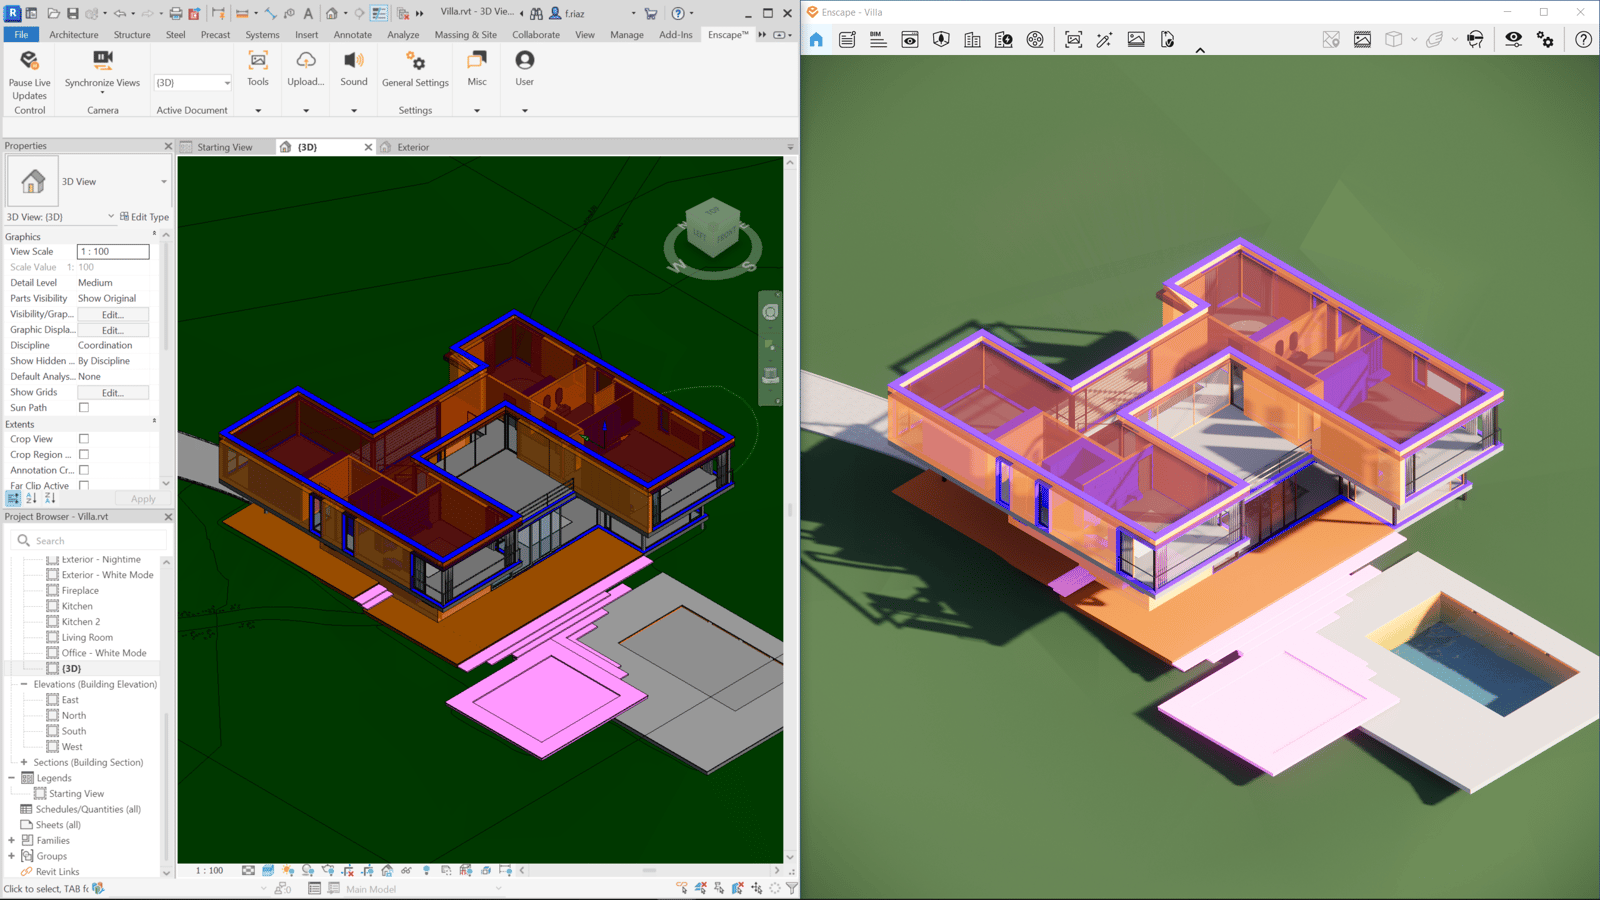
Revit Graphics Overrides in the Enscape Visualization
To make the Graphics Overrides visible in Enscape for Revit, follow the steps below:
- Go to the General Settings window in the Enscape menu inside Revit.
- Then check the Revit tab and select Display Revit Objects, Filters, and Elements.
Checking this box makes the overrides visible in the Enscape visualization, as shown.
Changing the graphic display of layers in a linked file specifies whether Revit preserves or discards the graphic overrides.

General Settings Button
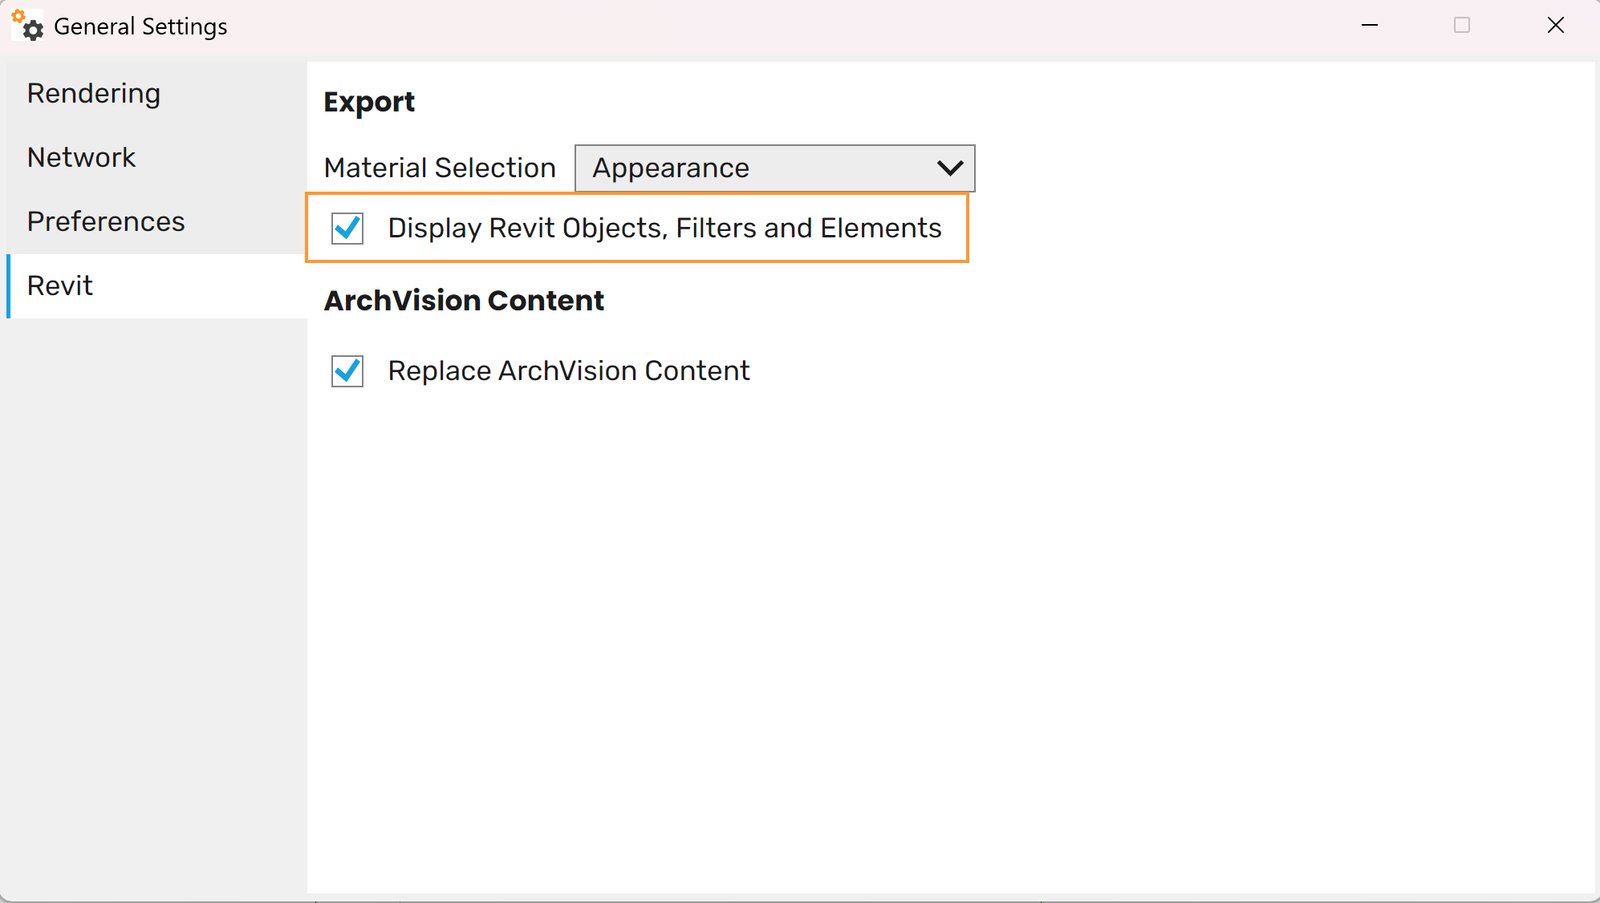
Display Revit Objects, Filters and Elements
4-2-rv-4
mp4
12 MB
Native Revit Materials Compatibility
To make a Revit Native Material appear in the Enscape Material Editor, follow the steps below:
1. Open Revit’s Material Browser and select a material.
2. Right-click on the Appearance tab and select Duplicate as Generic.
3. Click Apply in the lower right corner to save the changes.
The material now appears in the Enscape Material Editor.

Right-click on the Appearance tab and select Duplicate as Generic.

Glass material showing in the Enscape Material Editor.
Import a PBR material from Enscape
Find more information on how to import a PBR material from the Enscape Material Library to the host platform of your choice in the expandables below:
Import a PBR material from Enscape to SketchUp
Import a PBR material from Enscape to Revit
Import a PBR material from Enscape to Rhino
Import a PBR material from Enscape to Archicad
Import a PBR material from Enscape to Vectorworks
Texture Editor
Use up to four textures at a time per Enscape material. Textures control a material’s Color, Visibility, Surface Detail, and Roughness.
Click on any of the blue underlined Texture image file names or the icons in front of them to enter the Texture Editor interface.

The Texture Editor provides the following options:
Browse – Selects the image file for your texture.
Brightness – Adjusts the texture brightness.
Inverted – Inverts the colors of your image.
Explicit Texture Transformation – Adjusts the Width, Height and Rotation angle of the texture.

Texture Editor Interface
Importing and Exporting Materials
Import or export a single material as a *.matpkg file. Hover over any material listed on the left-hand side of the Material Editor until the three-dot icon appears. Click the icon to reveal the dropdown menu.
Export Material Package – Exports material as a *.matpkg file.
Import Material Package – Imports material from an existing *.matpkg file at a selected location.Ex

Hover over a material until the three-dot icon appears.

Material Dropdown Menu Options
Import multiple materials simultaneously via the Batch Import feature. Locate the Batch import option in the three-dot dropdown menu next to Materials.
Batch Import *.matpkg… – Allows the upload of several *.matpkg at once.

Batch Import *.matpkg options
Replace Existing Materials
Hover over any material listed on the left-hand side of the Material Editor until the three-dot icon appears. Click the icon to reveal the dropdown menu.
Replace with Enscape Material – Opens the Enscape material library, providing a variety of replacement materials.
Replace with AI Material – Opens the AI Materials window in the Chaos Cosmos Browser.
Select a material to use as a replacement. The selected material is previewed in place of the previous one.
Selecting a replacement material from the library enables the Replace button.
Click the Replace button to apply the selected material.
replace-material
mp4
10 MB
Replacing an existing material.
Naming Keywords
Before introducing the Material Editor, Enscape lets you set material properties using keywords that you must include in the material name. This framework is still included in the Enscape feature set and can be used freely alongside the material editor for greater comfort.
These are the keywords to include in the Material name to help Enscape display it more realistically.
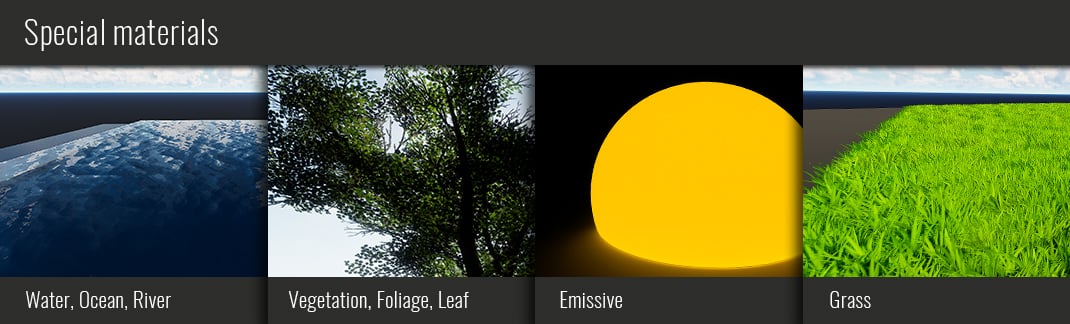
Keywords and their effects
KEYWORD | EXPLANATION |
KEYWORD | EXPLANATION |
Water, Ocean, River | Draws the material as a water surface. |
Vegetation, Foliage, Leaf | Adds translucency to thin surfaces (single face). |
Emissive | Emissive material based on the material color. |
Grass, Tall Grass, Short Grass, Wild Grass | Realistic grass material based on the underlying surface color. |
Long Carpet, Short Carpet | Carpet-like material, either long or short, that takes on the underlying color or texture file. |
Keywords and their effects
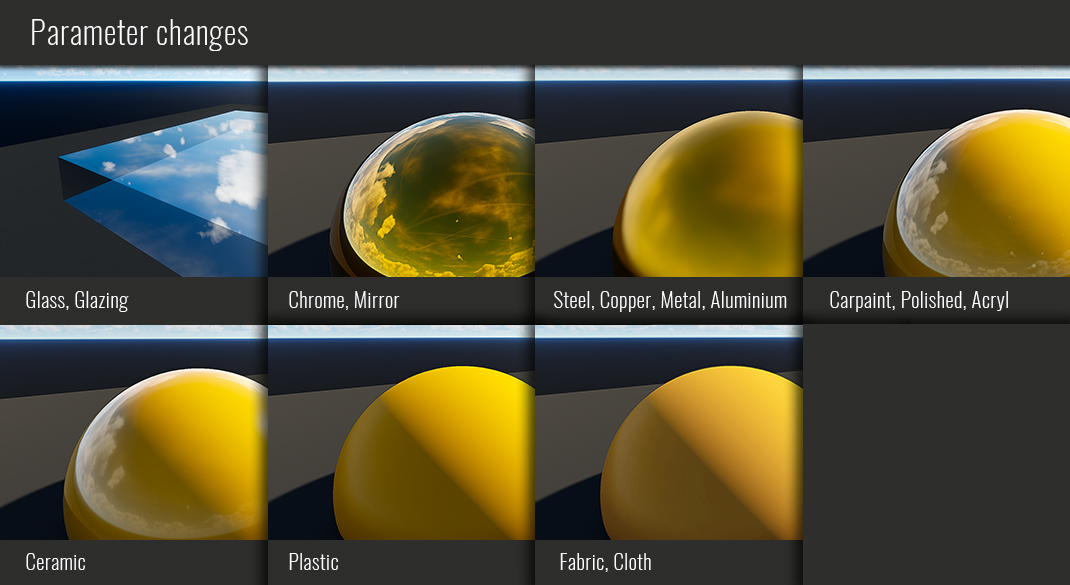
Keywords change the material parameters without changing their color. The color is still defined by the texture. The default roughness is 1.0.
KEYWORD | EXPLANATION | SPECULAR HIGHLIGHT |
KEYWORD | EXPLANATION | SPECULAR HIGHLIGHT |
Glass, Glazing | 0,0 | – |
Chrome, Mirror | 0,0 | Metal |
Steel, Copper, Metal, Aluminum | 0,3 | Metal |
Carpaint, Polished, Acryl | 0,02 | – |
Ceramic | 0,1 | – |
Marble | 0,2 | – |
Plastic | 0,5 | – |
Fabric, Cloth | 0,8 | – |