Enscape
Virtual Reality Headset
This page provides information about the Virtual Reality feature.
Last updated 1 September 2026
This page provides information about the Virtual Reality feature.
Hardware Requirements
We recommend at least an NVIDIA RTX 4070 Ti graphics card or an AMD equivalent GPU (eg., RX 7900 XT) with at least 12GB or more for a smooth VR experience with Enscape.
For less complex projects, the official requirements are enough.
- Official Meta Quest 3 hardware requirements
- Official HTC Vive Pro 2 hardware requirements
- Please ensure you have the latest available graphics driver installed. See the NVIDIA drivers for their latest versions. See the AMD graphics cards drivers for their latest versions.
Meta Quest 3
Setup using Quest Link
- Open the Oculus PC app on your Windows and log in using your Meta account.
- Turn on your headset.
- Plug your USB 3 cable into a USB 3.0 port on your PC, then plug the other end into your headset.
- Put on your headset, then press / on your right controller to pull up your universal menu.
- Open Quick settings.
- Select Quest Link.
- Select the computer that your headset is plugged into, then select Launch.
Setup using Air Link
- Open the Oculus PC app on your Windows and log in using your Meta account.
- Turn on your headset.
- Put on your headset, then press / on your right controller to pull up your universal menu.
- Open Quick settings.
- Select Quest Link.
- Select the toggle to Use Air Link.
- Your PC and headset must be on the same network.
- Connect the computer to your router with a cable.
- Select Launch to begin using Air Link.
Enable VR in Enscape
- Open the Meta/Oculus App and select Settings. In the General settings section activate the Unknown Sources option.
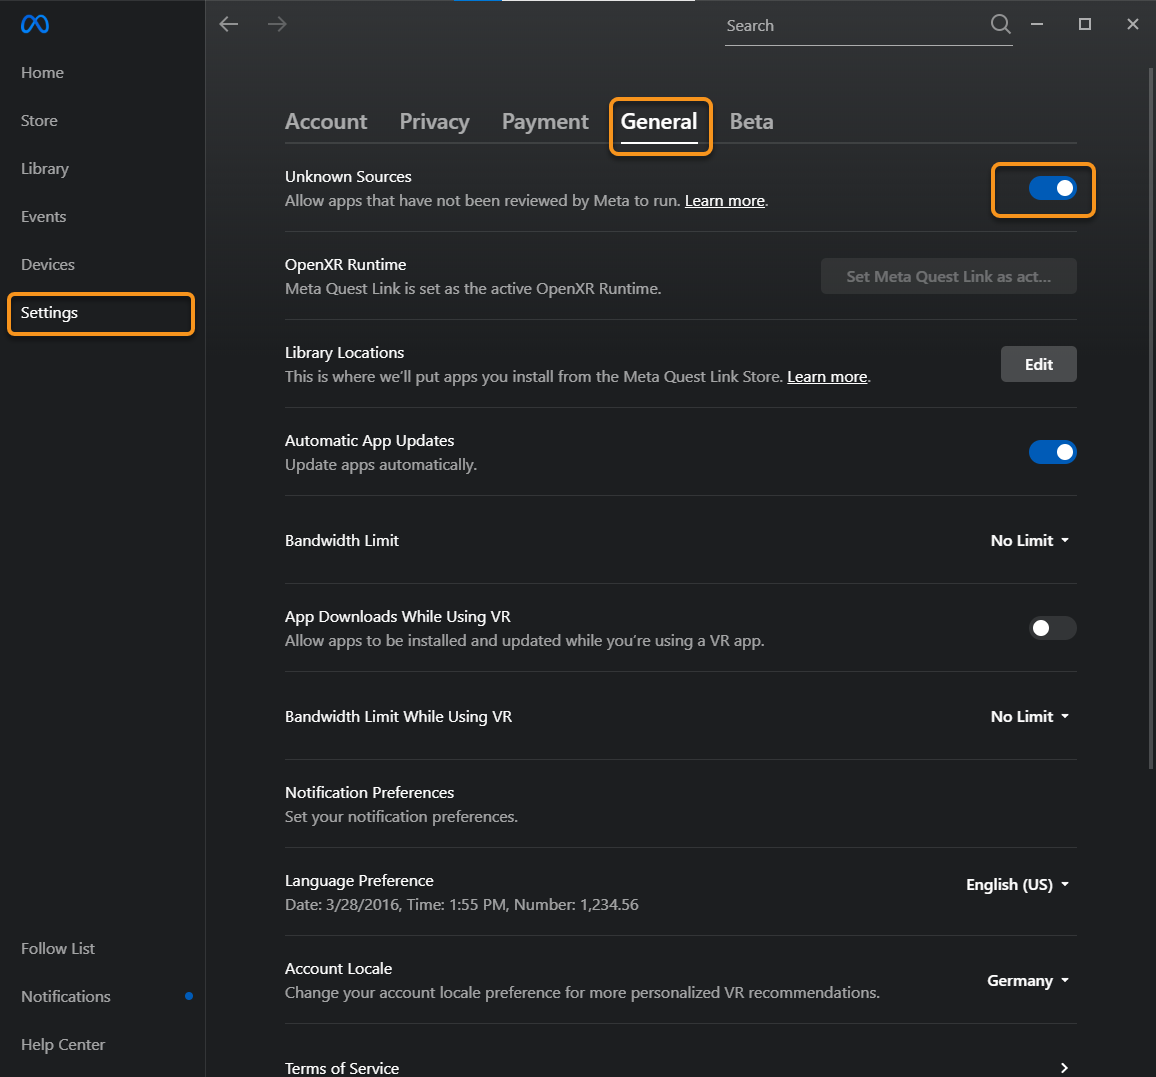
Meta Quest 3 Settings with Unknown Sources enabled.
Enable Enscape’s VR mode via the Enable VR Headset button on the Enscape ribbon.

VR mode in the Enscape ribbon
To change the resolution of a Meta VR HMD, the options can be found in the Oculus native settings window under Devices > Graphics Preferences.
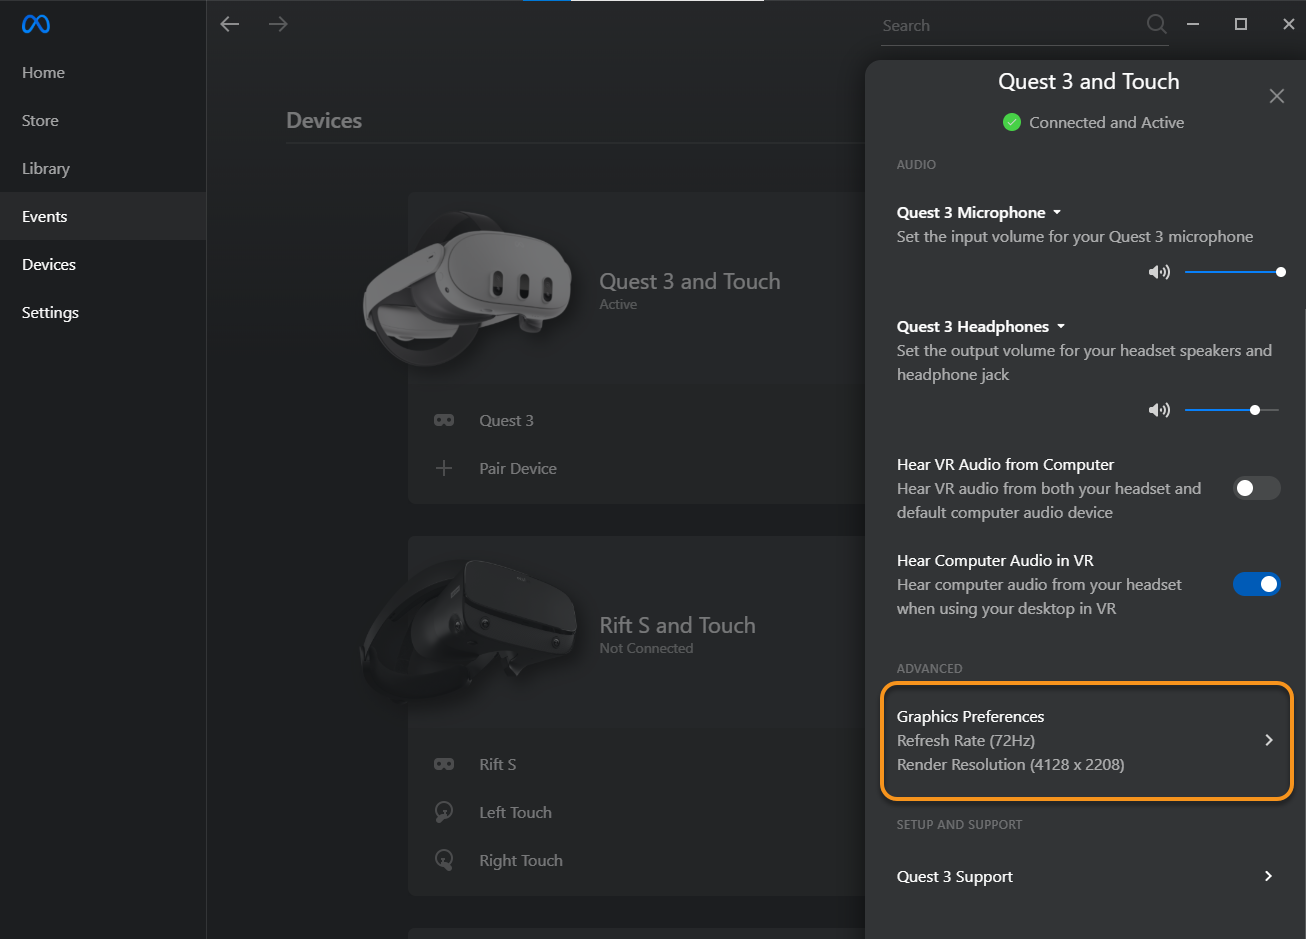
Meta Quest 3 Resolution Settings
Movement & Controls
- When activating a view or starting Enscape, you are placed on the next valid position on the floor.
- You can explore your surroundings freely by moving around using the left-hand controller.
- The right-hand controller allows you to navigate vertically.
- The time of the day may be manipulated using both controllers.
- Teleportation functionality is described here.

Meta Quest 3 Touch Controllers
Best Practice
- If you’re experiencing stuttering in VR even though your hardware meets the mentioned requirements, you might want to reduce Enscape’s Rendering Quality in the Enscape settings window. Quality level Ultra is not recommended for VR unless you’re running on a NVIDIA RTX 4070 Ti or better.
- If you have two graphics cards installed make sure either one of them is disabled prior Oculus usage or ensure that Oculus and Enscape are executed on the same graphics card.
HTC Vive Pro 2
Setup
- In order to run Enscape with the HTC Vive Pro 2, you’re required to have Steam, including SteamVR, installed and running. All required software will be installed by the official Vive Setup.
- Once installed, SteamVR will guide you through all the setup steps needed to prepare your room scale VR experience (Run Room Setup).
- When SteamVR signals everything is green and ready to go, you can go ahead and enable Enscape’s VR mode via the Enable VR Headset button in the Enscape ribbon.

SteamVR indicates the headset and controllers are ready, enable VR mode in the Enscape ribbon
Movement & Controls
- When activating a view or starting Enscape you will be placed on the next valid position on the floor if possible.
- You’re then able to explore your surroundings freely by simply moving around using the left-hand controller.
- The right-hand controller allows you to navigate vertically.
- The time of the day may be manipulated using both controllers.
- For information on the Teleport functionality, see the Teleportation section.
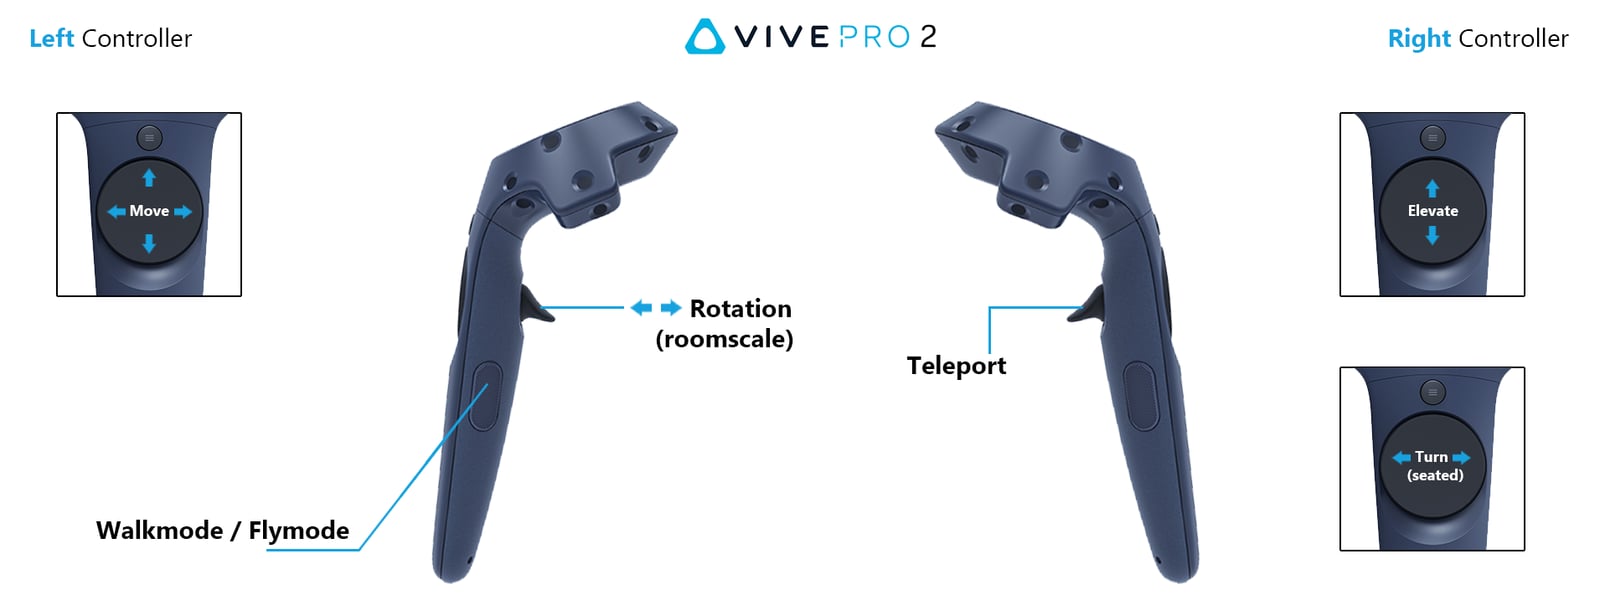
HTC Vive Pro 2 Controllers
Best Practice
If your system does not meet the recommended requirements, we advise lowering the rendering quality to medium or even draft.
If the VR is distorted, and you are using a high-end graphics card, this may be due to SteamVR setting the resolution to 100%, which forces super-sampling. This needs to be changed to 50%. To adjust this:
- Start your CAD.
- Start Enscape.
- Start VR in Enscape.
- Open Steam VR.
- Open the SteamVR Settings window.

Open SteamVR Settings
In the dialog, select the Video option, and click on Per-Application Video Settings.

Per-Application Video Settings
In the Manage Video Settings window, set the Custom Resolution Multiplier to 50% or lower. Anything lower than 50% may increase performance, and the image quality may decrease. This is expected.

SteamVR Video Custom Resolution Multiplier slider
Other Headsets
Other headsets, such as the Quest 2, Quest Pro, or any Windows Mixed Reality Headset, are NOT officially supported. However, users have reported using them via a Link Cable, or Oculus Air Link. However, we do NOT officially support these headsets.
Preventing Nausea
Usually, cybersickness is not a common problem. However, it depends on the individual and their experience within Virtual Reality.
Some of the most common symptoms of Cybersickness include such things as general discomfort, headaches, a feeling of movement within the stomach, generally feeling odd, nausea, disorientation, and dizziness. Certain things can make you prone to Cybersickness, and these include: age, gender, and general fitness, stability of the posture, a low visual refresh rate, spacial awareness, and sensitivity to motion.
The intensity of the symptoms of Cybersickness can be intensified by things such as visual refresh rate, position of the user, motion mismatch, field of view, motion parallax, and viewing angle.
However, there are some things you can do to reduce the effects of Cybersickness:
- When entering VR for the first time, the person wearing the glasses should trigger the navigation with a hand controller, not someone else.
- Enter VR from a ground plane.
- Try to limit the use of flying and elevation modes; walk physically to a destination, or teleport when possible.
- Always allow the user time to get comfortable with the glasses before handing out the controller. New Virtual Reality users can be easily overwhelmed.
- Chew gum.
- Wear an anti-sea-sickness wrist band.
- Limit your exposure to VR.
- Use peripheral-limiting VR Goggles or Glasses.
- Wear the ReliefBand, a medically proven motion sickness treatment device.
- Practice good hydration.
Interaction
To interact in the Enscape VR world, Enscape provides you with a Menu Ribbon, that is always visible, above the left-hand controller in VR.

The Enscape Menu ribbon in VR
When any of these symbols are selected in VR, an associated panel slides out of the top of this strip. The selected menu option is indicated with an orange bar. When the left-hand controller is not in focus, after a short period of time, the menu panel slides back down into the Menu Strip and disappears.
Teleportation
The Teleportation functionality uses two distinct stages in its operation:
- Holding the trigger (but not pressing the trigger fully down) – Displays the Teleportation Target Indicator.
- Pressing the trigger down completely – Executes the Teleportation, if the location is available.

Teleportation Target Indicator (showing a destination that is available to teleport)
The Teleportation Target Indicator is able to penetrate doors and windows (curtain wall windows are not supported yet). You can easily reach the areas behind them.
If the pointer turns red with an X symbol when holding down the trigger and pointing at a location, this indicates that the destination is not available to teleport.

Teleportation Target Indicator (showing a destination that is not available to teleport)
Navigation
The Navigation panel contains five possible options.
- Roomscale – Sets the VR mode to operate within your VR Boundary settings, along with using your actual real world height as the spectator height in VR.
- Seated – Assumes a certain spectator height (defined in the settings) when in Walkmode.
- Walkmode – The position is bound to the ground plane, whilst also colliding with geometry.
- Flymode – Allows you to freely move around without being bound to the ground plane.
- Recenter Tracking – Recenters your tracking origin to your current position within the ‘play area’.

The Navigation Panel
To further clarify the functionality of the Recenter Tracking option, consider the following use cases:
- You’re in Seated mode in VR, but in Real World (RW) you’re standing up, and the VR tracking center has been calibrated for a seated position (this is initially defined during VR Setup). This results in your virtual self being too tall (due to the offset between your standing height and the calibrated seated position). Press Recenter Tracking to rectify the discrepancy. This corrects the virtual height and matching the defined spectator’s height.
- In Roomscale VR Recenter Tracking is only relevant in Walkmode. This is because collision is based on the calibrated center. If you move several steps sideways in RW, and then try to move through a door using the controller in Walkmode, your collision will be off. Recenter Tracking fixes this.
Presentation Mode
Any views that have been created and have been marked as a Favorite become available under the Presentation Mode menu in VR.

Mark as Favorite Views in Enscape
In VR mode, select the Presentation Mode symbol, and the Presentation Mode panel appears. This is a carousel menu containing thumbnails of all the Views highlighted in the View/Manage Views menus. Use the right-hand controller’s trigger to scroll through and to select the thumbnail of the View you want to display. Once selected, you are instantly teleported to that saved View location, whilst the Time of Day, associated with the View, is also updated.

Presentation Mode
Mini Map
On selecting the Map symbol from the VR Menu, a Mini-map is displayed. This is a top elevation map using True North as its orientation, which allows you to quickly select a location to instantly transport you within your project.

The Minimap panel in VR.
Virtual Camera
The Virtual Camera settings panel allows you to capture an image of the screen in VR. There are two types of screen capture:
- Screen Capture
- Render Image
Screen Capture
With Screen Capture you can capture exactly what you are seeing in the VR window. When you are happy with the position you are in, press the right trigger on your control module to capture exactly what you are seeing in VR. However, the quality is not the same as an actual rendering.

The Virtual Camera settings panel showing Screen Capture
Render Image
The Render Image function allows you to capture high-quality images.The framing of the screenshot, the resolution, and the aspect ratio can be adjusted in the Enscape Visual Settings Output tab.

Enscape Settings Output tab, where the capture resolution can be set for the Render to be taken
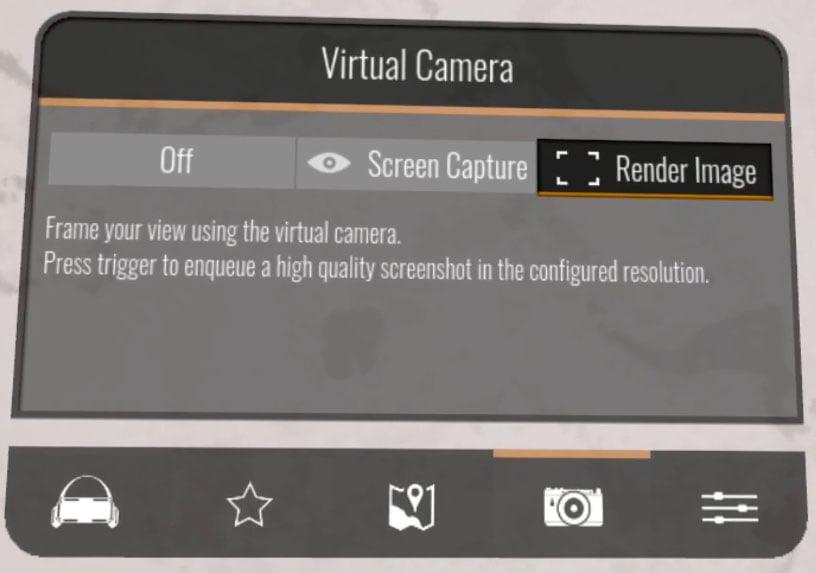
The Virtual Camera settings panel showing Render Image method.
You can then frame your view by moving the virtual camera.
A Preview window shows you the area you are going to capture as a lower-resolution, grayscale image.
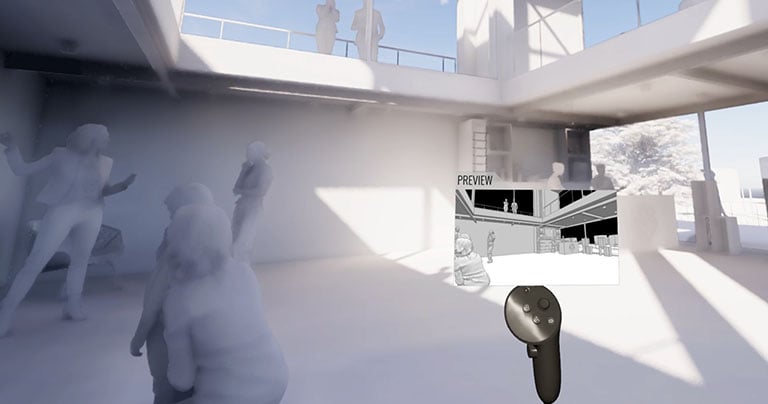
Render Image method showing the Preview window
You can render as many images as you want without leaving VR. The preview quality is not the same quality as the final rendering. The final renderings are generated when VR is disabled.
Settings
Opening the settings screen allows you to change three aspects:
- White Mode – Everything, apart from transparent materials is turned white. For more information on White Mode, see the Rendering Styles page.
- Outlines – Displays geometry with outlines; the thickness can be adjusted in both Normal and White Mode.
- Time of Day – Adjust to set the time of day you require.

White Mode is enabled

Outlines are set thick with the slider