V-Ray for Blender
Layers
This page describes the Layers panel available in the V-Ray Frame Buffer for Blender.
Last updated 11 December 2025
This page describes the Layers panel available in the V-Ray Frame Buffer for Blender.
Overview
The Layers panel in the V-Ray Frame Buffer provides a new, powerful workflow for adjusting your rendered image. You can bring out render channels and compose them with individual color corrections in the panel's Composite mode or deconstruct light contribution in the scene and fine-tune each light individually in the completed render using the LightMix mode. You can also color-correct the final render, just like you were able to do in the previous version of VFB.
UI Path: ||V-Ray Frame Buffer|| > Layers
Layers Menu
Commands available for the Layers panel are located at the top of the panel. Click on the icons to see the expanded list of commands for the stacked buttons.


Creates a layer. Multiple layers of the same type can be added. Folder - Allows grouping multiple layers in folders. This is only available when the Source layer is set to Composite; |
Creates a layer. Multiple layers of the same type can be added. Folder - Allows grouping multiple layers in folders. This is only available when the Source layer is set to Composite; | |
Deletes the selected layer(s). | |
Saves a layer tree preset. | |
Loads a layer tree preset. | |
Quick access to custom layer presets. You must set the path to it in the VFB Settings. | |
Undo create layer. | |
Redo create layer. |
Command | Description |
|---|
Command | Description |
|---|---|
Reset | Resets all changes done to the selected layer. |
Save | Saves the layer as a preset. |
Load | Loads a preset for the selected layer. |
Delete | Deletes the selected layer. |
Save all CCs as LUT | Bakes all the color corrections to a LUT file. |
New Layer | Creates a new layer. |
Duplicate | Duplicates the selected layer. |
Blend Modes | Specifies how the selected layer blends with the result from all layers below it. |
The Display Correction, Lens Effects, Denoiser, and Source layers are listed in the Layers panel by default to any rendered image. Their order cannot be changed.

Layers can be disabled from the visibility icon (), reordered, nested, stacked in folders, etc.

Layers can me masked using the masking icon (). See the Masks page for more.
Corrections are applied from the bottom to the top, except for nested layers, which are executed after their parent.
Blending
Layers are applied from the bottom to the top, where the bottom is the background (BG), and the top is the foreground (FG) of the composite.
Blending – Specifies how the layer blends with the result from all layers below it.
When adding a new layer, it is placed on top of the stack and it is considered the foreground (FG).
The result of all layers below it is considered the background (BG). Layers are applied from the bottom to the top.
Where darker and lighter pixels are mentioned, it is in relation to mid-grey.

Blend Modes* | Description |
|---|
Blend Modes* | Description |
|---|---|
Overwrite | Displays the current layer (FG) on top of all layers (BG) without blending. This is the default. |
Average | The average of the current layer (FG) and the result from the layers below it (BG). |
Add | Adds the FG to the BG. |
Subtract | Subtracts the FG from the BG. |
Darken | Compares the FG to the BG and takes the darker pixel values of the two. |
Multiply | Multiplies the FG by the BG. |
Color Burn | The color of the FG is applied to darker pixels in the BG. |
Linear Burn | Same as Color Burn but with less contrast. |
Lighten | Compares the FG to the BG and takes the lighter of the two. |
Screen | Makes both light and dark areas lighter. |
Pin Light | Replaces the BG colors depending on the brightness of the FG color. |
Difference | Compares the pixels in the BG and FG and subtracts the darker pixels from the brighter ones. |
Exclusion | Same as Difference but with less contrast. |
Hue | Uses the hue from the FG , while the value and saturation are taken from the BG. |
Saturation | Uses the saturation from the FG, while the value and hue are taken from the BG. |
Color | Uses the hue and saturation from the FG, while the value is taken from the BG. |
Value | Uses the value from the FG, while the hue and saturation are taken from the BG. |
Hard Mix (8bit) | Adds the FG to the BG and for each color component returns a value of 255, if the result is 255 or greater; or returns 0, if the result is less than 255. |
Color Dodge (8bit) | The color of the FG is applied to lighter pixels in the BG. |
Linear Dodge (8bit) | Same as Color Dodge but with less contrast. |
Spotlight (8bit) | Same as Multiply, but with twice the brightness. |
Spotlight Blend (8bit) | Same as Spotlight, but additionally brightens the BG. |
Overlay (8bit) | Darker pixels become darker where the BG is dark, and brighter pixels become brighter where the BG is bright. |
Soft Light (8bit) | Darker pixels become darker where the FG is dark, and brighter pixels become brighter where the FG is bright. |
Hard Light (8bit) | Spotlight is applied to pixels where the FG is dark, and Screen is applied to pixels where the FG is bright. |
* All 8-bit blend modes clamp colors to a maximum value of 1.0.
Display Correction
The Display Correction layer specifies the color space, in which the image is displayed. You can choose between sRGB, Gamma 2.2, OCIO and ICC or select None to return to a linear display.
The ICC correction allows you to apply an ICC profile to the image, so that (for example) it matches the appearance of the image in Adobe Photoshop. This is a display correction that is only applied when the image is viewed in the frame buffer. It is not applied when the image is saved to a file.
The OCIO correction allows you to apply color corrections from an .ocio color profile to image colors. When this correction is enabled and no specific .ocio profile is specified, it attempts to read the OCIO environment variable and apply the profile specified in it.

Normally you would specify the ICC file for your calibrated monitor here. Programs like Photoshop display images using your (primary) monitor's ICC profile automatically. However (at least for the moment), Blender is not a color-managed application and you must manually load the monitor ICC profile into the V-Ray Frame Buffer in order to match the appearance of your images in Photoshop.
OpenColor (OCIO)
Input color space – Specifies the input color space for the image; normally this is a linear color space as V-Ray internally works in that space.
Display Device – Specifies the device on which the VFB with the image is displayed.
View Transform – Specifies the viewing transformation.
Save in image – Saves/bakes the OCIO effect along with the image. This does not affect multi-channel images (such as multi-channel .exr).

Source
The Source layer determines the input of the layers stack. It specifies if you work on your rendered image, composite or light mix.
RGB - The rendered image is the source.
LightMix - This mode allows you to adjust the intensity and color of your lights during and after the render. Changes can be transferred back to the lights in the scene. To use LightMix, add a VRayLightMix render element before rendering.
Composite - You can add Render element layers in this mode and start compositing your image from the render elements rendered with it. For example, you can do a simple Back to Beauty compositing of your image in this mode.

LightMix Mode
When the Source is set to LightMix, you can enable/disable lights and adjust light intensity and color during and after the render. The modifications can be saved as light mix presets and reused. VRayLightMix automatically creates Environment and Self Illumination render elements. See the Light Mix page for more information and examples.
Reset – Resets all changes made to default values.
Save – Saves the changes as a light mix preset.
Load – Loads a light mix preset.
To Composite – Sends the Light Selects from LightMix to Composite for additional post adjustments.

Recent – Shows a list of recent light mix presets.

Checkbox – Enables/Disables the selected light.

Multiplier – Specifies an intensity multiplier.

Color Slot – Specifies a color for the selected light.

Lens Effects
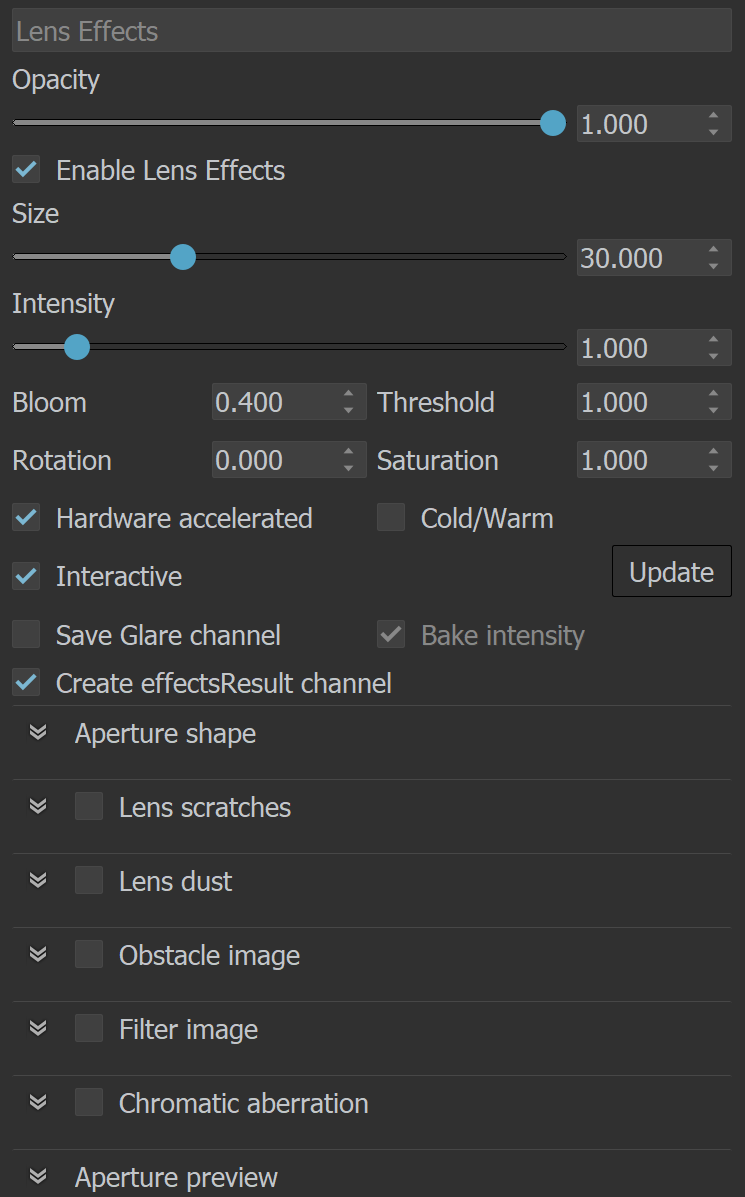
The Lens Effects layer simulates real-world camera lens effects such as bloom and glare. The plug-in uses a fast multi-threaded technique to compute the result and provide immediate updates in the VFB. V-Ray Lens Effects are applied in the effectsResult channel together with other post effects executed over the RGB-rendered image.
Sharpen/Blur
This layer helps you compute sharpening or blurring post-effects to your image.
Opacity – Controls the weight of the layer. A value of 0 means no effect and a value of 1.0 means full effect.
Calculate Sharpen/Blur – Enables computation on the sharpen/blur post effect and automatically sets it visible when computed.
Sharpen amount – Applies sharpening to the image. Increasing the amount leads to a sharper image, while setting the amount to 0 switches off this filter.
Sharpen radius – Determines the radius in pixels used for sharpening. Higher values lead to more extensive sharpening.
Blur radius – Determines the radius in pixels used for blurring. Higher values lead to a greater blurring effect.

Denoiser
This layer allows you to control the V-Ray Denoiser from inside the VFB. This layer is available only if the V-Ray Denoiser is enabled. Enable it from the View Layer tab.
Opacity – Controls the weight of the layer. A value of 0 means no effect, and a value of 1.0 means full effect.
Calculate denoiser – Enables/disables the denoiser calculation. This can be useful sometimes while adjusting your render. Disabling the denoiser layer visibility instead still calculates the denoiser in the background.
Update – Updates the Denoiser layer manually and also initiates a Lens Effects update.
Preset – Offers presets to automatically set Strength and Radius values.
Default – Applies mid-level denoising.
Mild – Applies a more subtle level of denoising than the Default preset.
Strong – Applies a stronger level of denoising than the Default preset.
Custom – Allows the Strength and Radius parameters to be set to custom values.
Hardware accelerated – Uses the GPU device(s) to accelerate the denoising calculations. In case there is no compatible GPU device, denoising automatically falls back to use the CPU, even if the option is enabled. When the NVIDIA AI denoiser is used, this option is not available, as it requires an NVIDIA GPU.

Background
This section allows you to load an image and use it as a background for your render.
Opacity – Determines the opacity of the layer.
Color – When enabled, sets a color value as the background.
Image – When enabled, loads a file that is going to be used as a background.
Stretch – Control the aspect ratio of the image by stretching the image to fit the VFB.
Fit – Keeps the aspect ratio of the image. Enlarges or shrinks the VFB to fit the image.
Fill – Keeps the aspect ratio of the image and cuts some parts of the picture to fill the VFB.
Horizontal Offset – Controls the background image position by the X axis.
Vertical offset – Controls the background image position by the Y axis.
As foreground – When enabled, the image loaded in the Image field is used as a foreground. This means that the image is on top of the render and you are able to see the render only if the image has an alpha channel.
Save in image – When enabled, saves the Background layer to the image.
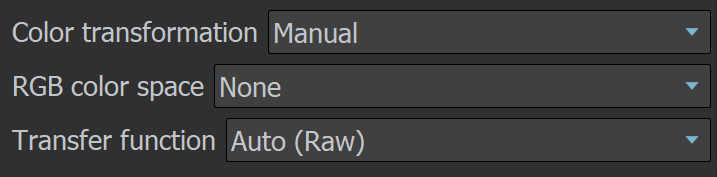
Color transformation – This dropdown allows display corrections to be applied to the Background layer independently.
Auto (cs: None/tf: Raw) – Recognizes what the desired transformation would be based on the image suffix (_srgb, _lin_srgb, _acescg...) and sets those settings automatically.
Manual – Allows manual setup of the color transformation options. The options can be left at Auto and be determined automatically by V-Ray. The options can be set to None and apply no transformations.
RGB color space – Choose which color space to use for the color transformations. sRGB is the color space for most monitors and computer displays. ACEScg allows for greater range of color transformations in post. It has a wider gamut of colors than the sRGB linear gamut.
Transfer function – Alters the pixel values to a new range. Gamma 2.2 is the standard for most monitors.
OCIO – Allows an Input color space to be selected when an OCIO profile is already loaded. OCIO profiles can be loaded either through the Display Correction layer.
Input color space – Determines the input color space for the background image; normally, this is a linear color space as V-Ray internally works in that space.


Constant
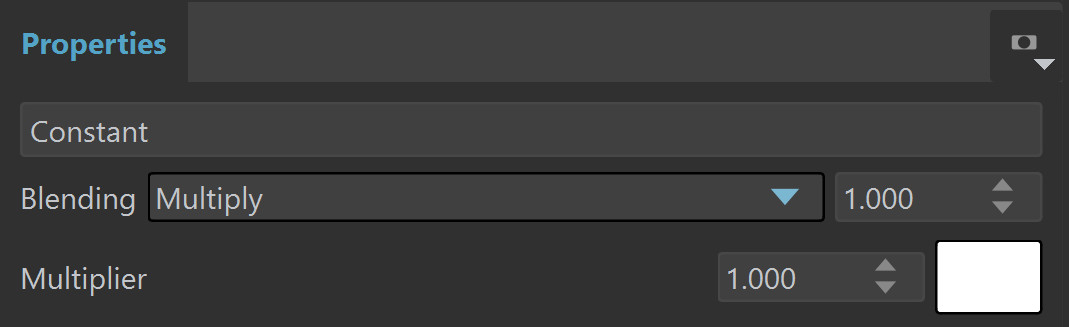
This color correction applies a solid color that can be used as a constant to achieve an effect on another layer. For example, it can be multiplied by another layer.
Exposure
This color correction applies exposure and contrast to the image. An Exposure value of 0.0 leaves the original image brightness, +1.0 makes it twice as bright, and -1.0 makes it twice as dark.
Highlight Burn selectively applies exposure corrections to highlights in the image.
Positive Contrast values push the colors away from the medium gray value to increase image contrast, while negative values push the colors closer to medium grey.
Increasing Whites and Blacks increases the brightness in the whitest and darkest areas of the render and vice versa.
Highlights and Shadows allow you to tweak the brightness of the highlights and the shadows in the scene (the second most brightest and darkest areas of the render.
When Show clip warning is enabled, areas in the render with too bright or too dark pixels are highlighted. Areas that are too dark are highlighted in blue and areas that are too bright are highlighted in red. These highlights are only for preview purposes and they are not included when exporting the render.

White Balance
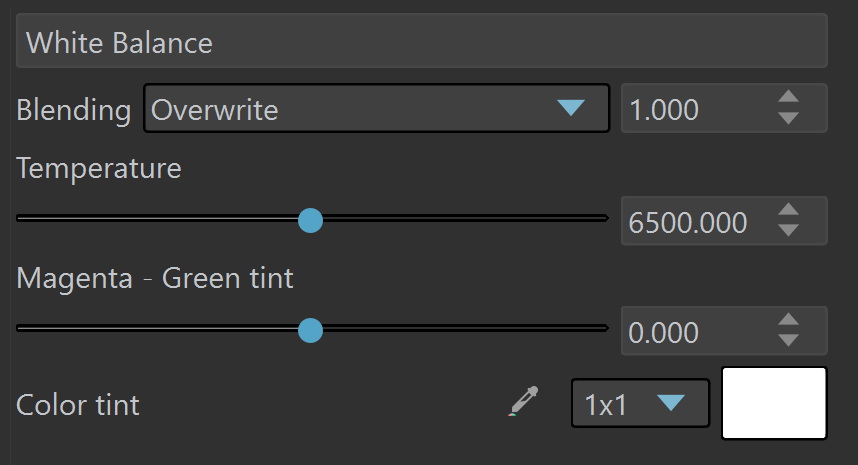
The White Balance (Temperature) slider corrects the colors in the image so that objects that are white appear as pure white (and not tinted blue, yellow, red, etc.) in the final image.
Temperature - Adjusts the white balance of the image by specifying the color temperature in Kelvin. Lower values make the image bluer, higher ones make it more amber.
Magenta - Green tint – Adjusts the white balance of the image to make it greener (positive values) or more purple (negative values).
Color tint – Picks or chooses a color to be the new "white point" for the image, adjusting all colors. Use it to pick a neutral color from the image (e.g. one that should be white or gray).

Render view color picker – Picks a color from the render window. Left-click to choose a new "white point" or a tint to neutralize. Right-click to pick a tint to boost.
Color Balance
This correction applies HSL transformation on the image colors. Moving the Hue slider changes the overall hue of the image colors (grey colors remain intact). Lower Saturation values move the image towards greyscale while higher values increase the colors' intensities. Higher Lightness values add white to the image, whereas lower values subtract white from the image.

Curves
This correction allows you remap the image colors with a Bezier curve. The control also allows you to save and load .acv curve files from Adobe Photoshop.
Controlling the View
Use the mouse wheel to zoom in and out of the curve view. Drag with the middle mouse button to pan.
Controlling the Bezier Points
Click on a point to select it. Draw a rectangle to select multiple points at once. Click and drag on a selected point or its tangents to move them. To add a new point, Ctrl+click on the curve. To delete points, select them and press Del, or alternatively, Shift+click on a point. Once a point is selected, you can also use the input coordinates field to modify its position. To display the input coordinates field, either press Enter or right-click on the point and then select Edit point.
Right-click on a point to bring up a context menu with additional options for that point.

Vignette
This layer adds a vignetting effect to the image. Its settings can be controlled through the layer's parameters or directly from the overlay handles visible in the VFB.
Preview as mask – Opens the vignette mask for the vignette effect, so you can preview it.
Size – Determines how much of the image's edge is affected. The size is relative to the image resolution.
Feather – Controls how defined is the edge of the vignette. Smaller values make the transition sharp, while larger values make the transition effect soft.
Rotation – Rotates the vignette effect. Increasing this value rotates the effect counterclockwise.
Inverted – Inverts the vignette effect.
Smoothness – Controls how smooth the outer edge of the Feather effect is.
Aspect ratio – This option is available when Match image aspect option is disabled. It allows for manual control over the aspect ratio.
Match image aspect – This option is enabled by default. It matches the currently loaded image aspect ratio.
Horizontal center offset – Offsets the center of the vignette effect horizontally.
Vertical center offset – Offsets the center of the vignette effect vertically.
Color – Sets a color for the vignette effect.
Show handles – Controls the preview of the overlay handles.
Never – The handles are not displayed.
Auto – Displays the handles only upon image hover.
Always – Displays the handles at all times.

Lookup Table
This correction allows you to remap the image colors based on an IRIDAS .cube LUT (Look-Up Table) file.
Convert to Log Space first – Converts the Base map to a logarithmic color space before applying the look-up table.
Convert to sRGB Space first – Converts the Base map to an sRGB color space before applying the look-up table.
Save in image – Saves/bakes the LUT effect along with the image. This does not affect multi-channel images (such as multi-channel .exr).

Filmic Tonemap
This correction allows you to control different types of mapping curves, make gamma correction and select a color space. Note that color values are mapped per channel.
Tone mapping space – Specifies the color space where the operator is applied. Converts the image to the selected space and back, if needed. You can choose between Linear sRGB and ACEScg.
Type – Specifies the type of curves used for the tone mapping. You can choose between Linear, Hejl-Dawson, AMPAS (ACEScg), Hable, and Power Curve.
Log space – Converts the image to log space before applying the tone mapping.
Gamma – Specifies the gamma correction. It is applied before the operator.
Use blue fix – Applies an additional transformation to ACEScg primitives that results in pure blues burning out through cyan instead of magenta. Available when Tone mapping is ACEScg.
AMPAS (ACEScg)
AMPAS mode applies an approximate ACES standard curve.
Hejl-Dawson Type
Shadows – Shadow compression. Higher values darken the shadows, while also brightening the mid tones.
Highlights – Highlight compression. Higher values reduce burnout.
Hable Type
Shoulder strength – Determines how sharp the shoulder is. Higher values sharpen the shoulder, which results in an overall brighter image.
Linear strength – Determines the strength of the effect from changing Linear angle.
Linear angle – Determines the angle of the curve at the base. Higher values increase the angle.
Toe strength – Low to mid tone compression. Higher values darken the low and mid tones.
White point – The intensity, which gets mapped to 1. This parameter scales the whole curve evenly.
Power Curve Type
Toe length – Determines the range of low to mid tones that are compressed.
Toe strength – Low to mid tone compression. Higher values darken the low and mid tones.
Contrast – Higher values increase the contrast between low and high tones.
Shoulder length – Determines the range of mid to high tones that are compressed.
Shoulder strength – Mid to high tone compression. Higher values darken the mid and high tones.
White point – The intensity, which gets mapped to 1. This parameter scales the whole curve evenly.

ICC Profile
ICC file – Specifies the full path to the ICC file.
Profile cached – When loading an ICC file, this checkbox indicates whether the file is smaller or bigger than a given threshold of 64k. If the file is smaller than 64k, the checkbox is enabled to indicate that the ICC file is directly embedded in the scene. If the loaded file is bigger than 64k, the checkbox is inactive, which indicates that you have to set the correct path to load it.
Rendering Intent – Specifies an ICC color replacement scheme. You can choose from Perpetual, Relative colorimetric, Absolute colorimetric, and Saturation.
Black point compensation – Enables black point compensation. This is a method of creating adjustments between the maximum black levels of digital files and the black capabilities of various digital devices.

Proportion Guide
The Proportion Guide layer allows for a number of composition guides to be overlaid on the image. The available guides are Rule of Thirds, Diagonals, Golden Ratio, Center Cross, and Custom Grid.
Rule of Thirds – Overlays the Rule of Thirds guidelines.
Diagonals – Overlays diagonal guidelines.
Golden Ratio – Overlays the Golden Ratio guidelines
Center Cross – Overlays a center cross guideline.
Custom Grid – Overlays custom grid guidelines. You can specify up to 10 columns and rows of the grid.
For all the guides there is a Line Width option, which can be controlled via a slider or spinners, as well as a Color Swatch to control the color of the lines.
For the Custom Grid Rows guides, there are Rows and Columns options to control the rows/columns of the grid.

Filmic Tonemap
This correction allows you to control different types of mapping curves, make gamma correction and select a color space. Note that color values are mapped per channel.
Tone mapping space – Specifies the color space where the operator is applied. Converts the image to the selected space and back, if needed. You can choose between Linear, sRGB and ACEScg.
Type – Specifies the type of curves used for the tone mapping. You can choose between Linear, Hejl-Dawson, AMPAS (ACEScg), Hable, and Power Curve.
Log space – Converts the image to log space before applying the tone mapping.
Gamma – Specifies the gamma correction. It is applied before the operator.
AMPAS (ACEScg)
AMPAS mode applies an approximate ACES standard curve.
Hejl-Dawson Type
Shadows – Shadow compression. Higher values darken the shadows, while also brightening the mid tones.
Highlights – Highlight compression. Higher values reduce burnout.
Hable
Shoulder strength – Determines how sharp the shoulder is. Higher values sharpen the shoulder, which results in an overall brighter image.
Linear strength – Determines the strength of the effect from changing Linear angle.
Linear angle – Determines the angle of the curve at the base. Higher values increase the angle.
Toe strength – Low to mid tone compression. Higher values darken the low and mid tones.
White point – The intensity, which gets mapped to 1. This parameter scales the whole curve evenly.
Power Curve
Toe length – Determines the range of low to mid tones that are compressed.
Toe strength – Low to mid tone compression. Higher values darken the low and mid tones.
Contrast – Higher values increase the contrast between low and high tones.
Shoulder length – Determines the range of mid to high tones that are compressed.
Shoulder strength – Mid to high tone compression. Higher values darken the mid and high tones.
White point – The intensity, which gets mapped to 1. This parameter scales the whole curve evenly.

Notes
- Color corrections in Linear sRGB mode are applied to all Beauty render elements and some Utility render elements. They are not applied to render elements that present masks or hold geometry or computational data for the rendered frame.