Configure Corporate Sign In for Chaos services with PingFederate.
Overview
Connect your PingFederate identity provider to Chaos so your employees can use Corporate Sign In.
Before you start, contact Chaos to request Corporate Sign In.
Chaos to PingFederate communication
Chaos communicates with PingFederate over TLS. PingFederate must present a trusted SSL certificate for the connection to work.
PingFederate configuration
Before you start, install PingFederate and enable Outbound Provisioning. This setup has been verified with PingFederate version 10.
Install Ping's official SCIM Connector. PingFederate only supports SCIM version 1.1, which is incompatible with SCIM version 2.0 used by Chaos. The connector adds SCIM version 2 support to PingFederate Outbound Provisioning.
For help, see PingFederate's installation and configuration documentation.
Configure OpenID-Connect policy
Configure the policy so the returned OAuth tokens contain the required claims with information from the correct LDAP attributes.
In the PingFederate administrative UI, go to Applications > OAuth > OpenID Connect Policy Management and click Add Policy.
Policy ID | A unique identifier for the policy |
Policy ID | A unique identifier for the policy |
Name | A unique, recognisable name for this policy |
Access Token Manager | JSON Web Tokens |
INCLUDE USER INFO IN ID TOKEN | Checked |
Click Next.
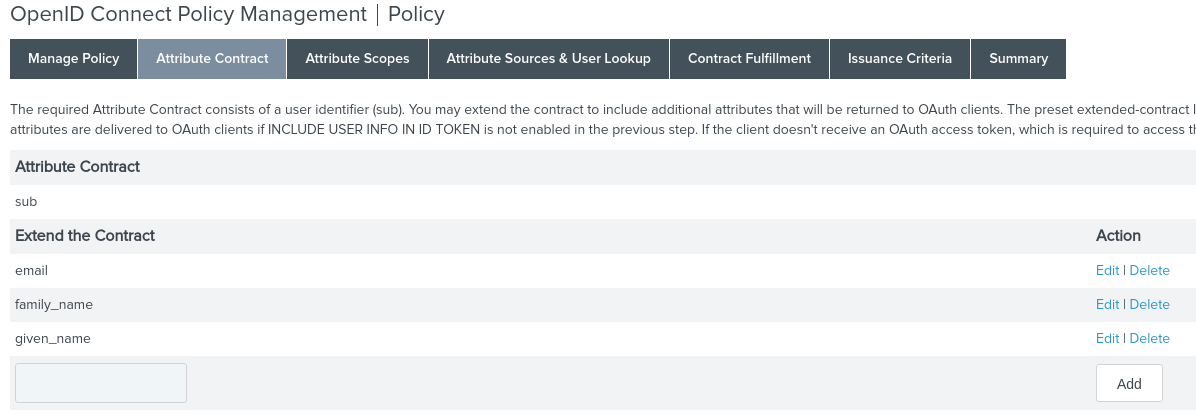
Under Attribute Contract, leave only email, family_name and given_name:
Click Next.
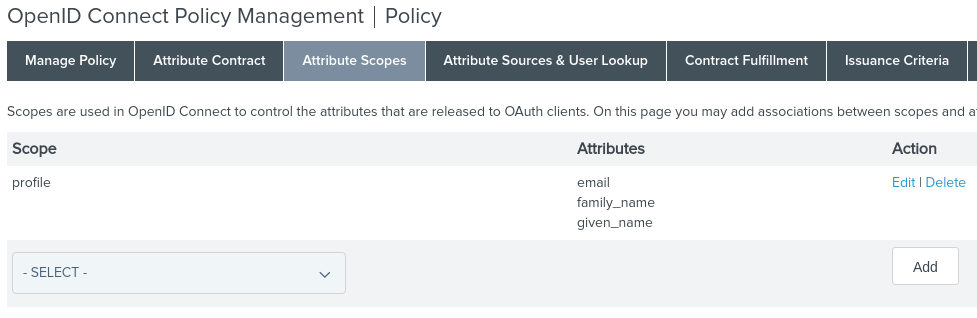
Under Attribute Scopes, add profile and select the email attribute manually. Click Add.
Click Next.
Under Attribute Sources & User Lookup, click Add Attribute Source. Enter these details for the attribute source datastore:
Attribute Source ID | A unique identifier for the attribute source |
Attribute Source ID | A unique identifier for the attribute source |
Attribute Source Description | A description of the attribute source |
Active Data Store | pingdirectory |
The store type automatically fills in as LDAP.
Click Next.
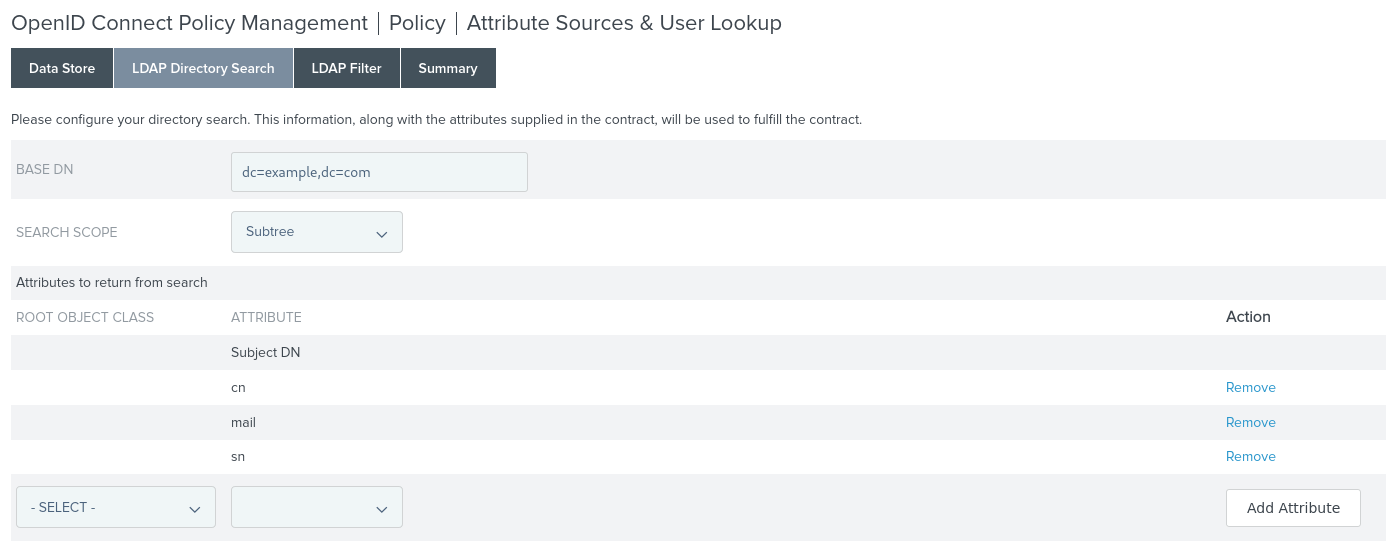
On the LDAP Directory Search tab, enter these details:
Base DN | dc=example,dc=com |
Base DN | dc=example,dc=com |
Attributes to return from search: Select <Show all attributes> and add these attributes: | cn sn |
Click Next.
Under LDAP Filter, enter this filter:
<code data-v-9a340a76=""><span data-v-9a340a76="" class="line">entryUUID=${Username}</span></code>
Click Done.
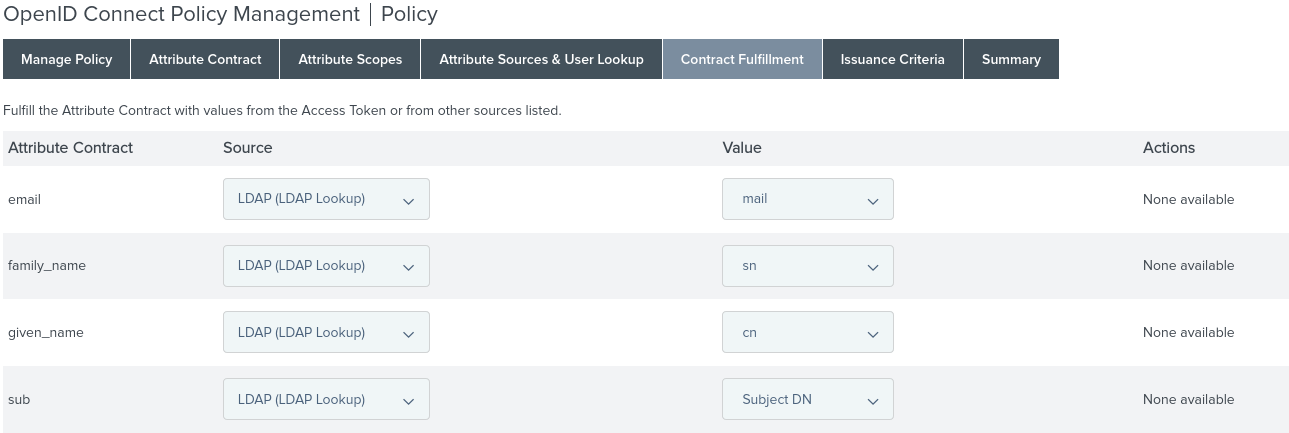
Return to OIDC Policy management. Under Contract Fulfillment, select the source for each OAuth claim as follows:
Go to the Summary page and click Save.
Create an OAuth client in PingFederate
Open the PingFederate administrative UI. Go to Applications > OAuth > Clients and create a New Client.
Complete these fields:
Client ID | The <client id> |
Client ID | The <client id> |
Name | A unique, recognisable name |
Client Authentication | CLIENT SECRET. Select this option to display the Client Secret field underneath. |
Client Secret | The <client secret> |
Allowed Grant Types | Authorization Code |
OpenID Connect > Policy | The policy you created in the previous section |
Click Save.
Configure the user datastore
This guide uses PingDirectory, Ping Identity's LDAP solution.
Some steps may differ if you use another type of user repository. For LDAP, go to System > Data & Credential Stores > Data Stores and select Add New Data Store.
Choose a unique name and select LDAP as the store type. Follow PingFederate's instructions to configure an LDAP connection.
Create a SCIM SP Connection
Go to Applications > Integration > SP Connections and click Create Connection.
Select Do not use a template for this connection and click Next.
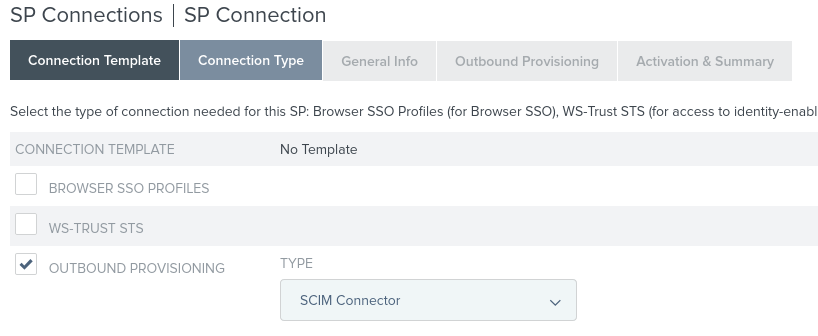
On the Connection Type tab, select Outbound Provisioning. In the new drop-down menu, select Type: SCIM Connector.
Click Next.
On the General Info tab, enter these details:
Partner's Entity ID | A unique ID for the partner connection |
Partner's Entity ID | A unique ID for the partner connection |
Connection Name | A unique, recognisable name for this connection |
Click Next.
On the Outbound Provisioning tab, click Configure Provisioning.
On the Target tab, enter these details:
SCIM URL | Use HTTPS with host dev.scim.chaos.com and path /<tenant id>/v2 |
SCIM URL | Use HTTPS with host dev.scim.chaos.com and path /<tenant id>/v2 |
SCIM Version | 2.0 |
Authentication Method | OAuth 2 Bearer Token |
Access Token | <access token> |
Unique User Identifier | workEmail |
Users API Path | /Users |
Provisioning Options | Select:
|
Remove User Action | Choose an option:
Chaos recommends Delete User. |
Click Next. On the Manage Channels tab, click Create.
Choose a unique, recognisable Channel Name.
Click Next.
On the Source tab, select the DataStore you configured earlier. Click Next.
On the Source Settings tab, enter these details:
Entity GUID Attribute | entityUUID |
Entity GUID Attribute | entityUUID |
GUID Type | Text |
Group Member Attribute | uniqueMember |
User Object Class | person |
Group Object Class | groupOfUniqueNames |
Changed Users/Groups Algorithm | Timestamp No Negation |
Timestamp Attribute | modifyTimestamp |
Account Status Attribute | accountLocked |
Account Status Algorithm | Flag |
Default Status | true |
Flag Comparison Value | true This value is case sensitive. If the LDAP attribute value is TRUE, the comparison fails and the account is not locked. |
Flag Comparison Status | false |
Click Next.
On the Source Location tab, enter these details:
Base DN | dc=example,dc=com |
Base DN | dc=example,dc=com |
Users Filter | (&(uid=*)(objectClass=person)) |
Click Next.
On the Attribute Mapping tab, configure these mappings:
userName | uid |
userName | uid |
workEmail | |
familyName | sn |
givenName | cn |
The required active field is calculated automatically from your Source Settings configuration. It depends on Account Status Attribute, Account Status Algorithm and the flag combinations you set there.
PingFederate's official documentation explains Flag Comparison Status:
Flag Comparison Status:
This setting determines whether the user is enabled or disabled when the flag matches Flag Comparison Value. Set it to true for enabled or false for disabled.
Example:
If Account Status Attribute is nsaccountlock, Flag Comparison Value is true and Flag Comparison Status is false, users with saccountlock=true are disabled.
Click Save to save the SP Connection.