Corona for Cinema 4D
Corona Image Editor
This page provides information on using the Corona Image Editor for Cinema 4D.
Last updated 1 September 2026
This page provides information on using the Corona Image Editor for Cinema 4D.
Overview
The Corona Image Editor (CIE) is a portable, standalone application that allows loading a Corona EXR (.cxr) file and applying all post-processing operations which are available in the Corona VFB to it, including adjusting LightMix, running Denoising, applying LUTs, Bloom and Glare effect, without the need to re-render. All of this is done without running any 3D software. It can be seen as a standalone version of the Corona VFB with extended functionality.
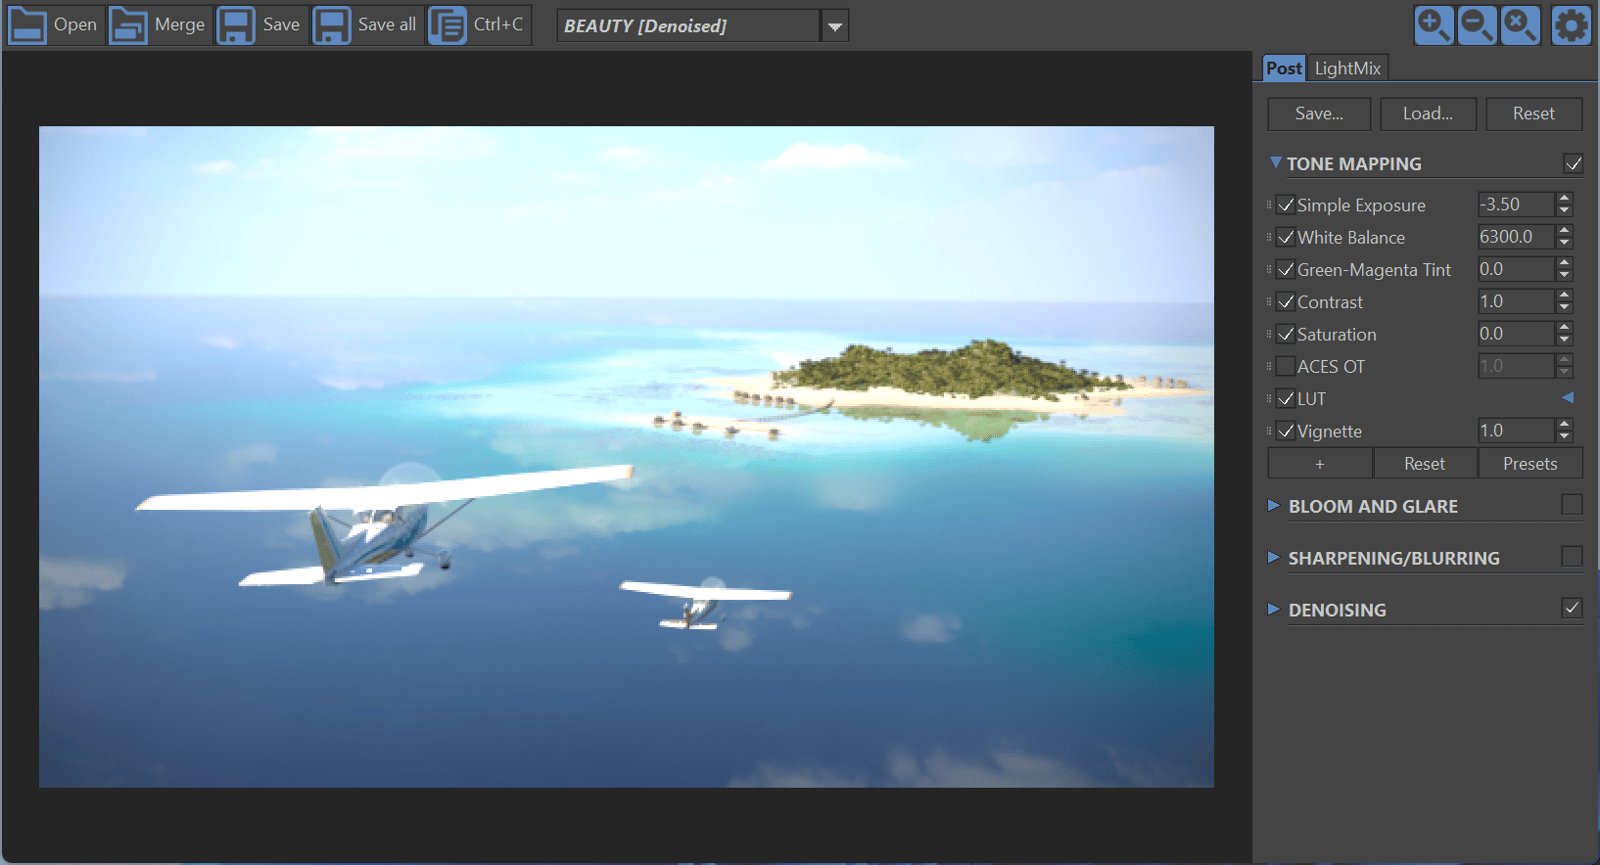
Corona Image Editor Shortcuts
Button | Description |
|---|
Button | Description |
|---|---|
Opens a single image. | |
Merges multiple images produced by Distributed Rendering (DR) render nodes. | |
Saves the currently displayed element. In the case of the Corona EXR format, saves the whole image and all its settings. | |
Saves all displayable elements into separate files. | |
Copies the currently displayed element to the clipboard. | |
Selects the element to be displayed. | |
Zooms in. | |
Zooms out. | |
Resets zoom. | |
Toggles visibility of the side panel. |
Post Tab
For more information about Post Tab – please check Corona VFB (legacy).
LightMix
For more information about Light Mix – please check LightMix.
Denoising
Denoise – Immediately denoises all denoisable elements using the most advanced denoising mode that is available for the image.
Denoise Amount – Mixing coefficient between the original (noisy) and processed (non-noisy) image. It allows fine-tuning the effect strength to find the sweet spot between preserving the finest details and removing excessive noise.
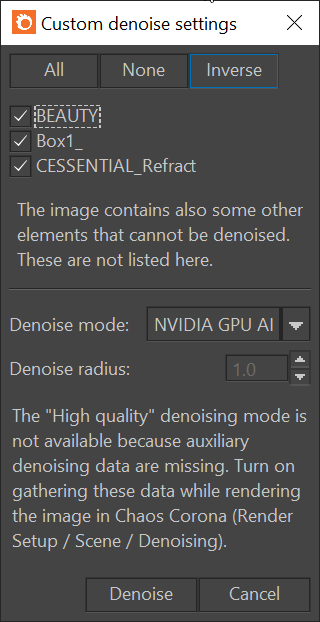
Custom Denoise
All – Selects all items for denoising.
None – Unselects all previously selected items for denoising.
Inverse – Inverts the current selection.
Denoise Mode – There are 4 denoising options available. The Denoise amount option can be used later to interactively control the strength of their effect.
Fireflies Only – Fast filter that just removes very bright pixels from the image (created by any source - noise, caustics, sun reflections, etc.)
NVIDIA GPU AI – Very fast GPU-based denoiser. Available only on NVIDIA GPUs when the optional NVIDIA AI Denoiser Corona component has been installed.
Intel CPU AI – (also known as Intel Open Image Denoiser) Fast denoising filter applied when render ends. It is a CPU-based denoiser, running on both Intel and AMD CPUs. It does not have any additional requirements to be executed; if the CPU runs Corona, it can run this denoiser. It is slower than NVIDIA GPU AI denoiser, but can achieve better quality.
High Quantity – A more memory and CPU-intensive filter that removes all random noise from the image, creating a noise-free image considerably faster than waiting for the rendering to converge.
Denoise Radius – Controls the radius of the denoising blurring.

Benefits of using Corona Image Editor
The CIE user interface is inspired by the Corona VFB, sharing its look and feel. Below are some features and benefits of using CIE:
- Lower system requirements than working with an image inside any 3D software - it can be run and used on a less powerful computer
- It is not necessary to have a scene loaded while you are working with your images, so you can denoise Corona renders outside of the rendering process, reducing the memory requirements significantly
- All LightMix and post-processing settings can be easily shared between the VFB in any host application and the CIE
- No need to copy settings manually: CXRs from the VFB is automatically loaded with them
- It also works with regular, non-Corona EXRs (in Float format). It is possible to add bloom and glare to them, apply your tone mapping settings, LUT, etc. Denoising and LightMix are not available for such EXRs because they do not have the necessary “hidden” auxiliary data
- Supports drag-and-drop to quickly load the images
- Saves to EXR, PNG, JPG, JPEG, BMP, HDR, IFF, JP2, J2K, RLA, SGI, TGA, TIF/TIFF
- You can associate the CIE with EXR and CXR files and open them just by double-clicking
- Ctrl+O and Ctrl+S can be used for fast image opening and saving
- It is a portable application, that works with just unpacking, no installation is necessary (license activation is required, though)
- It is included with a regular Corona license
CXR Image Format
The Corona EXR image format (CXR) is almost identical to the standard EXR format with the one difference being the additional data that is saved within the file. This additional data includes all render elements (also ones which are not exposed to the user, which are used during the denoising process), and rendering statistics such as rays per second, noise level, Corona version, etc. To save an image in Corona EXR format either - press and hold the Save button in the Corona VFB and select Save CXR from the dropdown menu.

Batch Editing CXR Images
CoronaImageBatch is a script for batch image processing. It can be used to process multiple images at once using custom .conf files, which can be saved using the GUI version of CIE, or edited manually. Help file and an example CXR file are included in the below ZIP archive.
Example use: save 100 frames of an animation in .cxr format, perform specific post-processing operations and denoising on all of them, and output all of them in .png format.
Download:
- For Corona Renderer 11 and newer: CoronaImageBatchV11
- For Corona Renderer 5 and newer: CoronaImageBatchV5
- For Corona Renderer 3 and 4: CoronaImageBatchV3
- For Corona Renderer 2: CoronaImageBatchV2
Note: you can run the CoronaImageCmd.exe application with additional command line parameters:
New in Corona 11:
Starting from Corona 11, the Corona Image Editor Command-Line Interface (CIE CLI) now includes a "--batch" parameter for optimized and faster processing of multiple files. This feature allows you to process multiple input files independently, making the batch editing significantly quicker.
Usage:
The "--batch" parameter can be used as follows:
In this command, "[arguments]" are optional settings you might want to apply to all images in the batch. For example, to enable bloom and glare for all images, your command might look like:
- While using "--batch", every provided input image must be followed by its corresponding output file name.
- The --batch parameter is not compatible with <weight> argument, as weights are used when multiple input files are being processed together to generate a single output file.
- We have also added the "--batch" parameter in the updated "CoronaImageBatchUpdated.bat" script, which allows for faster processing of multiple files.
This will print a list of various use cases of batch editing and short explanations of how to make them work.
This will print general help.