V-Ray for Blender
Sampler tab
This page provides information on the Image Sampler rollout under the Sampler tab in V-Ray's Render Settings.
Last updated 12 June 2026
This page provides information on the Image Sampler rollout under the Sampler tab in V-Ray's Render Settings.
Overview
In V-Ray, an image sampler refers to an algorithm for calculating a pixel's color based on the colors within and around it.
Each pixel in a rendering can have only one color. To get the color of a pixel, V-Ray calculates it based on the object's material, direct light striking the object, and indirect lighting in the scene. But within a single pixel there might be multiple colors, which may come from multiple objects whose edge intersect at the same pixel, or even difference in brightness on the same object due to changes in object shape or falloff and/or shadowing of light sources.
To determine the right color for such a pixel, V-Ray looks at (or samples) colors from different parts of the pixel itself as well as the pixels around it. This process is called image sampling. Different image sampling methods are discussed on this page.
UI Path: ||Properties Editor|| > Render > Sampler tab

Image courtesy of Tuna Unalan
Multiple colors within a single pixel. What color should the pixel be?
Progressive Sampler
V-Ray
Sampler Type – Specifies the image sampler type:
Progressive – Progressively samples the entire image. See the Progressive Sampler for additional parameters.
Bucket – Takes a variable number of samples per pixel depending on the difference in the intensity of the pixels. See the Bucket Sampler section for additional parameters.
Min Subdivs – Controls the minimum number of samples that each pixel in the image receives. The actual number of the samples is the square of the subdivs.
Max Subdivs – Controls the maximum number of samples that each pixel in the image receives. The actual number of the samples is the square of the subdivs.
Noise Limit – The desired noise level in the image. If this is 0.0, the entire image is sampled uniformly until either the Max. subdivs value is reached or the Render time limit is reached.
Max. Render Time (mins) – The maximum render time in minutes. When this number of minutes is reached, the renderer stops. This is the render time for the whole frame; it includes any GI prepasses like light cache, irradiance map, etc. If this is 0.0, the render is not limited in time.
Ray Bundle Size – Useful for distributed rendering (not currently supported) in order to control the size of the chunk of work that is handed to each machine. When using distributed rendering, higher values may help to utilize CPUs on the render servers better.
Adaptivity Clamp – Specifies an intensity limit for the adaptive bucket and progressive samplers to avoid excessive sampling of overexposed areas. Lower values mean a lower limit and potentially noisy overexposed areas. Higher values produce more samples in overexposed areas.
Animated Noise Pattern – Enables an animated noise pattern with a random seed to be used instead of a fixed one when rendering. Disabling Animated noise pattern causes repeated renders to be deterministic.

Anti-Aliasing Filter
Filter Type – Specifies the filter type to be used for anti-aliasing. V-Ray supplies eight types of Anti-aliasing filters: None, Area, Box, Catmull-Rom, Cook Variable, Gaussian, Lanczos, Mitchel-Netravali, Sinc, and Triangle. Each has advantages and disadvantages, which make them useful for different tasks.
Size – Determines the size of the filter in pixels. Higher values yield blurrier results. To produce physically accurate results, the minimum value of this parameter is 1.000, and the maximum value is 20.000. For more information, see the Anti-aliasing Filters example and the Anti-aliasing Filters and Moire Effects example.

Render Mask
Mode – Enables the render mask feature. The render mask allows you to define which pixels of the image are calculated. The rest of the pixels are left intact. This feature works best with the V-Ray frame buffer and the Bucket image sampler. The following types are available:
Disabled – The render mask is not used.
Texture – A texture map is used for the render mask. Black values in the map define pixels that are not rendered. Pixels with any other values are rendered. The Texture parameter is revealed, allowing you to specify the directory to the image file to be used.
Objects – A custom set of objects to render can be defined. When this mode is selected, the Mask objects list is revealed. Drag and drop Objects or Collections into the corresponding field, or use the eyedropper tool to select Objects from the Outliner. Selected items are added to the Mask objects list. The Mode determines whether these objects will be included or excluded from the Render Mask. You can remove selected items from the list by clicking on the Remove button.
Object IDs – Only objects with specified Object IDs will be rendered; you can list more than one by using commas to separate them. When this mode is selected, the Object IDs property is revealed, allowing you to set an object ID to include in the render mask.
Active Selection – Only objects that are currently selected are rendered. You can select objects either from the viewport or from the Outliner.
Clear Render Mask – When enabled, changes to the render mask selection (changing the specified Object ID, changing the active selection, changing the selected objects in the Mask objects list) replace the current render mask selection. If this option is disabled, changes to the render mask selection are added to the already present selection. For more information, see the Clear Render Mask example.
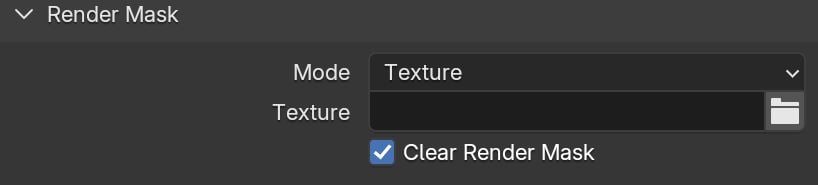
Render Mask Texture Mode

Render Mask Objects Mode
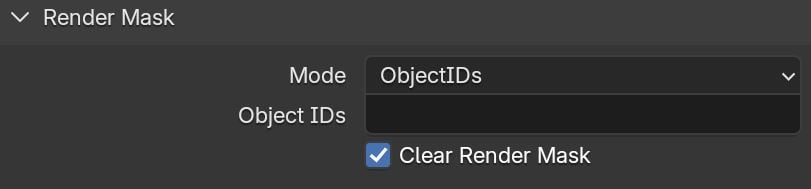
Render Mask ObjectIDs Mode

Render Mask Active Selection Mode
V-Ray GPU
GPU Texture Options
Texture Mode –Determines how textures' resolution/size are handled to help optimize memory usage. The possible values are:
Full size textures – Textures are loaded at their original size.
Resize textures – Adjusts the size of high-resolution textures to a smaller resolution to optimize render performance.
Compressed – Compresses the textures to optimize performance. Compression results in roughly a 75% reduction in memory usage. In some situations, Bitmaps cannot be compressed, such as when a bitmap is used both as a normal/bump map and a color map; when a bitmap is used as a displacement map; when a bitmap is used for lens effects. This option is not supported on macOS.
Texture Size – When the Texture Mode is set to Resize Textures is enabled, this value specifies the resolution to which the textures are resized.
Texture Format – The amount of bits per channel used to store the material texture information into memory. You can choose between 8 bit, 16 bit, and 32 bit. This does not affect textures used for lights and displacement.
Use System Memory for Textures – Lowers GPU memory usage significantly by offloading textures to system memory with little impact on performance. This option speeds up GI build-up and eliminates the risk of errors caused by memory insufficiency. Not compatible with On-demand, Compressed, and Resized textures.

Image Sampler
The Rays Per Pixel and Samples Limit options are unique to V-Ray GPU.
Sampler Type – Specifies the image sampler type:
Progressive – Progressively samples the entire image. See the Progressive Sampler for additional parameters.
Bucket – Takes a variable number of samples per pixel depending on the difference in the intensity of the pixels. See the Bucket Sampler section for additional parameters.
Samples Limit – Determines the maximum number of samples that each pixel in the image receives. V-Ray performs adaptive sampling on the image, trying to put more samples into areas that have more noise. If the Samples Limit is set to 0, V-Ray renders with the default value of 2500.
Noise Limit – The desired noise level in the image. If this is 0.0, the entire image is sampled uniformly until either the Max. subdivs value is reached or the Render time limit is reached.
Max Render Time (mins) – The maximum render time in minutes. When this number of minutes is reached, the renderer stops. This is the render time for the whole frame; it includes any GI prepasses like light cache, irradiance map, etc. If this is 0.0, the render is not limited in time.
Ray Bundle Size – Useful for distributed rendering in order to control the size of the chunk of work that is handed to each machine. When using distributed rendering, higher values may help to utilize CPUs on the render servers better.
Rays Per Pixel – The number of rays that are traced for each pixel during one image pass. The greater the value, the smoother the picture from the very beginning of the rendering with GI, but interactivity may be significantly diminished. Increasing this value also reduces the amount of data transferred from the render servers back to client machine.
Animated Noise Pattern – Enables an animated noise pattern with a random seed to be used instead of a fixed one when rendering. Disabling Animated noise pattern causes repeated renders to be deterministic.

Anti-Aliasing Filter
Filter Type – Specifies the filter type to be used for anti-aliasing. V-Ray supplies eight types of Anti-aliasing filters: None, Area, Box, Catmull-Rom, Cook Variable, Gaussian, Lanczos, Mitchel-Netravali, Sinc, and Triangle. Each has advantages and disadvantages, which make them useful for different tasks.
Size – Determines the size of the filter in pixels. Higher values yield blurrier results. To produce physically accurate results, the minimum value of this parameter is 1.000, and the maximum value is 20.000. For more information, see the Anti-aliasing Filters example and the Anti-aliasing Filters and Moire Effects example.

Render Mask
Type – Enables the render mask feature. The render mask allows you to define which pixels of the image are calculated. The rest of the pixels are left intact. This feature works best with the V-Ray frame buffer and the Bucket image sampler. The following types are available:
Disabled – The render mask is not used.
Texture – A texture map is used for the render mask. Black values in the map define pixels that are not rendered. Pixels with any other values are rendered.
Object – A custom set of objects to render can be defined. Drag and drop Objects or Collections into the corresponding field, or use the eyedropper tool to select Objects from the Outliner. Selected items are added to the Mask objects list. The Mode determines whether these objects will be included or excluded from the Render Mask. You can remove selected items from the list by clicking on the Remove button.
Object IDs – Only objects with specified Object IDs will be rendered; you can list more than one by using commas to separate them.
Clear Render Mask – When enabled, changes to the render mask selection (changing the specified Object ID, changing the active selection, changing the selected objects in the Mask objects list) replace the current render mask selection. If this option is disabled, changes to the render mask selection are added to the already present selection. For more information, see the Clear Render Mask example.
Render Mask Texture Mode
Render Mask Objects Mode
Render Mask ObjectIDs Mode
Render Mask Active Selection Mode
Example: Anti-Aliasing Filters
Here is an example briefly demonstrating the effect of different anti-aliasing filters on the final result. Open the expandable panel to view the filter examples.
Note that rendering with a particular filter is not the same as rendering without a filter and then blurring the image in a post-processing program like Adobe Photoshop. Filters are applied on a sub-pixel level, over the individual sub-pixel samples. Therefore, applying the filter at render time produces a much more accurate and subtle result than applying it as a post effect. The zoomed in images below have been zoomed in and cropped 300%.
Expand to see the filter examples
Filtering is off. | Lanczos filter , size 2.5 | Triangle filter |
Filtering is off. | Lanczos filter , size 2.5 | Triangle filter |
Sinc Filter , size 2.5 | Box Filter , size 2.5 | Area filter , size 2.5 |
Catmull-Rom | Cook Variable , size 2.5 |
Example: Anti-aliasing Filters and Moire Effects
This example demonstrates the effect anti-aliasing filters have on moire effects in your images. Sharpening filters may enhance moire effects, even if your image sampling rate is very high. Blurring filters reduce moire effects. Open the expandable panel to view the filters and effects examples.
Note that moire effects are not necessarily a result of poor image sampling. In general, moire effects appear simply because the image is discretized into square pixels. As such, they are inherent to digital images. The effect can be reduced through the usage of different anti-aliasing filters, but is not completely avoidable.
The scene is very simple: a sphere with a very fine checker map applied. The images were rendered with a very high sampling rate (15 subdivs, or 225 rays/pixel). This is enough to produce quite an accurate approximation to the pixel values. Note that the image looks quite different depending on the filter:
Click here to see the filters and effects examples
No Filter | Box Filter | Area Filter , size 1.5 |
No Filter | Box Filter | Area Filter , size 1.5 |
Triangle Filter , size 1.5 | Lanczos Filter | Area Filter , size 4.0 |
Catmull Rom | Gaussian Filter , size 1.5 | Gaussian filter , size 6.0 |
Example: Stages of Rendering with the Progressive Sampler

Image after 1 pass

Image after 16 passes

Image after 256 passes
Clear Render Mask Example
This example showcases how Object IDs can be used to apply a render mask to your render.
- Select the object you want to mask and open its Object Properties. Scroll down the list to find the V-Ray Object Properties tab and expand it. Set an Object ID. Remember the number for later reference. Do this for as many objects in your scene as you need. If two or more objects have the same Object ID, all of them will be rendered when that ID is referenced.
- Open the Render Properties and click on the Sampler tab. Expand the Render Mask submenu. Set the Mode to ObjectIDs. In the Object IDs property, write one of the IDs you just set. Disable Clear Render Mask.
- Open the V-Ray Frame Buffer (VFB) and start an interactive render - . Now, if you switch the value of the Object IDs property to another ID, the render mask will add that selection to the mask, without removing the initial masked object.
- When you enable the Clear Render Mask property, changing the value of Object IDs will remove the previous mask and create a new one, only including the new selection.
This applies to the Active Selection Mode and all other Modes of the Render Mask.
The Render Mask functionality is compatible with both interactive and production rendering. In this example, we use the interactive rendering to view the changes in real-time.
youtu.be
Bucket Sampler
V-Ray
Lock Subdivs – Sets a fixed number of samples taken for each pixel.
Min Subdivs – Determines the initial (minimum) number of samples taken for each pixel. You will rarely need to set this to more than 1, except if you have very thin lines that are not captured correctly, or fast-moving objects if you use motion blur. The actual number of samples is the square of this number (e.g. 4 subdivs produce 16 samples per pixel).
Max Subdivs – Determines the maximum number of samples for a pixel. The actual maximum number of samples is the square of this number (e.g. 4 subdivs produce a maximum of 16 samples). Note that V-Ray may take less than the maximum number of samples, if the difference in intensity of the neighboring pixels is small enough. V-Ray GPU's default Max subdivs value is 48.
Noise Limit – The threshold that will be used to determine if a pixel needs more samples.
Adaptivity Clamp – Specifies an intensity limit for the samplers to avoid excessive sampling of overexposed areas. Lower values mean a lower limit and potentially noisy overexposed areas. Higher values produce more samples in overexposed areas.
Firefly Removal Threshold – This option is available in the Bucket Sampler type only. Removes fireflies from the render and optimizes the render times. Further, it removes the flickering effect in animations. Lower values are less aggressive at removing fireflies while higher values are more effective but can start removing actual parts of the image such as small bright highlights.
Animated Noise Pattern – Enables an animated noise pattern with a random seed to be used instead of a fixed one when rendering. Disabling Animated noise pattern causes repeated renders to be deterministic.
Anti-Aliasing Filter
Filter Type – Specifies the filter type to be used for anti-aliasing. V-Ray GPU supports Box, Area, Lanczos, and Gaussian filter types. Each has advantages and disadvantages, which make them useful for different tasks.
Size – Determines the size of the filter in pixels. Higher values yield blurrier results. To produce physically accurate results, the minimum value of this parameter is 1.000, and the maximum value is 20.000. For more information, see the Anti-aliasing Filters example and the Anti-aliasing Filters and Moire Effects example.
Render Mask
Type – Enables the render mask feature. The render mask allows you to define which pixels of the image are calculated. The rest of the pixels are left intact. This feature works best with the V-Ray frame buffer and the Bucket image sampler. The following types are available:
Disabled – The render mask is not used.
Texture – A texture map is used for the render mask. Black values in the map define pixels that are not rendered. Pixels with any other values are rendered.
Object – A custom set of objects to render can be defined. Drag and drop Objects or Collections into the corresponding field, or use the eyedropper tool to select Objects from the Outliner. Selected items are added to the Mask objects list. The Mode determines whether these objects will be included or excluded from the Render Mask. You can remove selected items from the list by clicking on the Remove button.
Object IDs – Only objects with specified Object IDs will be rendered; you can list more than one by using commas to separate them.
For more information, see the Render Mask example .

Bucket Options
Bucket Size – Determines the size of the bucket (width and height are equal) in pixels.
Sequence – Determines the order in which the buckets are calculated.
Top-Bottom – Buckets are calculated from top to bottom.
Left-Right – Buckets are calculated from left to right.
Checker – Every other bucket is calculated, creating a checker-like pattern of calculated buckets.
Spiral – Buckets are calculated in a spiral pattern.
Triangulation –
Hilber curve –
Random – Buckets are calculated in a random order.
Reverse Sequence – Reverses the bucket calculation order.

V-Ray GPU
Samples Limit – Determines the maximum number of samples that each pixel in the image receives. V-Ray performs adaptive sampling on the image, trying to put more samples into areas that have more noise. If the Samples Limit is set to 0, V-Ray renders with the default value of 2500.
Noise Limit – The threshold that will be used to determine if a pixel needs more samples.
Ray Bundle Size – Useful for distributed rendering in order to control the size of the chunk of work that is handed to each machine. When using distributed rendering, higher values may help to utilize CPUs on the render servers better.
Rays Per Pixel – The number of rays that are traced for each pixel during one image pass. The greater the value, the smoother the picture from the very beginning of the rendering with GI, but interactivity may be significantly diminished. Increasing this value also reduces the amount of data transferred from the render servers back to client machine.
Adaptivity Clamp – Specifies an intensity limit for the samplers to avoid excessive sampling of overexposed areas. Lower values mean a lower limit and potentially noisy overexposed areas. Higher values produce more samples in overexposed areas.
Animated Noise Pattern – Enables an animated noise pattern with a random seed to be used instead of a fixed one when rendering. Disabling Animated noise pattern causes repeated renders to be deterministic.

Example: Render Mask

The original image.

The same image, only objects with chrome material were re-rendered.

The actual render mask image - RGB channels.

The actual render mask image - Alpha channel.