V-Ray for Maya
Rendering Very Large Images
This page provides a tutorial on rendering large images with V-Ray.
Last updated 19 September 2025
This page provides a tutorial on rendering large images with V-Ray.
Overview
Rendering very large images can be memory intensive as very large resolutions require more memory be added to the scene's own memory needs. This tutorial explains how to set up V-Ray to render very large images directly to disk, optimizing memory efficiency. By writing the rendering image file directly to disk, the memory buffer is disabled, saving on overall memory use. This is very advantageous for machines with limited memory.
Want to follow along but don’t have a license?
Setting Up to Render Large Images
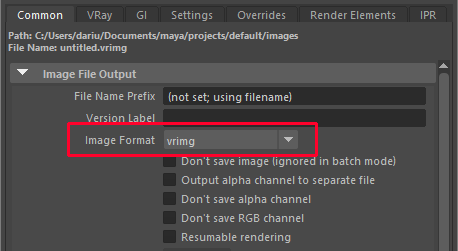
1. In the Common tab of the Render Settings dialog, set the Image Format to vrimg: You may also select Multi-Channel OpenEXR file for the output format. Note that if you choose an OpenEXR file, it will be a tiled file and not scanline-based, because Memory frame buffer is off. However, OpenEXR files do support multi-channel output when the Memory frame buffer is turned off.
2. In the Render View rollout shown below, set the Memory Frame Buffer to None. You can also set the Memory frame buffer attribute to Preview so that V-Ray generates a small resolution preview of the final result.

3. In the Resolution rollout, set the desired resolution of the image (such as 12000 x 12000 shown below).

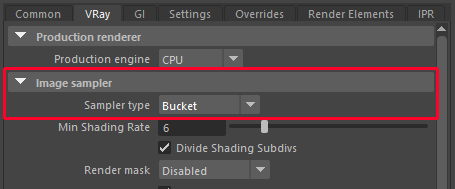
4. In the VRay tab, under the Image sampler rollout, switch the image sampler Type to Bucket.
5. Render the image.
6. If you rendered to a .vrimg file, you can use the vrimg2exrtool to convert the file to a scanline-based OpenEXR file.