V-Ray for SketchUp
V-Ray Asset Editor
This page provides details on the Asset Editor in V-Ray for SketchUp.
Last updated 1 September 2026
This page provides details on the Asset Editor in V-Ray for SketchUp.
Overview
The V-Ray Asset Editor is the place where you can create, save and open assets, and adjust their settings. These include materials, textures, geometry, and lights. You can also manage the Render Channels from the Asset Editor. From its Settings tab, you can choose the render engine, set up the camera, optimize the render process, or render with Swarm. You can also start the render or submit a scene to Chaos Cloud, as well as open the VFB.
UI Paths
||V-Ray for SketchUp Toolbar|| > Asset Editor

SketchUp Menus Ribbon
||Extensions|| > V-Ray > Asset Editor
Functionalities
Categories
Assets are grouped in Categories for ease of access and use. On top of the central Asset Editor's panel you can find the Materials, Lights, Geometry, Render Elements, and Textures categories.
Left/Right-click on an empty category to create an asset. If there already existing items, Left-click selects the directory, while a Right-click always opens a list of available assets to choose from in order to create them. The Asset creation dropdown lists remain active when the Ctrl (Cmd on macOS) key is held, allowing the creation of multiple assets in quick succession.
Each Category has a Search Scene tab on the top of the list. You can search for assets from the category selected. You can select more than one category or asset at a time with Ctrl+select(Cmd+select) or Shift+select.

Buttons
The utility buttons are located at the bottom of the Asset Editor.
Button | Description |
|---|
Button | Description |
|---|---|
Opens a list of all V-Ray assets grouped into categories. | |
Opens a directory from which to import .vrmat files. | |
Saves the selected asset to your computer. | |
Deletes the selected asset. | |
Purges all unused assets from the selected asset categories. | |
Opens the Notifications window. | |
Traces back assets that were previously selected. | |
Moves the selection one level up in the hierarchy. |

Preset Material Library Buttons
In earlier V-Ray versions, the V-Ray Material Library is called Preset Material Library and it resides in the Asset Browser. It has some functionality buttons at the bottom of the Asset Editor.
Button | Description |
|---|
Button | Description |
|---|---|
Adds a new file system location. | |
Changes the view between row and a column layout. | |
Changes between grid and list view for the material gallery. | |
Zoom material previews out and in. |
For more information about all the functionalities that the V-Ray Material Library offers, follow the link.
Preview Swatch
The Preview Swatch is located in the right panel of the Asset Editor, rendering all changes done to the currently selected asset. This is a quick preview of materials, textures and lights. It has several controls that can be customized for your workflow. As the Preview Swatch is an actual render, it might require some additional computing power.
Button | Description |
|---|
Button | Description |
|---|---|
/ | Enables or disable the live preview of the swatch. |
Preview current asset once. The swatch renders the current settings of the asset, but does not take into consideration any changes done to it later. | |
Changes the resolution of the rendered swatch. Select from 100%, 50%, 25%, 12.5%. | |
/ | Changes the render engine for the live preview. |
Changes the preview asset scene. Select from from Generic, Fabric, Floor, Ground, Subsurface Scattering, Wall, Wall Closeup and Sphere. | |
Preview a specific asset regardless of the currently selected one. Displays the pinned asset until unpinned. |
Asset Tagging
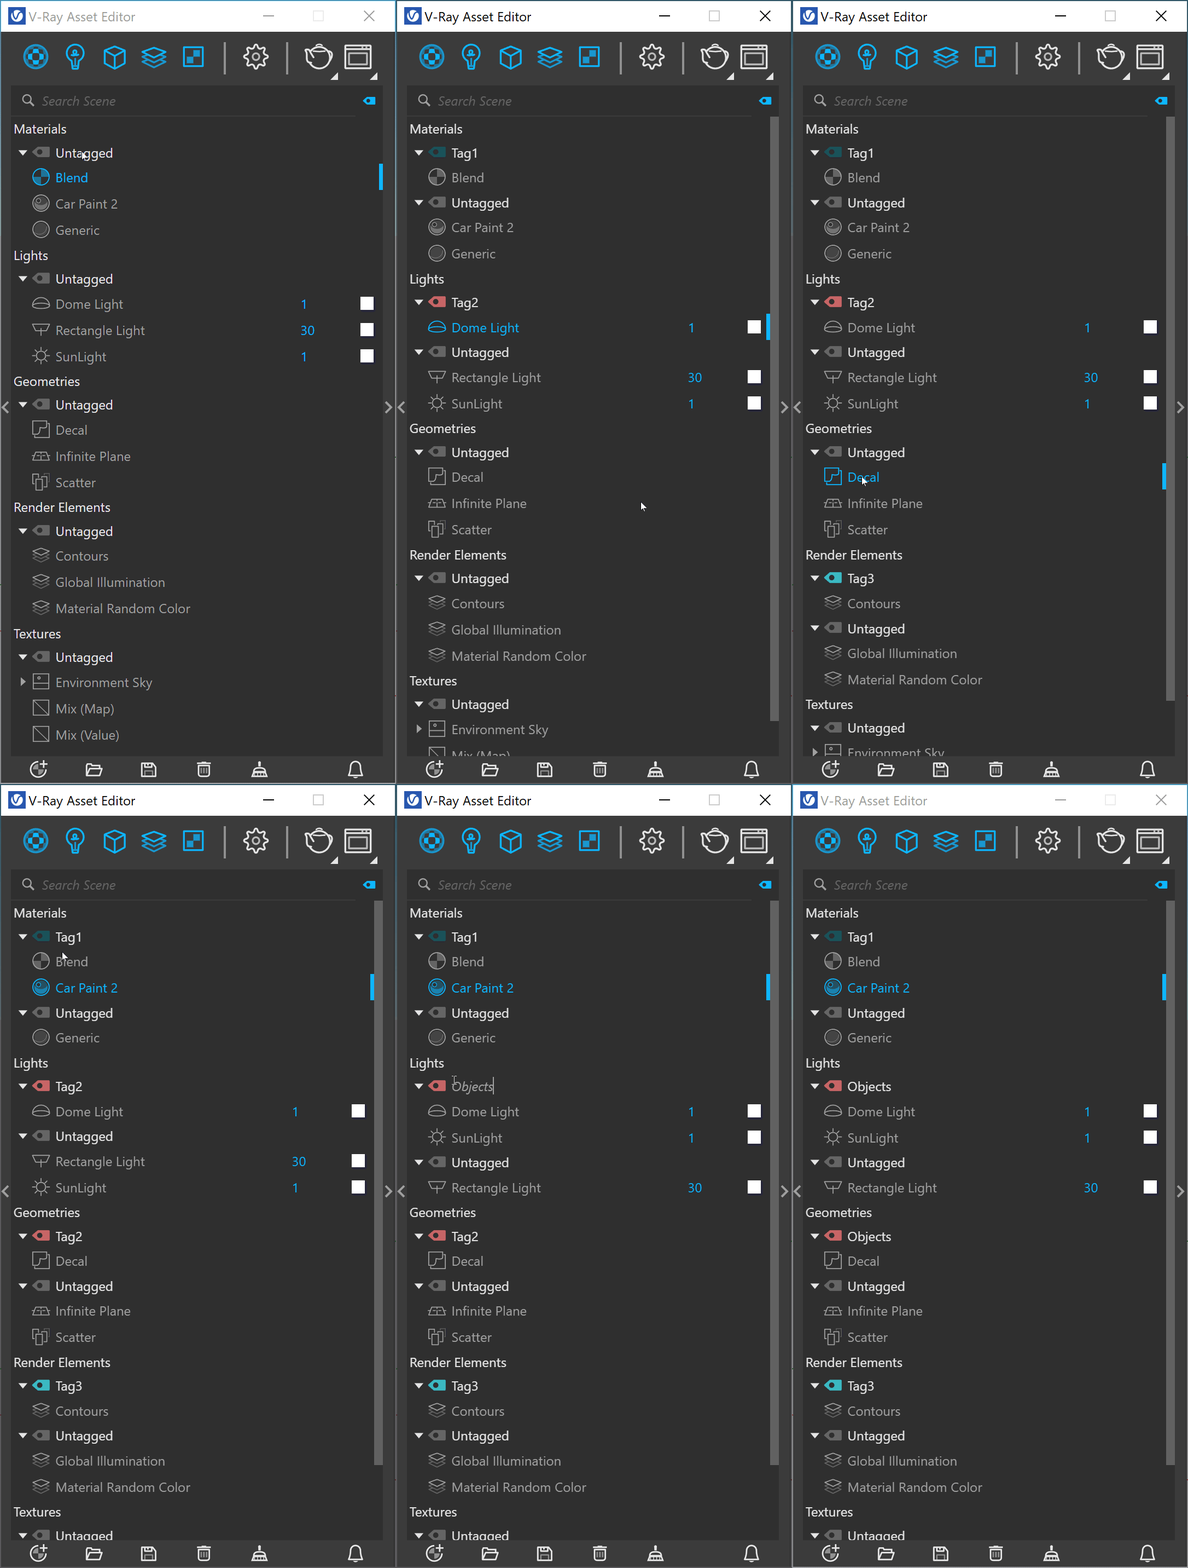
Custom grouping scene assets of any type is now possible in the V-Ray Assets Outliner. A new Tag View button allows toggling tags visibility on or off. It is located at the top-right corner of the Asset Outliner, next to the search field. Tags help to organize and work more efficiently in complex projects. Upon creation each tag is assigned a random color.
Each tag can be assigned to multiple assets all at once via the context menu and one asset can be assigned multiple tags. Tags can be assigned to assets of all categories - materials, textures, lights, etc. When a tag is assigned to assets of different types, the tag indicator appears in each category.
Right-clicking on a tag allows its renaming or deletion. Alternatively, double-clicking a tag name allows its renaming directly.
Right-clicking on any asset and hovering over its "Tag" context menu entry displays a list of all available tags in the scene, as well indicators which tags are currently assigned to the asset.
Dragging an asset over a tag assigns the tag to this asset.
Mathematical Expressions
Entering mathematical expressions as text in the input number fields of the asset editor is also allowed. Find some useful examples below.
Examples of supported operations:
Input | Result | Examples |
|---|
Input | Result | Examples |
|---|---|---|
+ | Addition | 1 + 3 = 4 |
- | Subtraction | 4 - 2 = 2 |
* | Multiplication | 3 * 2 = 6 |
/ | Division | 3 / 2 = 1.5 |
Mod | Modulo | 6 Mod 4 = 2 |
! | Factorial | 5! = 120 |
log | Logarithm with base 10 | log1000 = 3 |
ln | Natural Logarithm | ln2 = 0.6931... |
pow | Power function | pow(2,3) = 8 |
^ | Power function | 2^3 = 8 |
root | Square root | root(4) = 2 |
Trigonometric functions are supported such as "cos", "sin", "tan" are also supported.
The following mathematical constants are supported as well.
- pi = 3.1415...
- e = 2.71...
Parenthesis are also supported which allows for complex mathematical expressions such as: (3*2)^2/4 = 9. Parenthesis are not necessary for some of the operators: e.g.
- root2 = root(2)
- ln2 = ln(2)
- sin60 = sin(60)
Color Picker
The V-Ray Color Picker can be accessed by clicking on any color slot in the Asset Editor. It is a color manager that allows numeric color value selection in Screen (sRGB) and Rendering (RGB) Color spaces, options to regulate RGB, HSV and temperature. V-Ray Color Picker automatically converts Kelvin to RGB values, as well as RGB to Kelvin whenever possible.
Left-click on the current color to save it in the palette. Alternatively, right-click on an empty slot in the palette. Right-click on a saved color in the color slot to replace it with a new one.
The V-Ray Color Picker has a Color Assistant that can be opened by clicking on the side bar at the bottom of V-Ray Color Picker window. The Color Assistant provides color palettes to pick a color from.
Left-click on a color from the Color Assistant to pick the current color. Right-click on it to use as a base for a color palette.
Render Menu
Select the render method from the Render menu. The available options are Render with V-Ray, Render with V-Ray Interactive, Render with Chaos Cloud and Export V-Ray Scene File.
Button | Description |
|---|
Button | Description |
|---|---|
Renders the current view with the V-Ray production renderer. | |
Stops the current V-Ray production render. | |
Starts a V-Ray Interactive Render. | |
Stops the V-Ray Interactive Render. | |
Exports the scene to Chaos Cloud. | |
Exports a V-Ray Scene File (.vrscene) |

Shortcuts Menu
The following buttons are available:
Button | Description |
|---|
Button | Description |
|---|---|
Opens the V-Ray Frame Buffer. | |
Opens the V-Ray Light Gen. | |
Opens the Chaos Cosmos Browser. | |
Opens the V-Ray log window. | |
Opens V-Ray File Path Editor. | |
Opens the Chaos Cloud Collaboration. | |
Opens the V-Ray Node Editor (Beta). | |
Opens Chaos Veras. |

Notes
1 - Sliders are allowed to be focused and controlled by the keyboard. The visual indication that a slider is focused, is the same as if you have hovered over it.
2 - The default theme of the V-Ray Asset Editor can be changed to a lighter one in the Configuration rollout.
3 - .vismat files are no longer supported. For more information visit Workflow Changes page.
4 - Most numeric V-Ray parameters come with a slider to make fine-tuning easier. Each slider is set to a default range of recommended or commonly used values. If a value above that range is used the slider adapts by increasing its range accordingly (2x the input value) to maintain usability. If a value below the current slider range is used, the slider again adjusts its range by shrinking it to twice the amount of the input value.
5 - Тhe slider range does not indicate the parameter's total minimum and maximum input values. The absolute minimum and maximum values of each parameter can be found by hovering over its spinbox.