Use the My Chaos dashboard to check your organisation's credit balance, assign Named credits to users and review credit usage.
Open the credits dashboard
- Sign in to My Chaos.
- Open the Organisation tab.
The Organisation tab has two sub-pages:
- Users & Product assignments shows your seat assignments.
- Chaos Credits shows the credits dashboard covered in this article.
Read the dashboard
The dashboard has two main sections:
1. The score cards
Three cards summarise your credit balance:
- Need more credits? has a Buy credits button for subscription upgrades and credit top-up packs. To arrange a purchase through Procadsys, Request a quote.
- Named credits shows the total credits from assigned Named seats across your organisation. Use Assign products to assign Named licences, or View details to see credits by subscription.
- Shared pool shows your Floating pool balance, which is available to all users. Use Set credit limit to set limits for each user, or View details to see the breakdown.
The progress bar below each balance shows credit usage.
2. The user table
The table lists every user in your organisation and has these columns:
Column | What it shows |
|---|
Column | What it shows |
|---|---|
User | The user's name, email and role (Admin or User). |
Credits usage (Named) | The Named credits the user has spent this cycle across all their Named subscriptions. |
Assigned credits | The user's total Named credit allowance from all their assigned Named seats. |
Credits usage (Shared) | The credits the user has spent from the Floating pool this cycle. |
Usage allowed | The user's Floating credit limit: a specific number of credits, "Unlimited" or "Disabled". |
You can search by name, email or role, filter the list and sort by any column.
The Unassigned row at the top shows Named credits from seats that have not been assigned to a user.
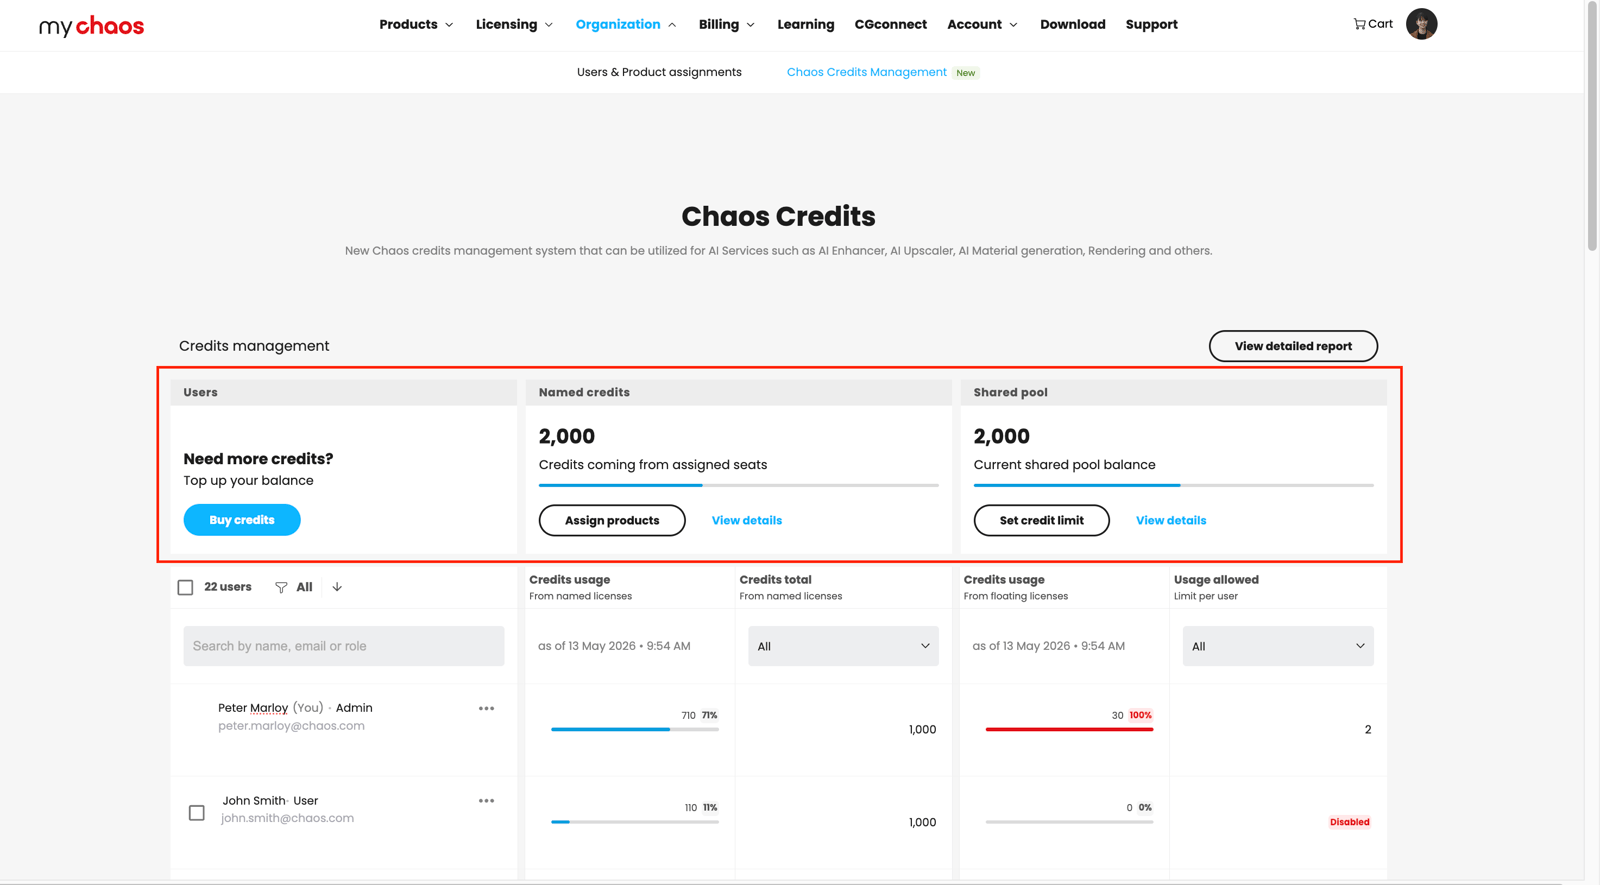
Dashboard
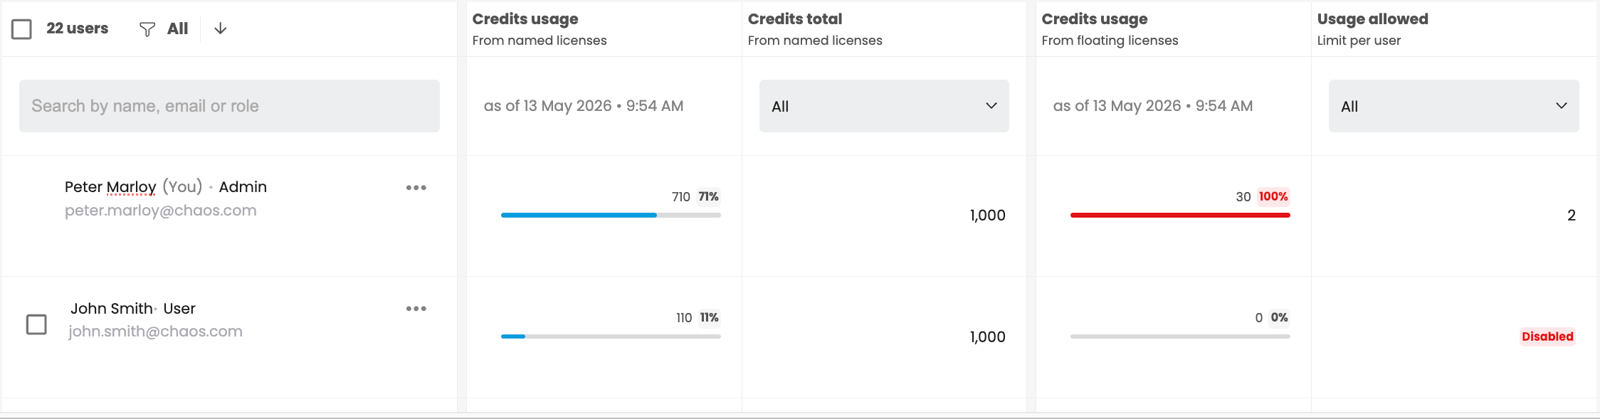
User table
The per-user actions menu
Each row in the User table has a ⋯ (more) menu on the right. Open it to see actions for that user:
- Allocate product to user opens the assignment process described below. Use it to assign a Named licence and its credits to the user.
- Set floating credit limit sets or changes the user's Floating pool credit limit. See Manage Users and Credits Quotas for details.
- View usage report opens a report for the user. It has the same chart and filters as the organisation report, with data for that user only.
- Credit details shows Named credits by subscription for the Named seats assigned to the user.
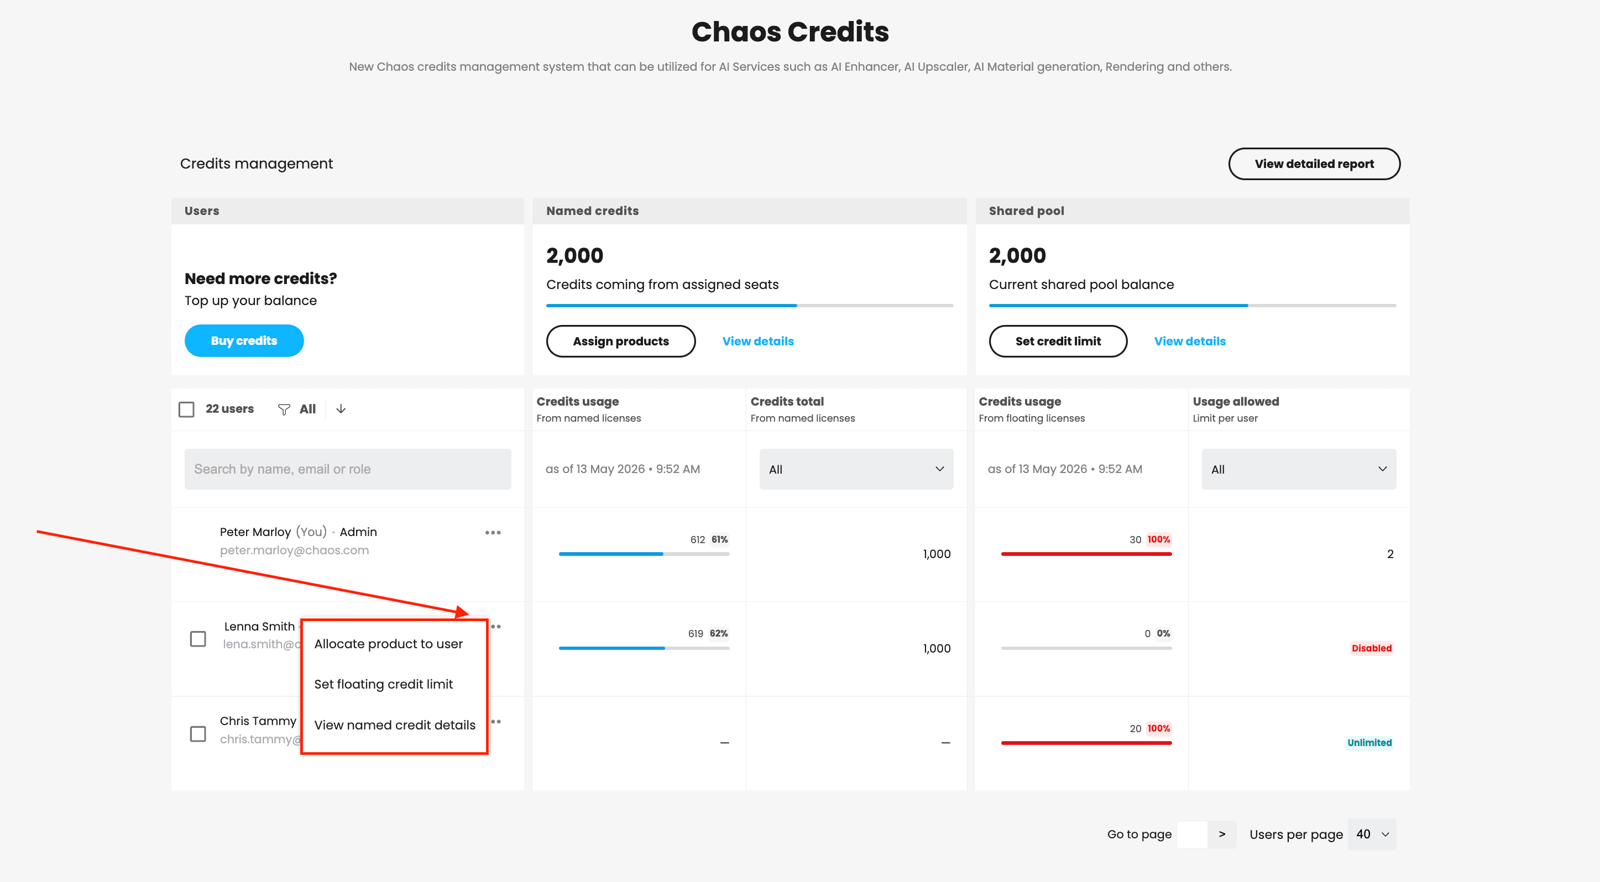
Each user's three-dot menu
Assign Named credits to users
Named credits belong to specific users. You can assign them through two routes, each with a 4-step process and the same fields.
Option A. Assign products to multiple users from the Named credits card
Use this option to assign the same product to multiple users at once.
- Click Assign products on the Named credits score card. The Product assignment page opens with a 4-step progress indicator at the top. The stages are Users, Product, Expiration date and Summary, in that order.
- In Users, select one or more users from your organisation. Search by name or email, or use Select all to select everyone.
- In Product, choose the Named licence or product to assign.
- In Expiration date, choose the subscription to assign from by its expiry date. This applies when subscriptions for the same product have different expiry dates. If there is only one option, this step is automatic.
- In Summary, review and confirm your selections.
The selected users receive their Named credit allowance immediately.
Option B. Assign a product to a user from the three-dot (⋯) menu
Use this option to assign a product to one specific user.
- Find the user in the table and click the ⋯ menu on their row.
- Choose Allocate product to user. The Allocate product to user dialogue opens with four expandable sections. They are To, Product, Expiration date and From, in that order.
- The To field already contains the user you selected.
- In Product, choose the Named licence to assign. If the user already has all available products, you see "All available products are already assigned to this user" and cannot continue. Ask Procadsys about buying more Named seats, or unassign a seat from another user first.
- In Expiration date, choose the subscription to assign from by its expiry date. This applies only when multiple subscriptions are available.
- In From, confirm the assignment details.
- Click Allocate at the bottom.
View Floating pool details
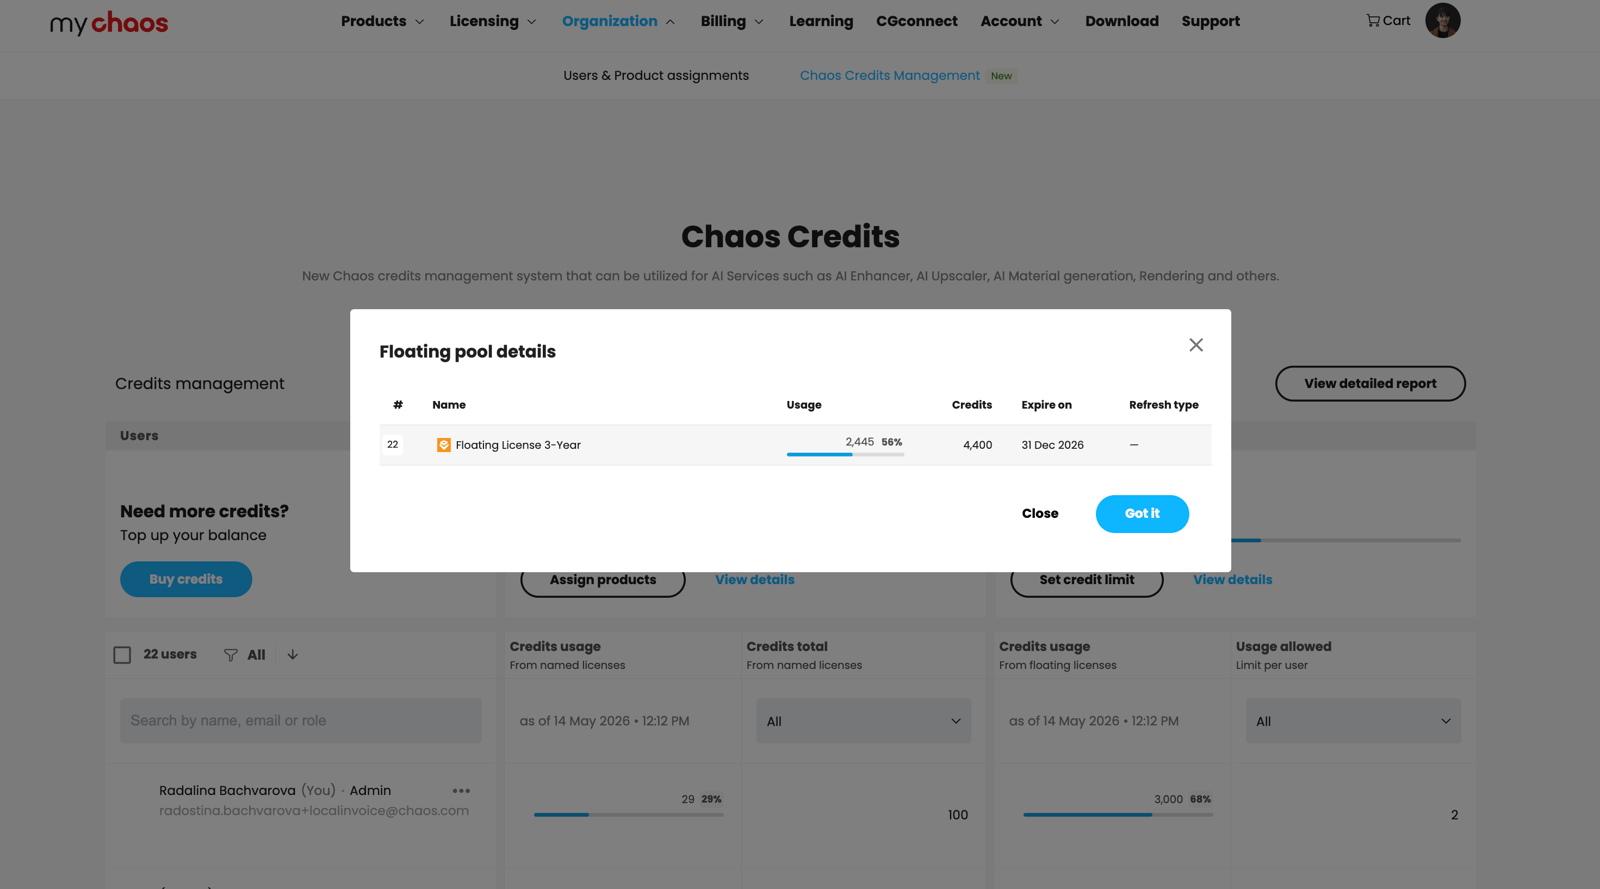
Click View details on the Shared pool card to open the Floating credits details dialogue. It lists every source of credits in your Floating pool, with these columns:
Column | What it shows |
|---|
Column | What it shows |
|---|---|
# | The number of credits from the source. |
Name | The subscription or pack. |
Usage | The credits used this cycle, with a percentage badge. |
Credits | The total credits the source provides. |
Expire on | When the credits expire. |
Receive new on | The next credit refresh date. |
Refresh type | Monthly, Annual or none. |
Close the dialogue with Close or Got it.
View the usage report
Click View detailed report at the top right of the Credits management section to open your organisation's usage report. It shows credit usage across your organisation for the selected period.
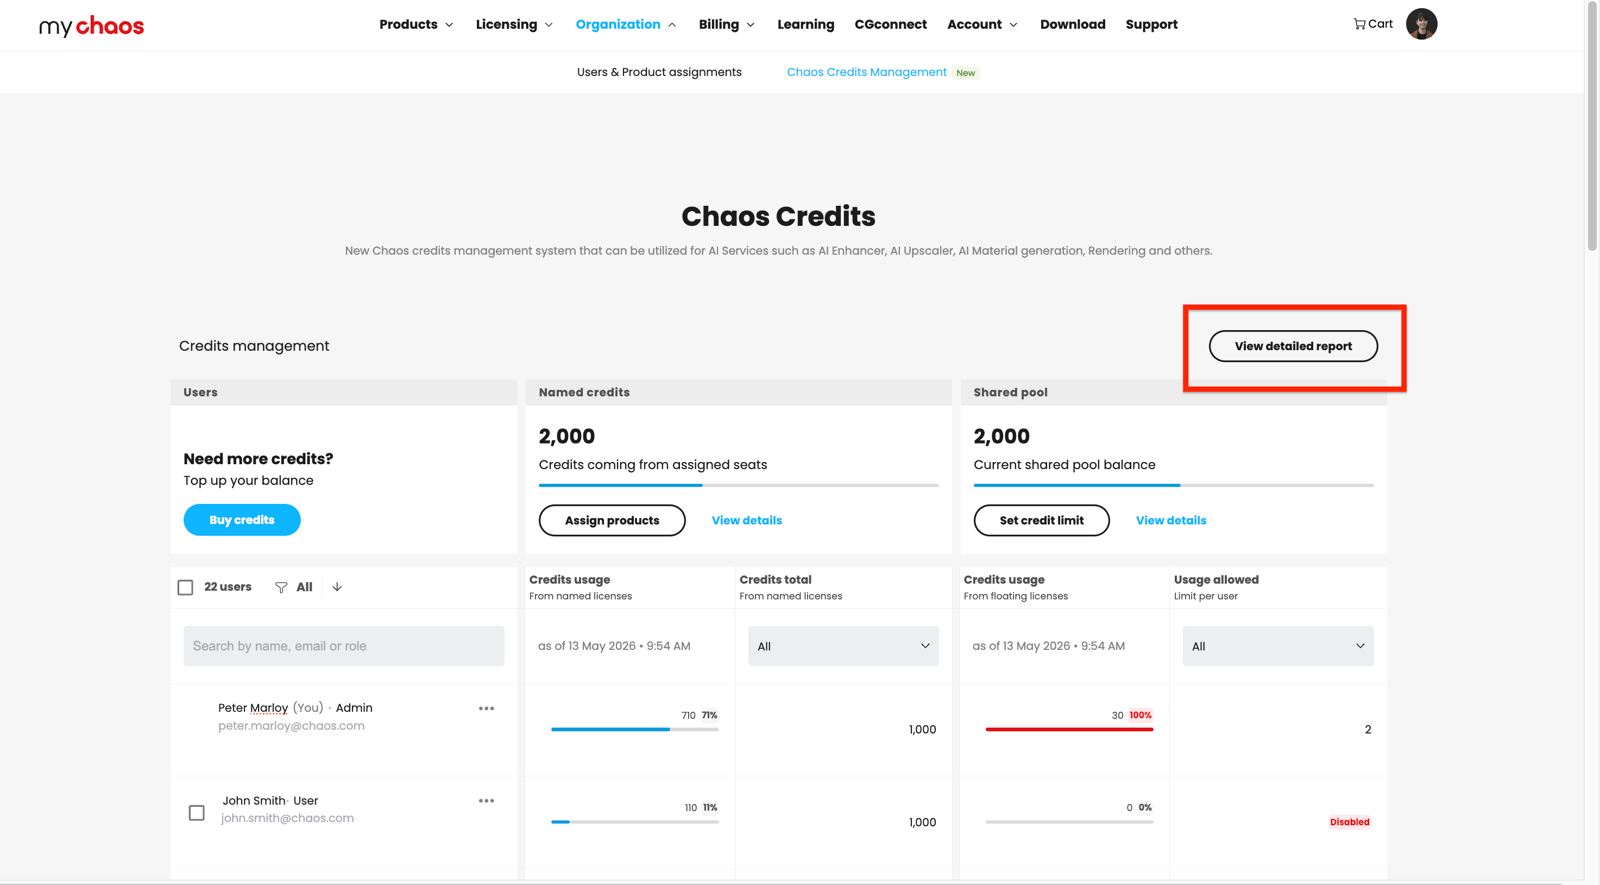
View detailed report button
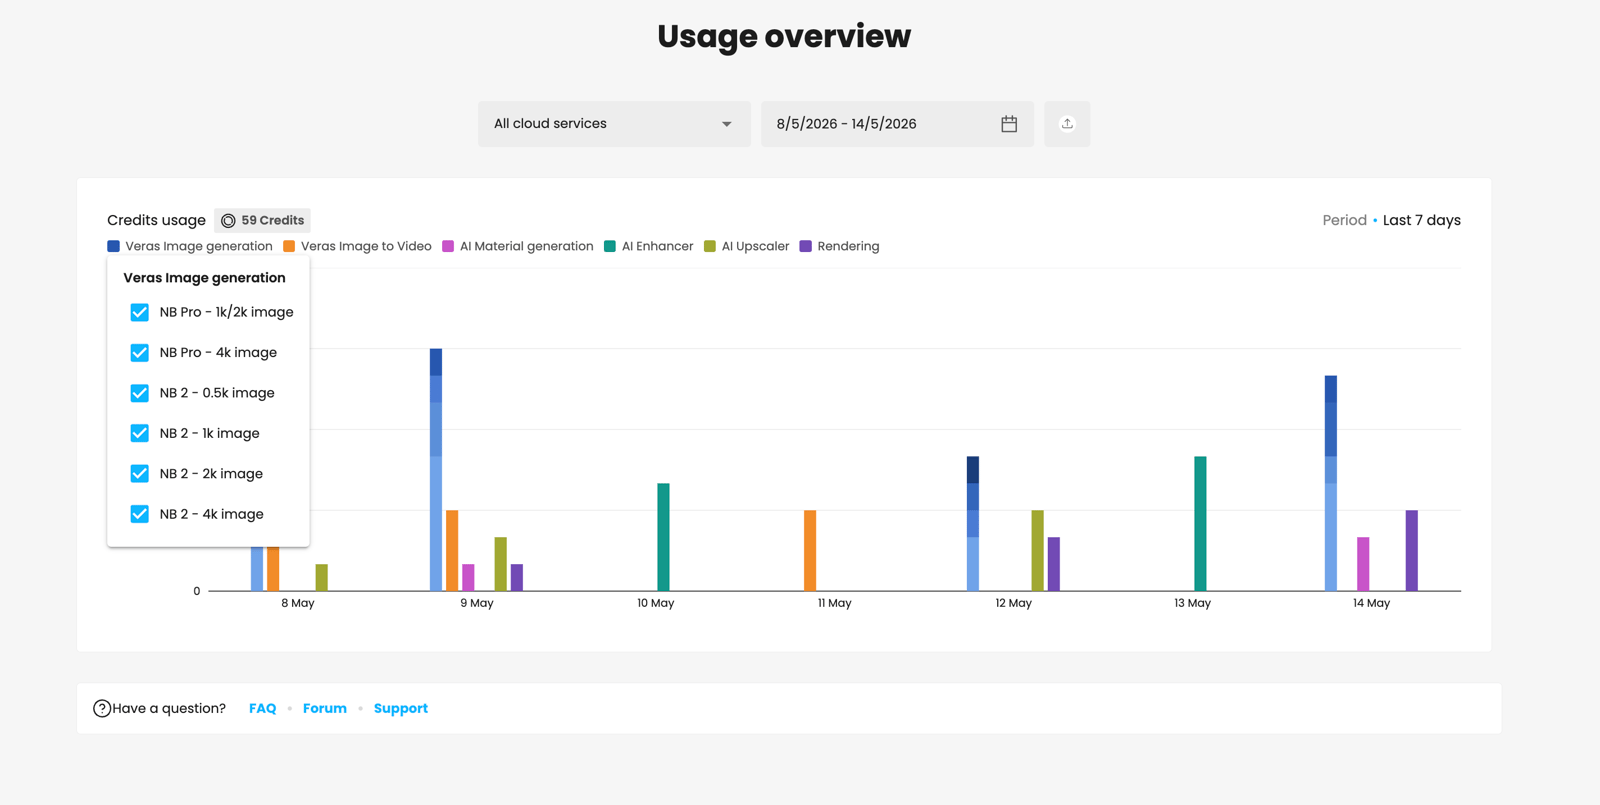
Usage overview graphic
Filters and controls
Three controls appear at the top of the report:
- The Cloud service filter defaults to All cloud services. Open it to show a single service in the chart.
- The Date range picker lets you choose custom start and end dates. Click the calendar icon to set them. Use longer ranges to see usage trends or shorter ranges to focus on recent activity.
- Export is the icon button to the right of the date range. It downloads the displayed data as a CSV file for finance reporting, internal billing or spreadsheet analysis.
Read the chart
The stacked vertical bar chart has one bar for each day in the selected date range. Each colour represents a cloud service: Veras Image generation, Veras Image to Video, AI Enhancer, AI Upscaler or Rendering. The legend above the chart identifies each service's colour.
Some services have sub-operations. Lighter and darker shades of the same colour show these within each bar. For example, Veras Image generation can be split by model and resolution. Click a service name in the legend to open its sub-operation checkboxes. Select or clear the checkboxes to include or exclude sub-operations from the chart.
Two indicators above the chart summarise the current view:
- Credits usage shows the total credits used for the selected period and filters, such as 59 Credits.
- Period shows the selected time window, such as Last 7 days.
Per-user usage report
To see a user's report, open the ⋯ menu on their row and choose View detailed report. The report has the same chart, filters and export options, with usage data for that user only.
Use the report
- Check individual usage. Open per-user reports to see which team members use the most credits.
- Check which services use the most credits. Filter by cloud service or compare the colours across days to see whether most usage comes from Veras, AI features or Rendering.
- Track usage over time. Use longer date ranges to identify weeks with unusual activity and estimate future demand. This can help you decide whether you need a top-up or subscription upgrade.
- Allocate costs and prepare reports. Export the CSV for internal cost allocation, finance reporting or spreadsheet analysis.
What to do when the pool runs low
If your balance drops faster than expected, consider these options:
- Ask Procadsys about upgrading your subscription tier. A higher tier provides more credits and product features if your team regularly exceeds its allowance. The Buy credits page lists subscription upgrade options.
- Ask Procadsys about buying a top-up. Buy credits opens the purchase page. To arrange your purchase through Procadsys, Request a quote.
- Set per-user limits to prevent unintended spending. See Manage Users and Credit Quotas for details.