Corona for 3ds Max
Corona VFB 2.0
This page provides information on the new Corona VFB 2.0, its settings, and usage.
Last updated 1 September 2026
This page provides information on the new Corona VFB 2.0, its settings, and usage.
Overview
Corona 12 introduces the new Virtual Frame Buffer (VFB) 2.0 with an updated interface that has been tuned to the most common needs of artists and can provide a very decent post-production experience and results.

Corona VFB (Virtual Frame Buffer) 2.0
Corona VFB 2.0 Buttons
Button | Description |
|---|
Button | Description |
|---|---|
Saves currently displayed image to a selected file. | |
Press and hold the vertical bar icon:
| |
Copies the VFB content to the host app frame buffer. | |
Copies currently displayed image into clipboard. | |
Erases currently displayed image. | |
Activates mode for editing the render regions. | |
Press and hold the vertical bar icon:
| |
Activates pick mode for selecting objects and setting of camera focus point. | |
Opens the VFB Settings window. | |
Uploads an image to Chaos Cloud with data necessary for AI enhancer. The image contains all data necessary for the AI Enhancer. | |
Opens Collaboration to share drafts and final renders, manage feedback with markups, and coordinate with your team in real time via Chaos Cloud. | |
Start IR – Starts Interactive Rendering. | |
Stops current rendering, but applying postprocessing effects. | |
Press and hold the vertical bar icon: | |
Starts production rendering. | |
Press and hold the vertical bar icon:
| |
Selects currently displayed render elements. | |
Displays the current zoom percentage of the image. | |
Click on the 100% button:
| |
Hide or show tools sidebar. |
VFB Settings
Title – Window title of the Corona VFB.
"R" button – Resets the VFB title to defaults.
"?" button – Shows a list of variables that can be used in the VFB title to include various statistics and information (for example: current noise level, total elapsed time, number of rendered passes, current date and time):
Click here to see the available VFB title variables

Reset – Resets the VFB title to default.
Help – Opens a Help window providing a list of special sequences that are replaced with statistics/info.
Update interval [ms] – The interval (in milliseconds) at which the VFB is periodically updated. Decreasing this value gives more fluid feedback at the expense of processing power that could otherwise be spent on the rendering itself. When the VFB refreshing takes too much of the rendering time, Corona adaptively lengthens this interval to up to 5 times of the set value to maintain adequate rendering speed.
Hide tool labels – When checked, this option hides the descriptive text labels that appear under the VFB toolbar icons, providing a more compact UI.
Render History and A/B Comparison
Folder – The folder where render history stores the CXR files.
Automatic saving on render end – If enabled, a new item is added to the render history in the Corona VFB after each render ends. If disabled, items are only added manually via the button in the VFB.
Show overwrite confirmation – The maximum number of files in the history folder and their total size is limited, once reached the older renders will get automatically removed. If this option is enabled, a confirmation dialog appears first prompting the user if the oldest render should be removed or not. If disabled, the prompt does not appear and the older renders are removed.
Size on HDD (MB) – Maximum size in megabytes of the folder that holds the render history. If the size of all stored items exceeds this limit, then oldest renders get automatically removed.
Limit file count – Maximum file count of the folder that holds the render history. If the count of all stored items exceeds this limit, then the oldest renders will get automatically removed. Zero means no limit is applied.

Post Tab
Saves current postprocessing settings into a file. | Loads postprocessing settings from the specified file. |
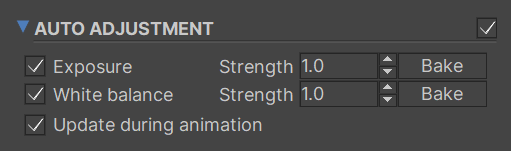
Auto Adjustments
Exposure – Calculates optimal exposure based on rendered values without tone mapping. To see what exposure values is generated, remove exposure operator(s) in tone mapping and bake auto exposure into tone mapping.
White Balance – Calculates optimal white balance based on rendered values without tone mapping. Bake to see the generated value.
Update during animation – If enabled, auto adjustments are calculated for each frame of sequence rendering. When disabled, auto adjustments are calculated only for the first frame of the sequence and stay unchanged.
Tone Mapping
The Tone Mapping rollout lists the currently added Tone Mapping Operators. By default, it includes the following operators:
- Simple Exposure
- White Balance
- Green-Magenta Tint
- Contrast
- Saturation
- ACES OT
"+" button – Displays the list of all available Tone Mapping Operators and allows to add one.
Reset button – Resets the current Tone Mapping Operators stack to the default configuration.
Presets button – Displays the list of built-in tone mapping presets.

Tone Mapping

Full list of mapping operators
Bloom and Glare
Compute After Render – Determines if bloom and glare will be computed during rendering or at the end of it.
Size – Increases/decreases bloom and glare size.
Bloom Intensity – Increases/decreases bloom intensity.
Glare Intensity – Increases/decreases glare intensity.
Threshold – Controls the minimum brightness which is considered for the Bloom and Glare effect. Increasing the threshold applies Bloom and Glare only to the brighter pixels. Reducing it allows the Bloom and Glare effect to be applied to pixels that are less bright.
Color Intensity – Controls how saturated the Bloom and Glare effect is. Higher values mean higher saturation.
Color Shift – Changes the hue of the coloring added to the Bloom and Glare effect.
Streak Count – Defines the number of streaks for the glare effect.
Rotation – Rotation of the glare effect in degrees.
Streak Blur – Decides whether the glare streaks should be sharper or more blurry.
Custom Aperture – Launches an editor which can be used to fine-tune advanced Bloom and Glare options.

Bloom & Glare
Custom Aperture
Sides – Sets the number of aperture blades used for custom aperture. When disabled, the circular aperture is used instead.
Rotation – Rotation in bladed aperture in degrees.
Streak Blur – Controls the blurring of glare streak perpendicular to the streak direction.
Occlusion – Enables occlusion of part of aperture shape.
Ratio – Controls ration of aperture being occluded, with the minimum value meaning no occlusion and the maximum value meaning full occlusion.
Rotation – Controls the rotation of the occlusion in the degrees.
Arc – The arc of occlusion with the minimum value being straight line and the maximum value being full arc.
Symmetric – When enabled, occlusion is applied symmetrically from both sides of the aperture.
Reset all – Resets the setting to default value.
Peripheral Grating – Enables grating along the sides of aperture shape.
Lens Scratches – Simulates scratches over the lens. Regular scratches can create additional glare effect, while irregular ones will effect shape and blur of existing glare effect.
Lens Dust – Simulates dust particles over the lens. Dust can create effect similar to bloom that is affected by overall pattern of generated particles.

Custom Aperture
Sharpening/Blurring
Sharpen amount – The value that is used to control sharpening.
Sharpen radius – Defines the sharpness radius.
Blur radius – Defines the radius of blur.

Sharpening & Blurring
Chromatic Aberration
Chromatic aberration – Enables chromatic aberration, an effect that simulates lens color distortion and gives realism to the render. The chromatic aberration is a phenomenon where the edge of a convex lens splits the white light into different wavelengths onto a sensor of a camera, so the image shows a presence of red and blue light. Mostly visible on the sides of the image.
Amount – Controls the strength of the effect.

Chromatic aberration
Denoising
Denoise amount – The main value that is used to control denoising. It blends between the original (noisy) image and the fully denoised version of the image, where 0 is the original image and 1 is the purely denoised version.

Denoising
Proportion Guide Lines
The Proportion Guide Lines are a set of non-rendering overlays available in the Corona Virtual Frame Buffer (VFB). Their purpose is to assist with image composition by displaying various guides directly over your render. Since they are for display only, they will not appear in the final saved image.
Select between Center Cross, Diagonals, Rule Of Thirds, Golden Ratio, and Custom Grid.
Enable or disable all guides using the main checkbox. Each guide type can be individually enabled and customized with the following common parameters:
Width – Controls the thickness of the guide lines in pixels.
Color – Sets the color of the lines.
Opacity – Adjusts the transparency of the lines, from fully transparent (0.0) to fully opaque (1.0).
Rows and Columns – Control the number of rows or columns for the Custom Grid option.

Proportion Guide Lines
Stats Tab
Times
Scene parsing – How long it took to get the data from the native application format to the internal Corona format. Excessive times (more than a few seconds or tens of seconds for complex scenes) can be caused by running out of RAM, using slow network drives, complex scatters and geometry models, etc.
Geometry – How long it took Corona to prepare the geometry for rendering. This includes computing displacement, building, and acceleration structure, and preparing the lights for sampling. Excessive times (more than a few seconds or tens of seconds for complex scenes) are most often caused by using too detailed displacement, using too detailed displacement, using too many textured lights, or running out of memory.
UHD cache precomp – How long it took to calculate UHD cache. The time depends on resolution, scene complexity, and UHD cache settings ( animation preset calculates significantly longer, but it does not flicker in animation).
Rendering – Total elapsed rendering time.
Denoising – How long the denoising took. Denoising is optionally computed after rendering. Its running time is dependent only on resolution (number of pixels) and the number of render elements to be denoised - it has to run from scratch for each element.
Estimated remaining – If any render limit is set (time, passes, or noise level), Corona computes the best possible time estimate. If no limits are set, '—' is shown and the user has to stop the render manually.
TOTAL elapsed – the total elapsed rendering time.
Scene
Primitives unique – Numbers of unique (non-instanced) primitives in the scene. Primitive means a single triangle, hair strand, etc. Each such primitive is stored in the memory, so this number is directly proportional to the RAM usage (1 primitive takes up about 200 Bytes).
Primitives displac. – The number of unique (non-instanced) micro triangles created by displacement in the scene. Each such object takes a certain amount of memory but is generally an order of magnitude smaller than regular triangles.
Primitives inst. – The number of primitives in the scene after instancing allows storing a single object in the memory just once and placing it into the scene multiple times with almost no additional memory usage. This is extremely useful e.g. for forests, grass, etc.
Geometry groups – The number of unique geometry groups in the scene. One geometry group roughly corresponds to one separate mesh/object in the source scene, not counting instanced meshes. This number does not significantly influence the performance/memory usage, with a single exception; high values (thousands and more) can slow down the preprocessing phase.
Instances – Number of geometry groups in the scene after instancing is applied. Each instance takes about 1000 Bytes of memory.
Lights (groups) – The first value is the total number of light-emitting primitives in the scene and the second value is the number of instances that contain these primitives. High values usually mean a scene with complex illumination, where slower rendering is to be expected. Only true light emission counts - neither self-illumination nor Light material with Emit light off.
UHD Cache
Records – Numbers of discrete points in the scene for which the illumination is computed during preprocessing and which are used for the interpolation during rendering. Complex scenes and animations, where higher precision is required, cause this number to increase, which in turn makes the precalculation slower.
Success rate – The percentage of rays that were accelerated using the cache. This is the effectiveness of the cache, e.g. 70% meaning that 7 out of each 10 rays were accelerated. The higher this number, the faster is the rendering as more rays are accelerated.
Performance
Passes total – The total number of passes computed. One pass in Corona means that each pixel received on average 1 sample. The number of passes directly influences the quality of antialiasing, the depth of field, and the motion blur effects. Smaller images accumulate passes faster there are fewer pixels to process. Also if Rays/sample is too high then too much work is spent per pixel, causing the number of passes to stay low, which slows down the antialiasing/depth of field/motion blur computation. A limit for the number of passes can be set in render settings.
Noise level – An estimate of the remaining noise level in the image. A limit for the noise level can be set in render settings, around 2% usually being enough for the final images, 5% for the final images with denoising, and anything higher than that being suitable for the previews.
Rays total – The average number of rays computed per second since the render started. Rays/s is a measure of the brute force computation power of the renderer. Comparing rays/s between different machines is a good way to compare their CPU performance. The number is also higher in simple scenes when using simple materials. A too low number (lower than usual for the machine) can mean problems with CPU overheating, running out of RAM, other CPU utilization problems, or just having too complex materials/shaders.
Rays actual – Number of rays computed in the last second. Rays/s is a measure of the brute force computation power of the renderer. Comparing rays/s between different machines is a good way to compare their CPU performance. The number is also higher in simple scenes when using simple materials. A too low number (lower than usual for the machine) can mean problems with CPU overheating, running out of RAM, other CPU utilization problems, or just having too complex materials/shaders.
Samples actual – Number of pixel samples computed in the last second. This is the rate of how fast the anti-aliasing, depth of field, and motion blur are computed. This number is the rays/s statistic divided by rays/sample.
Rays/sample – How many rays are needed to compute a one-pixel sample. This is the measure of the shading complexity of the scene, with high numbers meaning that a lot of work needs to be done to compute each pixel. This can be caused by using too complex shaders (with ambient occlusion and rounded edges), materials having too high albedo, or using too high GI vs. AA balance.
VFB refresh time – How long the VFB window takes to redraw last time.
Preview denoiser time – How long it took to denoise the VFB image.

Stats Tab
History Tab
Show with the original postprocessing – Determines which postprocessing is used when comparing images: the one used when the original image was saved or the one currently used in the VFB Post tab.


History Tab
Button | Description |
|---|
Button | Description |
|---|---|
Stores content of the current VFB into the history. | |
Loads content of selected CXR file in the history. | |
Disables the history comparison and shows only the current render. | |
Shows currently rendered image. | |
Removes all items from the history and optionally from HDD. |
Button | Description |
|---|
Button | Description |
|---|---|
Show and Edit this image. | |
Save current render element. | |
Resume rendering of the current scene using this history item as starting point. | |
Clear this item from history, but do not delete it from file system. | |
Delete this item from history, and also from the file system. | |
Uploads this item to Chaos Cloud. | |
Uploads an image with data necessary for AI enhancer. |
DR Tab
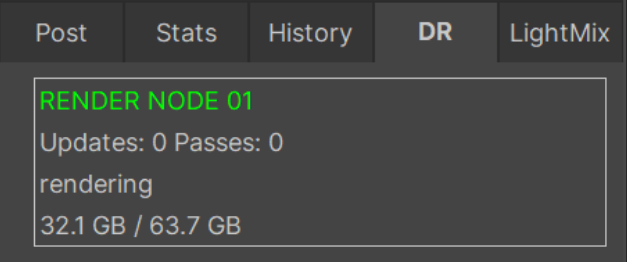
The DR Tab provides information on Corona Distributed Rendering.
Desktop – Resolved name of the render node.
Updates – Displays the count of how many times the render node has sent the rendered data to the master machine.
Passes – Displays the current number of passes render node has rendered.
Rendering – Shows the current stage of the rendering (Starting, Rendering, or Finished)
21.8 GB / 63.7 GB – Committed/Physical RAM installed in the system.
DR Tab
LightMix
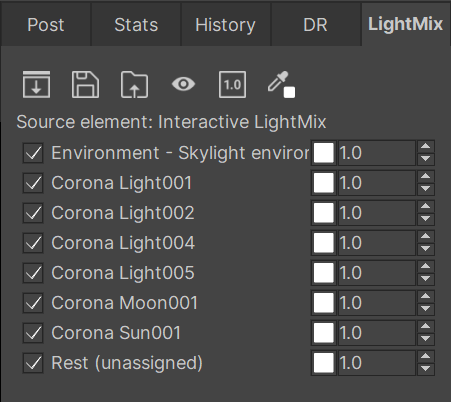
The LightMix tab is enabled as soon as at least one LightSelect and one LightMix render element are added to the scene. For more information, see: Corona LightMix.
Button | Description |
|---|
Button | Description |
|---|---|
Bake currently set light mix colors/intensities into the scene lights. | |
Save settings of the current displayed light mix element to a config file. | |
Load light mix settings from a config file to the currently displayed light mix element. | |
Enables all entries if some are disabled or disables all if all are currently enabled. | |
Set all intensities to 1. | |
Set all colors to white. |
Additional Tips:
- LightMix colors can be copied by dragging and dropping a color swatch onto another swatch.
- LightMix colors can be reset to pure white by right-clicking on a swatch.
- You can also right-click on the light names on the LightMix list in the Corona VFB to select a specific light in the scene, add that light to the current selection, or remove that light from the current selection.
LightMix Tab