V-Ray for Maya
Distributed Rendering
This page provides information on the Second-generation Distributed Rendering (DR2) in V-Ray for Maya.
Last updated 20 April 2026
This page provides information on the Second-generation Distributed Rendering (DR2) in V-Ray for Maya.
For older V-Ray versions, refer to the Legacy Distributed Rendering workflow.
Overview
Distributed rendering is a technique for distributing a single render job within a single frame across many computers in a network. The idea is to reduce render time by dividing the different parts of the rendering pipeline and assigning each participant a specific part of the job. A computer network that performs distributed rendering is sometimes referred to as a render farm.
V-Ray supports distributed rendering (DR). While there are many ways to do DR with V-Ray, the most common way is to divide the frame to be rendered into small regions. The Render Client connects to a Dispatcher, which connects to the Render Servers. The render servers are sent different parts to calculate. Once done, the servers request additional tasks to render the next part until the entire image is completed, and the client has assembled all the image data back together to form the full image. As a result, many machines can effectively participate in rendering. Note that the Render Client can act as a Dispatcher too, but you can optionally dedicate another machine to the role of a Dispatcher to further boost the performance.
Organization
In V-Ray, DR is performed entirely through the TCP/IP protocol, which is the standard protocol of the Internet and thus the most commonly supported protocol by hardware. V-Ray does not need an additional file or directory sharing to perform DR. However, you might need file/directory sharing for the bitmaps or other additional files used during rendering. The distribution management is divided into a Render Client, Dispatcher, and one or more Render Servers.
Render Clients
The Render Client is the computer from which the rendering is started. Maya and V-Ray for Maya must be running on this computer to start DR. The process initiated by the Render Client divides the frame into rendering regions and sends them to the Dispatcher. In any Distributed Rendering job, there is only one Render Client.
Render Dispatcher
Starting with V-Ray 7, update 2, the V-Ray Distributed Rendering process introduces the concept of a Dispatcher.
When a dedicated Dispatcher is used, the Client communicates directly with the Dispatcher, and the Dispatcher, in turn, communicates with the other Servers. Typically, the Client doesn’t participate in the rendering, which benefits machines with less powerful GPUs or CPUs. Customers with render farms can utilize the Dispatcher and Render Servers over a high-speed network link, thereby significantly increasing network throughput. This solution removes the limitation that sending out the scene and transferable assets would bottleneck the process due to the Client's limited network capacity.
The Dispatcher in a Distributed Rendering job can be only one, and the Dispatcher machine can’t be changed once the Distributed Rendering job has been started.
The machine used for the Render Client can be the same as that for the Dispatcher.
The Dispatcher can also participate in the rendering process if you want to utilize the machine’s resources.
Render Servers
A Render Server is one of the computers in the network that does the rendering work. A Render Server requests render data from the Render Dispatcher, processes it, and returns the result. In any DR job, there can be many Render Servers. Render Servers can be added before or during the distributed rendering process.
1. Installation
Option 1: Standard V-Ray Installation
Similar to installing V-Ray for Maya on your workstation, you'll need to install it on any computers to which you wish to distribute your render jobs. However, instead of the Full install option, the Standalone only option works if you plan to use that machine solely as a Render Server.

Option 2: Portable Installation
Portable Installation is beneficial for installing the same V-Ray version, with the same environment, on multiple machines without running an installer. You can refer to the Portable Installation Guide on how to unpack and set the relevant environment variables. The remaining steps are as described below.
2. Licensing
Next, ensure you have an active V-Ray for Maya License (by installing V-Ray for Maya on your computer, or connecting to a license server on your network). Each Render Server will need access to a V-Ray Render Node license. This process is made easy with Chaos Licensing by loading http://localhost:30304/#/ (or use the computer’s IP address running the licensing system, with port 30304). For more details on this process, please see the Changing the Product License Setup page.

3. Running the Render Servers
Now that everything is set and ready to go, we need the additional computers to start listening for render jobs on the network.
Run the V-Ray Render Server application installed with V-Ray for Maya. It can be started through convenient shortcuts or directly by running the vray -server command from V-Ray Standalone Command Line Options.
Windows
You can start the executable by navigating to the Start menu and selecting Launch V-Ray render server.
Alternatively, enter installed_vray_location\Maya XXXX for x64\maya_vray\bin\vray.exe -server in Command Prompt. Replace XXXX with your version of Maya, for example:
<code data-v-c2b1f83f=""><span data-v-c2b1f83f="" class="line">C:\Program Files\Chaos\V-Ray\Maya 2026 for x64\maya_vray\bin\vray.exe -server</span></code>

Linux
You can start the executable from usr\Chaos\V-Ray\Maya20XX-x64\vray\bin\vrayserver.
Alternatively, enter installed_vray_location\Maya XXXX-x64\maya_vray\bin\vray -server in Terminal. For example:
<code data-v-c2b1f83f=""><span data-v-c2b1f83f="" class="line">/usr/Chaos/V-Ray/Maya2026-x64/maya_vray/bin/vray -server</span></code>
macOS
You can start the executable from /Applications/Chaos/V-Ray/Maya20XX/vray/bin/vrayserver.
Alternatively, enter installed_vray_location/vray_XXXX_mayaXXXX/vray/VRay.app/Contents/MacOS/vray.bin -server in Terminal. Replace XXXX with your versions of V-Ray and Maya, for example:
<code data-v-c2b1f83f=""><span data-v-c2b1f83f="" class="line">installed_vray_location/vray_72000_maya2026/VRay.app/Contents/MacOS/vray.bin -server</span></code>
Register as a Server Service
This manual start process is great if you don't want the computer to always render in server mode. However, you'll need to remember to turn it on every time the computer starts, as it's required for rendering. If you don't want to do this manually every time, register the server as a service either through the installation process or by registering the V-Ray render server application as a service through the OS.
You can register the V-Ray Standalone application as a Windows service to run automatically on Windows boot from the Windows Start > All Programs > V-Ray for Maya 20xx folder > Register V-Ray render server as a service. V-Ray Standalone can now be a render server for Distributed, Network, and IPR rendering.
Running Servers on Different OSes
Cross-platform render jobs are possible with V-Ray. For example, you can start a rendering from a Windows machine and distribute to any combination of render servers running on Linux, macOS, and/or Windows to join the rendering job, as long as they are running their respective render server application. Any OS can originate a render as the render client, or receive a render job as a render server.
4. Set the Render Dispatcher
The Dispatcher can be the localhost or another machine. In principle, the Client doesn't participate in rendering. Depending on the setting (if Use dispatcher for rendering is enabled or not), only the Dispatcher and the Servers do.
If you want to run the Dispatcher headless on a separate machine from the Client machine, use the following command:
- For Windows:
<code data-v-c2b1f83f=""><span data-v-c2b1f83f="" class="line">"C:\Program Files\Chaos\V-Ray\Maya 2025 for x64\maya_vray\bin\vray.exe" -run-dispatcher=2</span></code>
- For Linux:
<code data-v-c2b1f83f=""><span data-v-c2b1f83f="" class="line">'/usr/Chaos/V-Ray/Maya2025-x64/maya_vray/bin/vray' -run-dispatcher=2</span></code>
- For macOS:
<code data-v-c2b1f83f=""><span data-v-c2b1f83f="" class="line">/Applications/Chaos/V-Ray/Maya2026/vray/VRay.app/Contents/MacOS/vray.bin -run-dispatcher=2</span></code>
Value of 1 starts in server mode with the ability to act as a DR Dispatcher. A value of 2 uses the Dispatcher to also help with the actual rendering as a server. This host, however, cannot be used as a server with someone else's Dispatcher.
If you want your local machine to act as both the Dispatcher and the Client, you don’t need to do any extra steps. Everything can be done on the Client side.
The Dispatcher can’t be changed during rendering.

5. Set the Render Client
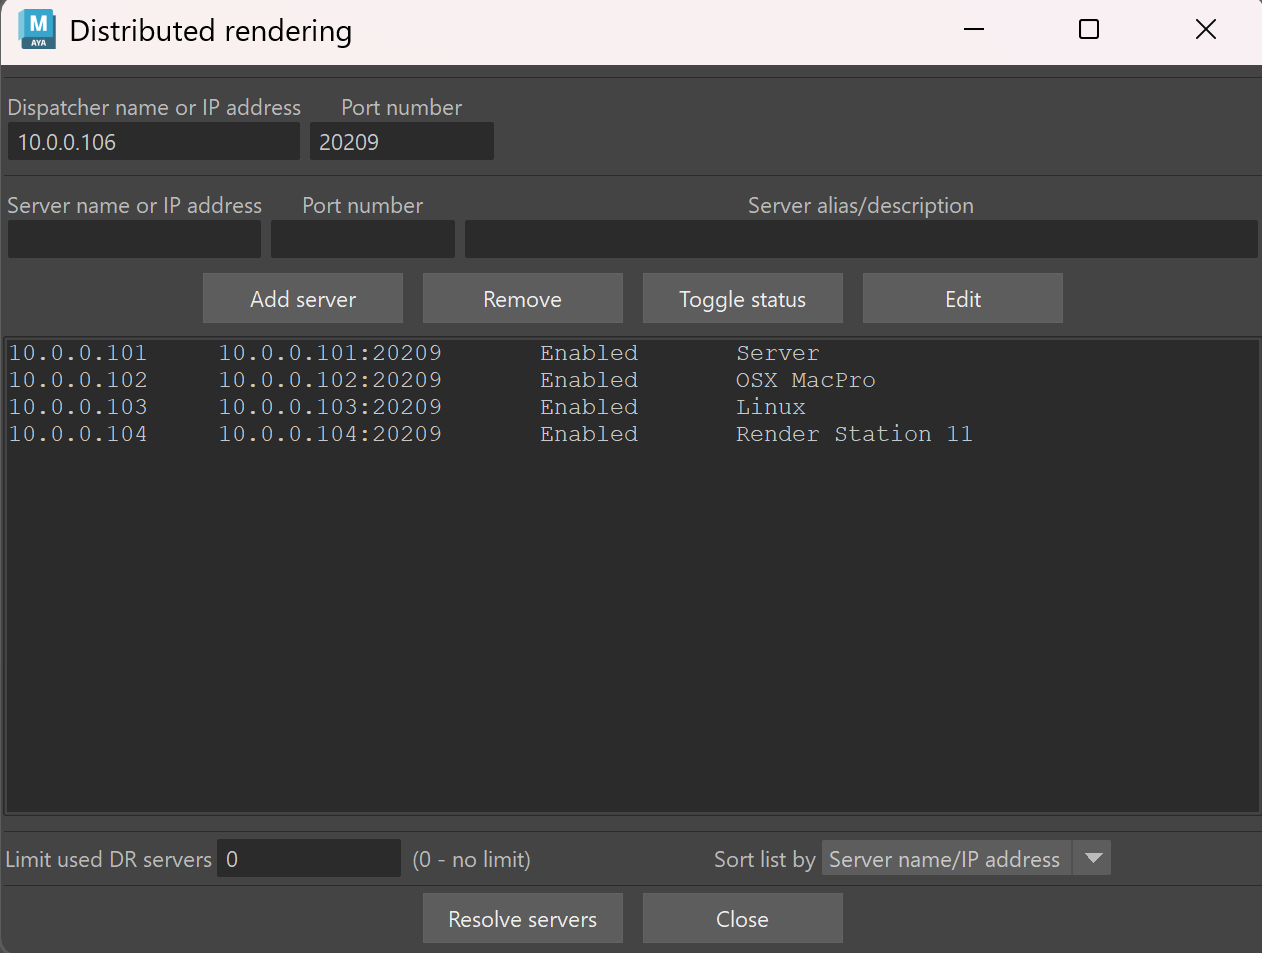
Let's start with the DR Settings... button to ensure the nodes are set up in our Maya session.
If you’re using a separate machine for the Dispatcher, enter the Dispatcher IP address and leave the default port number (20209). If your local machine will be acting as the Dispatcher, you can leave this slot empty.

Enter the name or IP address of the render servers into the Server name or IP address box in the upper left text box of the Distributed rendering settings window. The default port should be 20209. You can include a description, which is helpful if using IP addresses to help remind you which server is which.
Suppose you entered server names instead of IP addresses. In that case, you will need to click Resolve servers to convert those entries from names to IP addresses, ensuring that your render client can properly communicate with those machines. This step is not required if you have already entered IP addresses for all your render servers in this list.
Close the window and return to the Render Settings window.
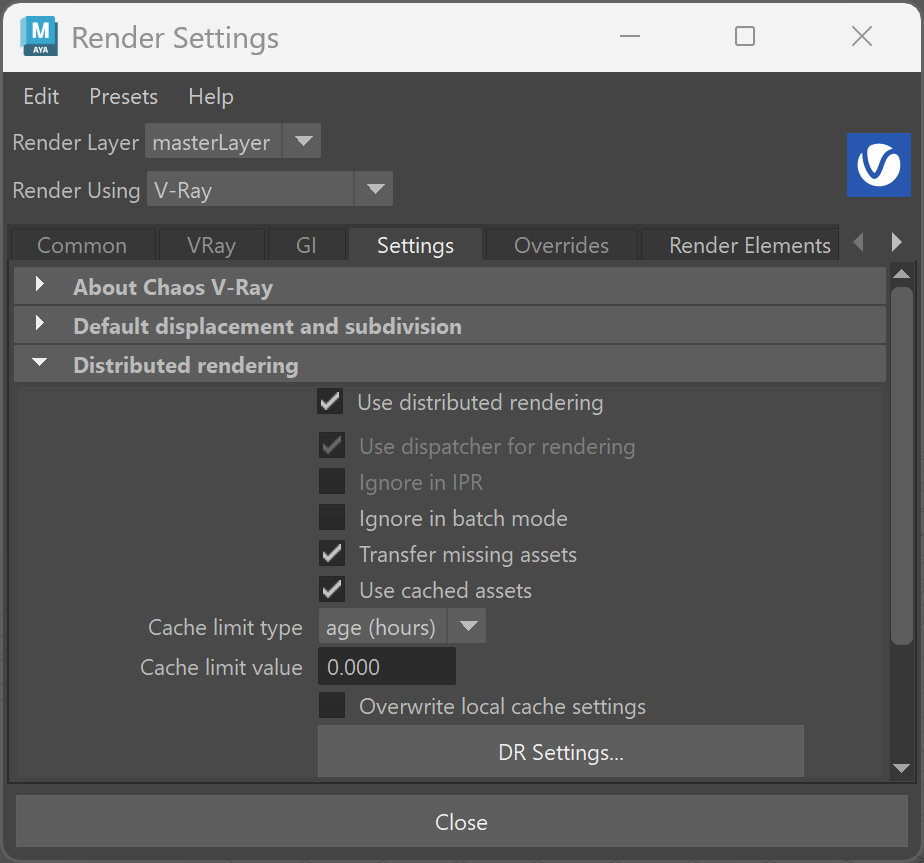
Turn Use dispatcher for rendering on or off, depending on whether you want the Dispatcher to participate in the rendering or not. If the Dispatcher is the local machine, you will get the equivalent of Use local machine from the old distributed rendering workflow.
Optional Settings
The rest of the settings below are optional, depending on how you want to render (or work while rendering).
If you use image textures, HDRI files, V-Ray proxy objects, or any other external assets, consider enabling 'Transfer missing assets'. This makes local copies on your servers to ensure that they have access to the project's assets. This can also be used when your project is not saved in a shared location on a network.
You can also enable Use cached assets if you need to render more jobs from the same project and don't want to transfer project files every time you render.
Cache limits can be set based on time or size to keep the cached assets from piling up and taking up too much hard drive space on the server machines. However, the commonly preferred workflow is to keep the project and its assets stored on a shared network drive, so that renders can occur without waiting for transfers.
For more details on the render settings for DR, see the Distributed Rendering Settings page.
To start a client job using V-Ray Standalone, refer to the Standalone command line page.
6. Rendering
V-Ray does not require any additional files or directory sharing to be set up to perform DR. However, if your Maya project uses additional bitmaps or assets, you may want to store them in a shared location on your network. If not, you need to use the Transfer missing assets option so that all the render servers will have copies of the project assets transferred to them before rendering can begin. For efficiency, enable caching of assets to avoid re-transferring an already copied asset for subsequent renderings.
A shared location can be a folder or drive on your workstation with sharing permissions enabled, or on a network server. What's important is that all the computers rendering the scene have access to the project location and can load any required assets. Furthermore, if using mapped network drives in Windows, ensure the same drive letter is used on the workstation and all render servers to ensure access to the exact shared location, unless you are using UNC paths for scene assets.
Once your scene in Maya is ready to render, turn on the Distributed Rendering Settings of the Maya Render Settings window.
Distributed Rendering on macOS via Autodesk Backburner
Since Backburner starts as the root user (hence, V-Ray is also started as a root user), V-Ray cannot find some files needed to properly set up distributed rendering. The solution to this problem is to do the following:
- Copy the vray_dr_list.xml file from the desired user's settings (/Users/<username>/Library/Preferences/Autodesk/maya) to /Applications/Chaos/V-Ray/<maya_version>.
- Add the string: export VRAY_AUTH_CLIENT_FILE_PATH=/Users/<username>/.Chaos/vrlclient.xml to the folder /etc/profile. This ensures V-Ray knows where to load its license.
UDP Usage
When UDP is applied to a DR dispatcher or a render server, it allows it to participate in the UDP automatic discovery mechanism on the local network segment. This means that when the UDP is enabled, the dispatcher can find the servers that have it enabled automatically without being provided a list beforehand. The dispatcher and servers have to be started on the same port for this to work. The port can be the default or custom. A custom port may be used, e.g., if you want to discover just the servers running on it.
To use UDP, you need to enable it on both the dispatcher side, so it can find servers, and the servers' side, so they can be automatically discovered. The option does not apply to the client.
Applied to the Dispatcher:
<code data-v-c2b1f83f=""><span data-v-c2b1f83f="" class="line">vray -run-dispatcher=1 -distributed-udp</span></code>
Windows example:
<code data-v-c2b1f83f=""><span data-v-c2b1f83f="" class="line">C:\Program Files\Chaos\V-Ray\Maya 2026 for x64\maya_vray\bin\vray.exe -run-dispatcher=1 -distributed-udp</span></code>
macOS example:
<code data-v-c2b1f83f=""><span data-v-c2b1f83f="" class="line">installed_vray_location/vray_72000_maya2026/VRay.app/Contents/MacOS/vray.bin -run-dispatcher=1 -distributed-udp</span></code>
Linux example:
<code data-v-c2b1f83f=""><span data-v-c2b1f83f="" class="line">/usr/Chaos/V-Ray/Maya2026-x64/maya_vray/bin/vray -run-dispatcher=1 -distributed-udp</span></code>
Applied to the Server:
<code data-v-c2b1f83f=""><span data-v-c2b1f83f="" class="line">vray -server -distributed-udp</span></code>
Windows example:
<code data-v-c2b1f83f=""><span data-v-c2b1f83f="" class="line">C:\Program Files\Chaos\V-Ray\Maya 2026 for x64\maya_vray\bin\vray.exe -server -distributed-udp</span></code>
Linux example:
<code data-v-c2b1f83f=""><span data-v-c2b1f83f="" class="line">/usr/Chaos/V-Ray/Maya2026-x64/maya_vray/bin/vray -server -distributed-udp</span></code>
macOS example:
<code data-v-c2b1f83f=""><span data-v-c2b1f83f="" class="line">installed_vray_location/vray_72000_maya2026/VRay.app/Contents/MacOS/vray.bin -server -distributed-udp</span></code>
Notes
- When you cancel a DR rendering, it may take some time for the render servers to complete their tasks, and they may not be immediately available for another render.
- Servers can be added, removed, enabled, and disabled while running a CPU-distributed render. For GPU rendering, DR settings can not be changed during the render. While a progressive rendering DR job is running, render nodes can’t be removed, but they can be added. While rendering, some of the options will be disabled. Stop the render to make adjustments.
- If the VRAY_ASSETS_CACHE_PATH environment variable is not set, the default system temp folder is used for copying the assets, usually C:\Users\<username>\AppData\Local\Temp on Windows (%TEMP%) or /tmp on Linux and macOS ($TMPDIR).