Enscape Envision
Camera Details
This page provides information about camera parameters in Enscape Envision.
Last updated 27 May 2026
This page provides information about camera parameters in Enscape Envision.
Overview
The camera parameters are accessible in the Details tab when a camera is selected. Cameras can be selected in the Cameras tab as well as in the Cameras filter tab of the Objects tab.
Parameters
A field for the name of the selected camera. Renaming the camera here automatically updates the camera name in the respective Objects filter tab. |
A field for the name of the selected camera. Renaming the camera here automatically updates the camera name in the respective Objects filter tab. | |
Lock – Disables the camera transformation options (position and rotation), greying out the disabled options. Click to re-enable the options for manipulation. | |
Select hierarchy All – Selects the parent element and all children of the current selection from within the scene hierarchy. | |
Select hierarchy Parent only – Selects only the parent of the current selection from within the scene hierarchy. | |
Select hierarchy All children – Selects the rest of the children in the scene hierarchy group that the current selection belongs to. | |
Land to surface – Moves the selected camera downwards (along the Z axis) until its bounding box collides with the first object below it. | |
Duplicate Camera – Duplicates the selected camera. | |
Copy Camera Settings – Copies all settings of the selected camera. | |
Paste Camera Settings – Pastes the previously copied camera settings to the selected camera. | |
Move along path – Associates the selected camera with a path to define its direction of movement. | |
Move along path settings – Opens the Move along path settings. Available when the Move along path button is activated and a path is selected. | |
Look at – Picks an object for the selected camera to look at during animation. |
Transformations
World coordinates – When enabled, camera transformations use world coordinates (the global scene axes). When disabled, camera transformations use local coordinates (the object's own axes).
Position – Moves the camera along the X, Y and Z axes.
Rotation – Rotates the camera along the X, Y and Z axes.

Click the Revert the transformation () button to restore all position and rotation values to their default values, i.e to zero.

Move Along Path
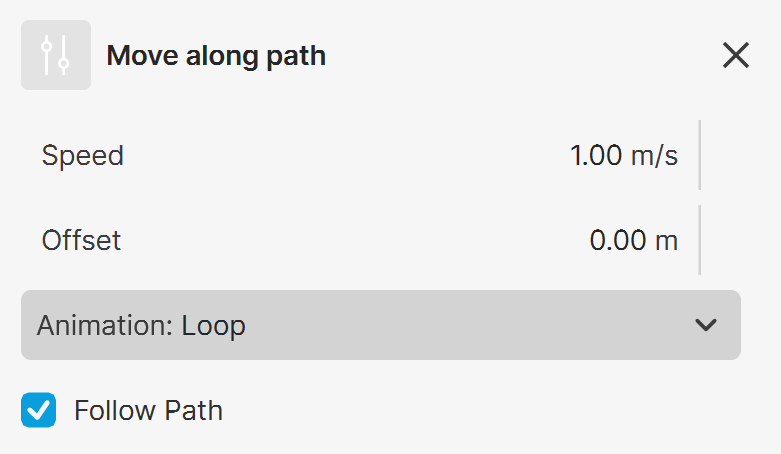
Speed – Specifies the speed of the camera while moving along the path.
Offset – Specifies the camera forward offset from the starting point of the path.
Animation – Specifies тhe behavior of the animation after it finishes playing. The animation can loop, stop, hide, or extrapolate.
Follow Path – When enabled, the camera aligns with the centerline of the path, automatically following the path direction.
General
Base properties
Camera Type – Specifies whether the camera is Perspective or Orthographic.
Aspect Ratio – Sets the aspect of the render resolution.

Simplify Aspect Ratio () – Simplifies the aspect ratio. For example, clicking Simplify Aspect Ratio on a resolution of 1920x1080 pixels sets the aspect ratio to 16x9.
Mode

– Switches to the use of Field of View.
– Switches to the use of Focal Length.
View Angle – Specifies the angle of view that the camera captures. Narrow angles zoom in, wider angles zoom out. See the View Angle example below.
Focal Length – Specifies the focal length of the camera in mm. Longer focal lengths have narrower view angle and result in zoom in. Shorter focal lengths have wider view angle and result in zoom out. See the Focal Length example below.
Exposure
Auto – Calculates camera exposure and white balance automatically.
Exposure – Controls the amount of light entering the camera, affecting image brightness. Higher values let in less light, resulting in a darker image. Lower values brighten the image.

Pick Surface () – Sets exposure compensation based on the brightness of a picked surface.
White balance – Adjusts the image to compensate for the “color temperature” of a light source, which refers to the relative warmth or coolness of white light. Objects in the scene that match the specified color appear white in the image.
Depth of Field
Depth of field – Enables the depth of field effect, which controls which areas of the image are in or out of focus. See the Depth of Field example below.
Focal Distance – Specifies the distance from the camera at which objects appear in sharp focus. Objects outside this distance are blurred based on the Aperture F-Stop value.

Pick Focal Point () – Sets the focal distance based on a point picked in the view. See the Pick a Focal Point example below.
Tilt correction (two-point perspective)
Automatic Vertical Tilt – When enabled, automatically tilts the camera, straightening all vertical lines to simulate 2-point perspective. See the Tilt Correction example below.

Color Corrections
Tonemapping
Type – Modifies the rendered image by adjusting the colors for a more realistic result. There are three available tonemapping modes:
Enscape – Matches the way Enscape performs tonemapping. Use this for better compatibility with projects coming from Enscape.
Simple – Doesn’t apply any adjustments by default. Lowering the Highlight burn applies soft clamping to overexposed highlights, preserving brightness in the shadows and midtones at the cost of lower color saturation. Contrast applies a simple contrast curve that brightens the highlights and darkens the shadows.
Filmic – Adjusts colors to resemble a camera film look: soft highlights, darker shadows, and saturated midtones. Provides additional parameters for advanced control over the image look.
Highlights – Scales the visibility of bright image regions to partially increase or decrease image contrast. Available for the Enscape type.
Shadows – Scales the visibility of dark image regions to partially increase or decrease image contrast. Available for the Enscape type.
Highlight burn – Applies exposure corrections to highlights in the image. Available for the Simple type.
Contrast – Increases or decreases image contrast away from the midium gray value.
Gamma – Specifies the gamma correction. It can be used as an aggressive contrast control.
Highlights – Controls the softness of bright areas. Higher values produce an overall brighter image with fewer overexposed highlights.
Midtones – Controls the brightness of the midtones and their transition with shadows and highlights.
Soften midtones – Controls the shadow-to-midtone transition. Higher values brighten the shadows and midtones; lower values darken the shadows.
Shadows – Controls how pronounced the shadows are. Higher values darken the dark tones and midtones.
Soften highlights – Controls how much of the overexposed highlights are softened. Higher values affect larger overexposed areas; lower values leave more overexposed areas intact.
LUT
LUT Correction – Applies a color lookup table file (LUT) for stylized or calibrated post-render color grading.
Amount – Specifies the LUT weight. A value of 0 applies no LUT effect; a value of 1.0 applies the full effect.
Load – Loads a LUT file.
Color space – Specifies the color space for the loaded LUT file.
Linear – The loaded LUT file is interpreted in linear color space.
sRGB – The loaded LUT file is interpreted in sRGB color space.
V-Ray Log – The loaded LUT file is interpreted in a V-Ray logarithmic color space.
Bloom
Bloom – Applies a soft halo or glow effect (bloom effect) to the scene.
Intensity – Increasing the value to boost bloom intensity.
Threshold – Sets a minimum value for the rendered pixels to be considered as bloom source. The Bloom is generated only around pixels with larger value than the specified threshold.
Iterations (spread) – Specifies the size of the bloom spread. Larger values increase the spread but impact performance.
Hue/Saturation
Hue/Saturation – Applies an HSL transformation to the image colors.
Hue – Changes the overall hue of the image colors. Grey colors aren’t affected.
Saturation – Specifies the intensity of the image colors. Positive values produce a more vibrant, saturated image; negative values desaturate and dull the image colors.
Lightness – Adds or removes white from the image for brightness control. Positive values add white to the image, making it lighter. Negative values remove white from the image, making it darker.

Examples
The following examples demonstrate the effect that individual Camera parameters have on the scene. Click on any image to view it at a higher resolution.
Focal Length
This example shows the effect of the Focal Length parameter.
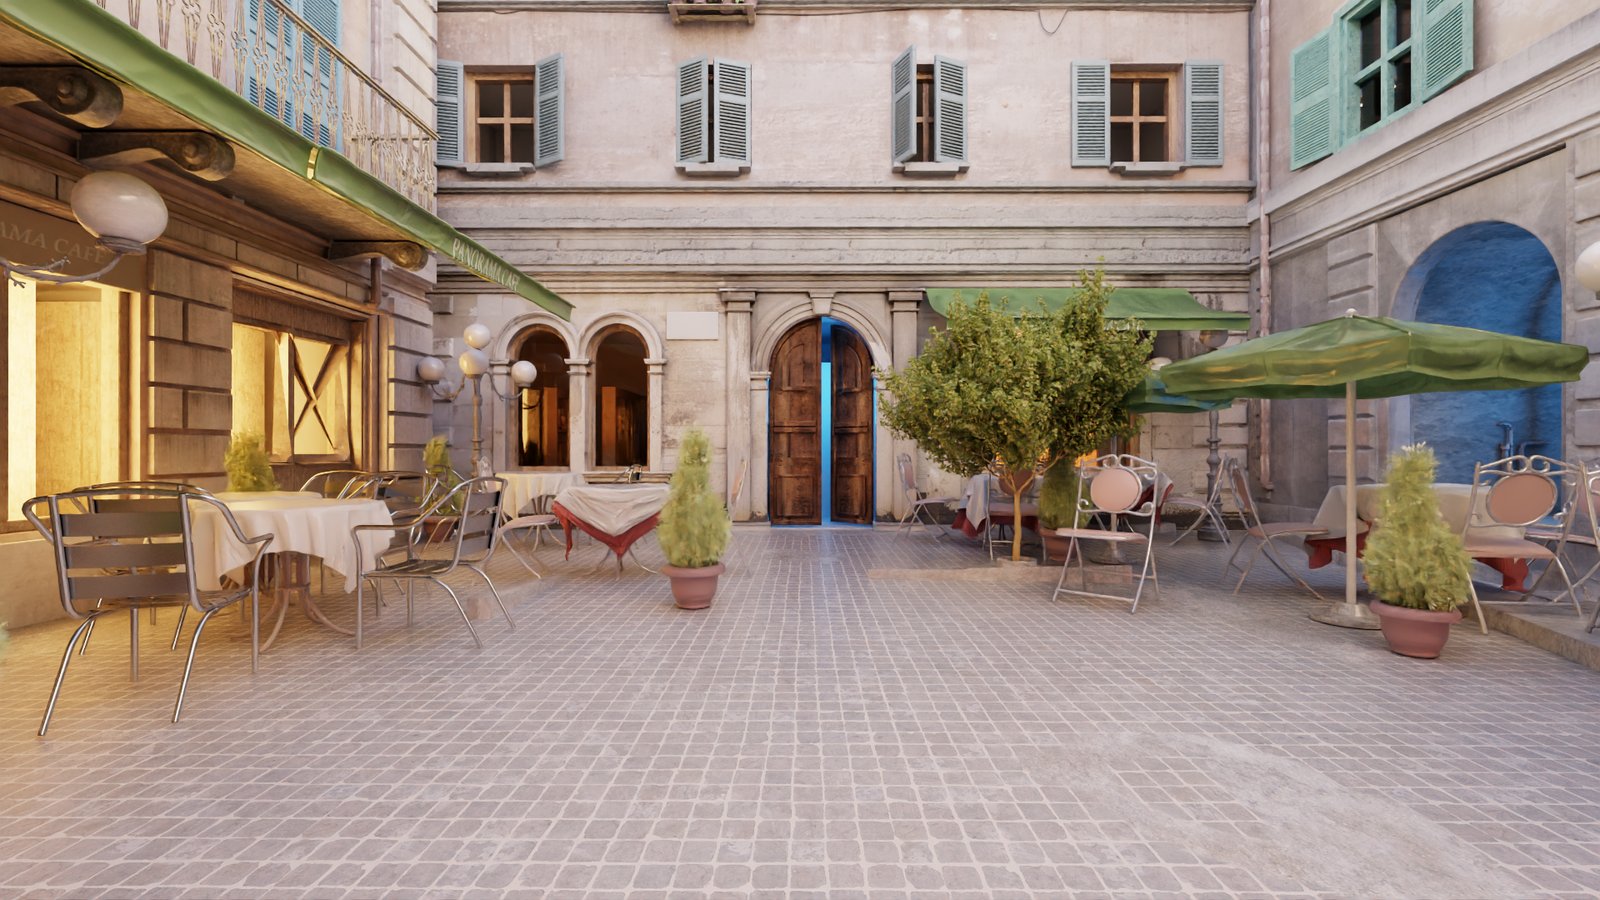
Focal Length = 20

Focal Length = 30
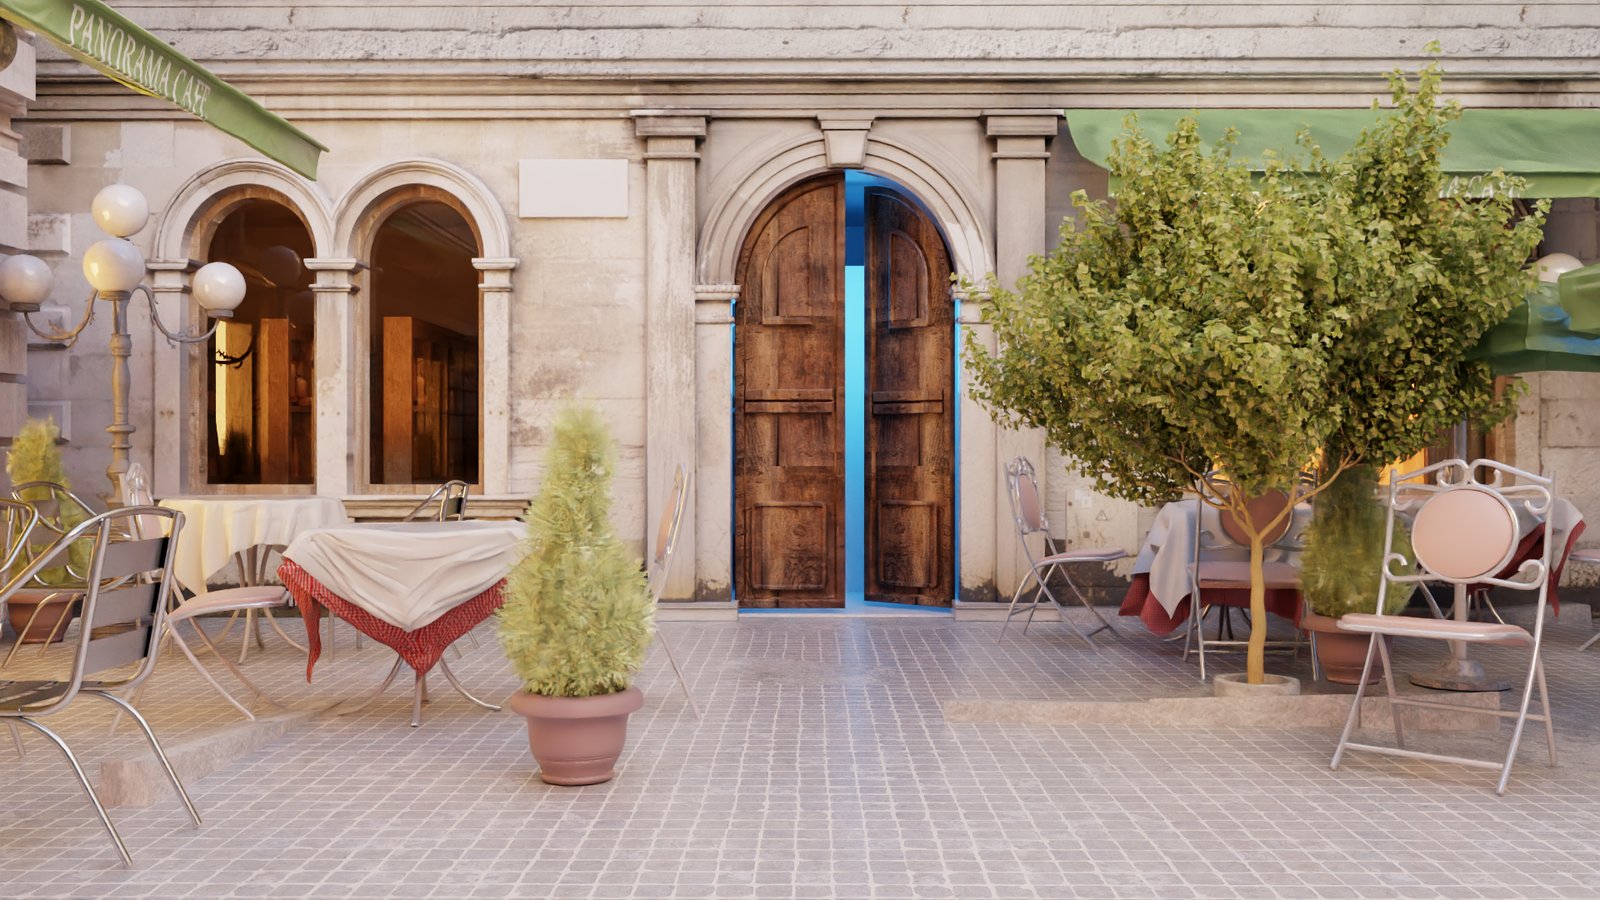
Focal Length = 40
View Angle
This example shows the effect of the View Angle parameter.
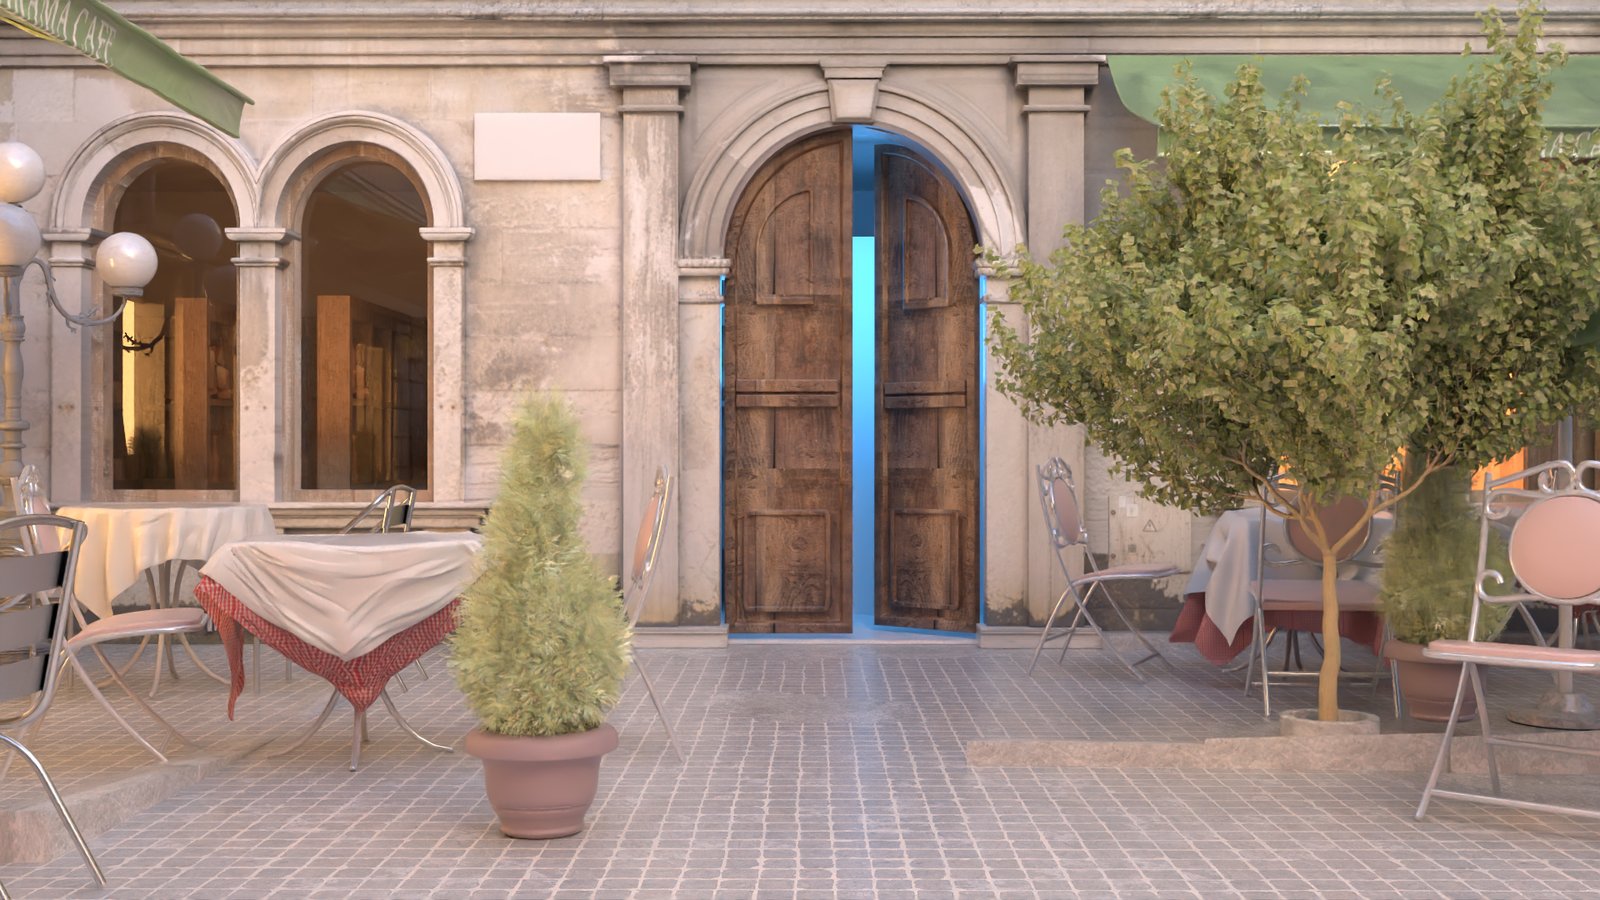
View Angle = 50

View Angle = 75

View Angle = 100
Depth of Field
This example shows the effect of the Depth of field (DoF) parameter.

DoF is on, Aperture is 0.5

DoF is on, Aperture is 1

DoF is on, Aperture is 2

DoF is off
Pick a Focal Point
This example shows the effect of the Pick a focal point parameter. The same Aperture value is used for all images.

The chair is picked as a focal point. Focal distance is 4.6m.

The tree is picked as a focal point. Focal distance is 7.3m.

The door is picked as a focal point. Focal distance is 14m.
Tilt Correction
This example shows the effect of the Tilt correction (two-point perspective) parameter.

Tilt correction (two-point perspective) is off

Tilt correction (two-point perspective) is on
See also: