Enscape Envision
Toolbar
This page provides information about the toolbar of Enscape Envision.
Last updated 7 July 2026
This page provides information about the toolbar of Enscape Envision.
Tools
The toolbar provides access to the tools available in Envision. The set of tools depends on the active UI mode – Easy Mode exposes a reduced set focused on essential workflows, while Advanced Mode exposes the full set.

Toolbar in Easy Mode


Toolbar in Advanced Mode
Button | Description |
|---|
Button | Description | |
|---|---|---|
Home | Envision Home – Opens the Enscape Envision Home screen, where you can open empty files or existing ones; access useful websites such as Envision Ideas Portal and Chaos Help Center, and get access to various sample projects. Find more at Home Screen. | |
Asset library | Asset library – Opens the Chaos Cosmos asset library. You can browse, place, and render pre-made 3D assets. Find more at Cosmos Asset Library. | |
AI Assistant | Chaos AI Assistant – Opens the Chaos AI Assistant creative companion. It matches the light mood from a reference image, recommends assets and materials, and provides workflow and product guidance. Find more at Chaos AI Assistant. | |
Selection | Select – Selects items from the viewport. Press Ctr to add more items to the selection. Press Shift to remove items from the selection. Shortcut: Q | |
Select by box – Selects multiple items from the viewport by drawing a box. All items within the box boundaries become selected. If the button is not visible, click the Selection arrow. Shortcut: B | ||
Select through transparent objects – Selects items placed behind transparent objects (e.g., a chair behind a glass window) without selecting the transparent objects. | ||
Enclosed selection – Selects objects only when they are completely inside the selection rectangle/box. | ||
Select material | Select material – Picks a material from the viewport to view and edit its properties. Shortcut: M | |
Transformations | Move – Moves the selected item(s). Use the Move Gizmo's arrows to move the object along the respective axes. Use the Move Gizmo’s rectangles to move the object along the axes plane. Shortcut: W | |
Rotate – Rotates the selected item(s). Use the Rotate Gizmo's rings to rotate the object along the respective axes. Shortcut: E | ||
Scale – Resizes the selected item(s). Use the Scale Gizmo's arrows to scale the object along the respective axes. Use the Scale Gizmo’s rectangles to scale the object along the axes plane. Use the Scale Gizmo’s center to scale the object along all axes simultaneously. Shortcut: R | ||
Snap – Aligns the selected item(s) to a selected surface. Press Shift to orient the object along the surface normal. Press Ctrl to snap the object’s bounds to the surface. Available in Advanced mode only! | ||
Snap to vertex – Aligns the object's pivot point to the mesh vertex that is closest to the mouse cursor. Available in Advanced mode only! | ||
Create objects | Create objects – Enables the creation of various simple forms. The last selected form appears on the toolbar button, whereas the rest are accessed after clicking the arrow. | |
Plane – Creates a plane object. Click and drag in the viewport to create the plane. If the button is not visible, click the Create objects arrow. | ||
Sphere – Creates a sphere object. Click and drag in the viewport to create the sphere. If the button is not visible, click the Create objects arrow. Available in Advanced mode only! | ||
Box – Creates a box object. Click and drag in the viewport to define the base of the box, release, then move the mouse upward to set the height and click to finish. If the button is not visible, click the Create objects arrow. | ||
Torus – Creates a torus (donut-shaped) object. Click and drag in the viewport to define the torus radius, release, then move the mouse to set the tube thickness and click to finish the torus. If the button is not visible, click the Create objects arrow. Available in Advanced mode only! | ||
Dummy – Creates a dummy object. If the button is not visible, click the Create objects arrow. Available in Advanced mode only! | ||
Create lights | Create lights – Enables the creation of various lights. The last selected light appears on the toolbar button, whereas the rest are accessed after clicking the arrow. Available in Advanced mode only! | |
Sphere light – Creates a spherical light. Hold left-click in the viewport and drag. If the button is not visible, click the Create lights arrow. Find more information at Light Types. Available in Advanced mode only! | ||
Rectangle light – Creates a rectangular light. Hold left-click in the viewport and drag. If the button is not visible, click the Create lights arrow. Find more information at Light Types. Available in Advanced mode only! | ||
Disk light – Creates a disk light. Hold left-click in the viewport and drag. If the button is not visible, click the Create lights arrow. Find more information at Light Types. Available in Advanced mode only! | ||
Scatter | Scatter – Scatters assets on top of selected surface(s). Find more information at Scatter. | |
Anima crowd | Anima crowd – Creates a crowd simulation. Find more information at Anima Crowd Details. Available in Advanced mode only! | |
Anima traffic | Anima traffic – Creates a traffic simulation. Find more information at Anima Traffic Details. Available in Advanced mode only! | |
Path | Path – Creates a path object. Left-click and drag for each point of the path. Right-click to finish the path, or click Done in the toolbar. Find more information at Path Details. | |
Create sensors | Create sensors – Creates a proximity sensor, adding it to individual objects or a group of objects, to trigger specific animation behaviors (rotation, slide, or scale) when approached by predefined 'activator' objects (e.g. camera, characters, vehicles). Find more information at Sensor Details. Available in Advanced mode only! | |
Slide – Creates a proximity sensor that triggers a movement behavior. Available in Advanced mode only! | ||
Rotation – Creates a proximity sensor that triggers a rotation behavior. Available in Advanced mode only! | ||
Scale – Creates a proximity sensor that triggers a scale behavior. Available in Advanced mode only! | ||
Take viewport screenshot | Screenshot – Saves a high-quality snapshot of the current view. You can find the folder where the snapshot is saved in the notifications pop-ups. The default location is C:\Users\<username>\Documents\Chaos Envision\Viewport Snapshots. | |
Render setup | Render setup – Opens the Render setup window where you can select camera shots and animations and add them to render queue. Find more information at Render Menu. | |
Veras | Chaos Veras – Opens Chaos Veras where you can quickly test different styles; use text prompts to add context, vegetation or architectural variations; and create camera paths and transitions based on your AI-enhanced frames. | |
Live Link | Live Link – Opens the Live Link controls where you can initiate a Live Link connection with a CAD/BIM application, pause and cancel it. Find more information at Live Link. | |
Start Live Link – Enables the Live Link connection from Envision. | ||
Stop Live Link – Terminates the Live Link connection. | ||
Modes | Easy – Switches to Easy mode. Easy Mode simplifies the workspace by reducing controls, making it faster and more intuitive to use. The current work is preserved, though advanced customization controls are unavailable. | |
Advanced – Switches to Advanced mode. Advanced Mode unlocks the full set of tools, controls, and parameters for greater flexibility and control over your project. The current work is preserved. | ||
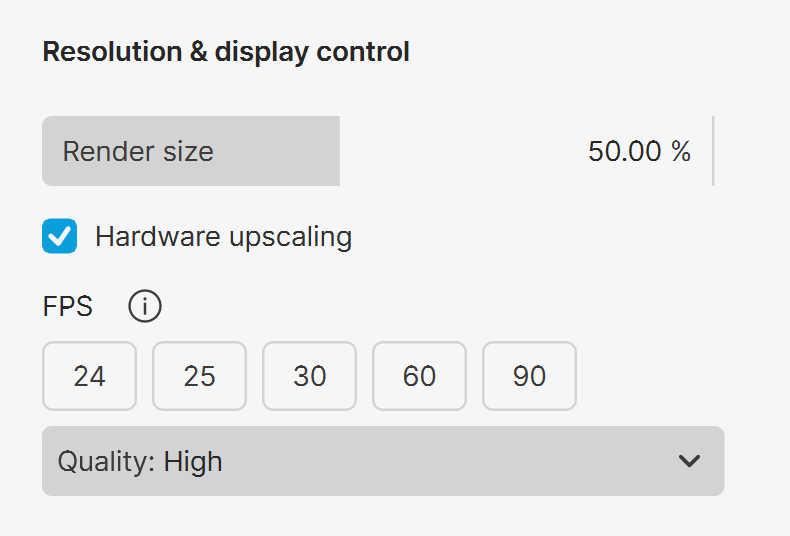
Resolution & display control | Resolution and display control – Opens Resolution & Display Controls where you can manage rendering resolution, FPS, and hardware upscaling. |
Resolution and Display Controls
Render size – Adjusts the size at which the image is rendered in the viewport keeping the current aspect ratio.
Hardware upscaling – When enabled, only half of the actual resolution is used for rendering and then upscaled. This boosts the performance while slightly reducing image quality.
FPS – Automatically adjusts the Render size to achieve the selected frames per second value.
Quality – Sets the rendering quality based on 4 predefined presets: Low, Medium, High, Ultra.