Enscape
Custom Preset Settings
This page provides information about the Custom Preset settings under Visual Settings.
Last updated 1 September 2026
This page provides information about the Custom Preset settings under Visual Settings.
Overview
Custom Presets reside in the Visual Settings window, accessible from Enscape's toolbar. The Custom Preset settings are organized across five tabs: Main, Image, Atmosphere, Sky, and Output.
- The Main tab contains style, camera, and rendering quality settings.
- The Image tab contains color corrections and effects settings.
- The Atmosphere tab contains fog, illumination, and wind settings.
- The Sky tab contains horizon, clouds, and skybox settings.
- The Output tab contains resolution and export settings for images and videos.

Visual Settings toolbar button opens the Custom Preset settings.
Main Tab
The following parameters are available under the Main tab of the Visual Settings.
Style
Mode – Specifies a style mode.
None – Does not apply any style mode.
White – Disables texture rendering. Makes your visualization look like its made out of paper.
Polystyrol – Makes the rendering look like polystyrol. The sunlight scatters through thin geometry.
Light View – Displays how much light is hitting each surface as a heatmap.
Sketch – Recreates the rendering as pen or pencil sketches, providing options for black and white outlines, grayscale, or colored rendering (disabled in VR and 3D TV stereo mode).
Watercolor – Transforms your rendering into a watercolor painting, simulating watercolor effects to create a soft, blended look for your visualization (disabled in VR and 3D TV stereo mode).
Outlines – Determines the thickness of the outlines.
Camera
Projection – Specifies the projection mode. Synchronized Views and Video Editor use Perspective projection only so this option is disabled for them.
Auto Exposure – Automatically sets the exposure brightness.
Exposure – Sets the desired brightness. If Auto Exposure is enabled, this is the target image brightness.
Field of View – Adjusts the horizontal field of view. Can be used as a zoom function. Note that Field of View is not available in Orthographic projection.
Depth of Field – Adjusts the amount of blurriness for objects located at the near and far side of the focal point. Note that Depth of Field is disabled in VR and Orthographic projection.
Auto Focus – Automatically sets the focal point to the object at the center of the view. Note that Auto Focus is not available in Orthographic projection.
Focal Point – Specifies the distance at which objects appear sharp.
Note that Focal Point is not available in Orthographic projection.
Rendering Quality
Rendering Quality – Adjusts the complexity of light calculations and various other techniques. Results in a higher quality image but may impact performance. Available options are Draft, Medium, High, and Ultra.
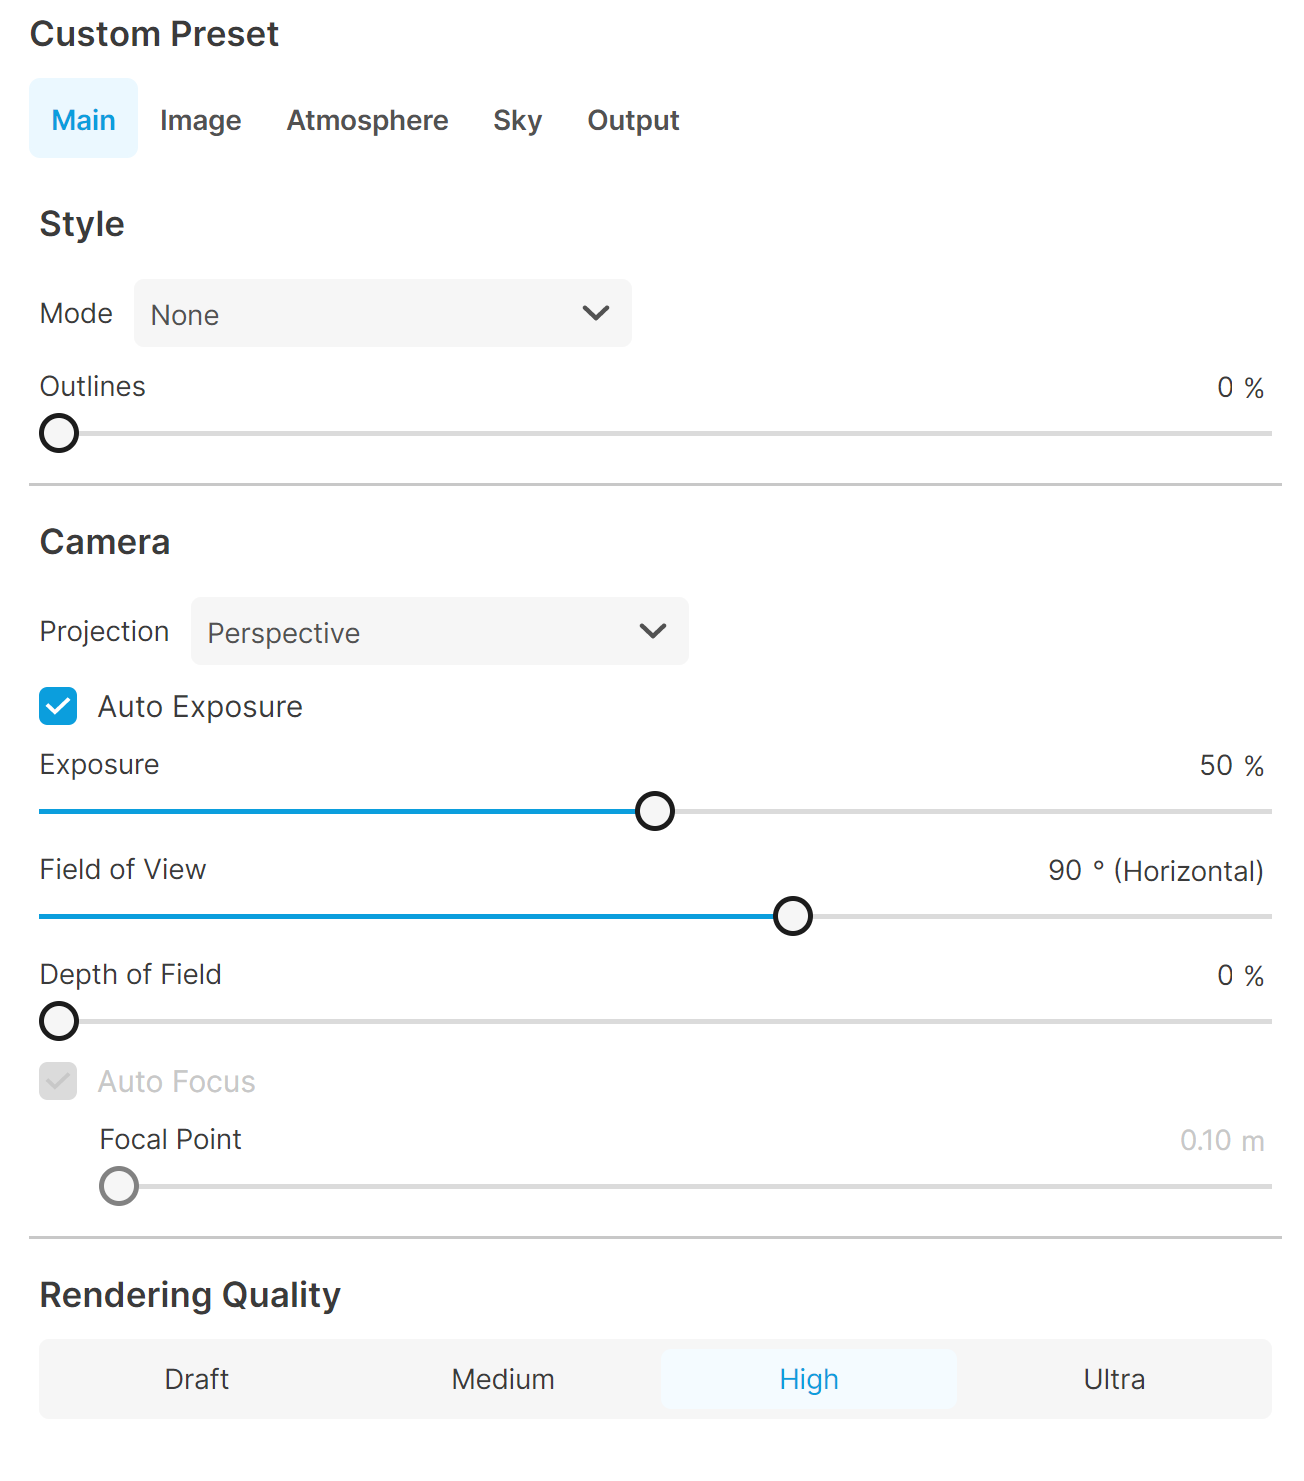
Main Tab
Image Tab
The following parameters are available under the Image tab of the Visual Settings.
Corrections
Auto Contrast – Enables automatic adjustment of the image histogram for an optimal contrast range.
Highlights – Scales the visibility of bright image regions to partially increase or decrease the image contrast.
Shadows – Scales the visibility of dark image regions to partially increase or decrease the image contrast.
Saturation – Controls the intensity of colors in the image.
Color Temperature – Sets the color temperature in Kelvins.
Effects
Motion Blur – Simulates blur caused by the length of time the camera shutter is open, multiplied by motion. This option is disabled in VR.
Lens Flare – Determines the intensity and number of light reflections on the lens. This option is disabled in VR.
Bloom – Determines the amount of outshining for bright objects and lights. This option is disabled in VR.
Vignette – Simulates a keyhole effect filter. This results in a darkening towards the image corners. This option is disabled in VR.
Chromatic Aberration – Simulates a color shift caused by optical dispersion. Slightly decreases image sharpness.
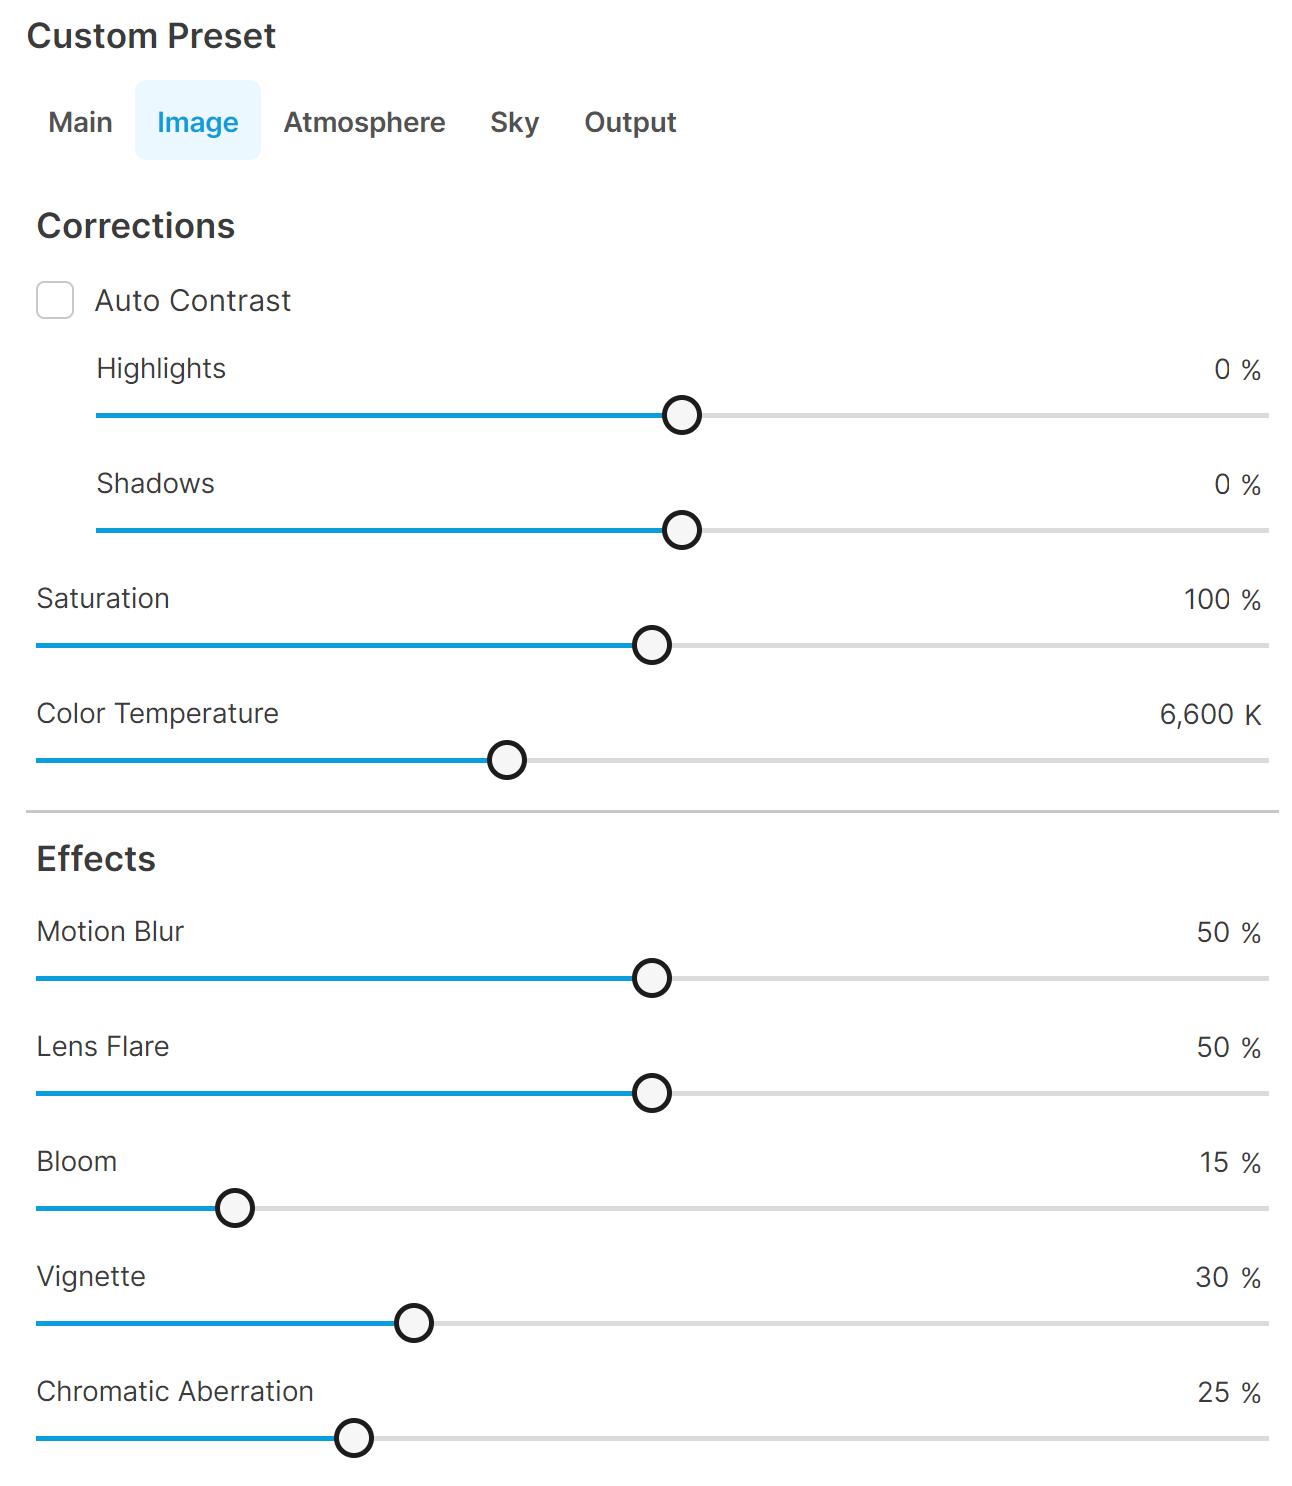
Image Tab
Atmosphere
The following parameters are available under the Atmosphere tab of the Visual Settings.
Fog
Intensity – Controls the visibility of fog and therefore the sun rays scattering through it.
Height – Controls the height at which the fig dissipates.
Illumination
Sun Brightness – Regulates the brightness of the sun and affects the contrast of the sun shadows.
Night Sky Brightness – Adjusts the moon and star brightness to increase their visibility and the amount of light in night scenes.
Shadow Sharpness – Controls the sharpness of the shadows caused by both sun and moon.
Artificial Light Brightness – Adjusts the brightness of all artificial light sources. Brightness of the sun and emissive objects is not influenced.
Ambient Brightness – Can be useful for brightening indoor lighting at daylight. Compensates for multi-bounce lighting by adding atmospheric brightness instead.
Wind
Intensity – Project-wide wind intensity affecting the water, vegetation and clouds.
Direction Angle – Specifies the direction from where the wind originates.

Atmosphere Tab
Sky
The following parameters are available under the Sky tab of the Visual Settings.
White Background – Displays a white background without changing the scene’s lighting and reflections.
Horizon
Source – Specifies the preest to be used for horizon plate (if any) or a custom skybox. Available sources are: Clear, Skybox, Desert, Forest, Mountains, Construction Site, Town, Urban, White Cubes, and White Ground.
Rotation – Specifies the rotation of the horizon background.
Moon Size – Controls the size of the moon in the sky. A value of 100% equals the real moon size.
Clouds
Density – Controls the density of the cumulus and stratus types of clouds. A higher value means more clouds.
Variety – Controls the clouds variety in space and shape.
Cirrus Amount – Controls the amount of high-altitude cirrus clouds.
Contrails – Controls the amount of airplane contrails visible in the sky.
Longitude – Adjusts the longitude cloud offset, i.e. moves the cloud system along the longitude.
Latitude – Adjusts the latitude cloud offset, i.e. moves the cloud system along the latitude.

Sky Tab
The following settings are available when the Source is set to Skybox.
Rotation – Specifies the rotation of the horizon background.
Load Skybox from File – Loads a skybox file. A Skybox is a background image that defines the visual environment surrounding a project. For more information, see the Skybox as Background page.
Brightness Point as Sun Direction – Positions the Enscape sun on the brightest spot of your Skybox for additional realism.
Normalize the average brightness to the value set below – Brightens or darkens your Skybox’s light emission to compare with the Enscape sun brightness.
Brightness – Controls the overall exposure of your Skybox environment. It functions independently of the Normalize the average brightness to the value set below setting. This adjustment is particularly useful for interior scenes, allowing you to perfectly balance the exposure of the outdoor environment visible through windows.

Skybox is selected as Source.
Output
The following parameters are available under the Output tab of the Visual Settings.
General
Resolution – Adjusts the image and video resolution in pixels. Maximum capture resolution is 8192x8192. Minimum capture resolution is 500x500.
Aspect Ratio – Displays the aspect ratio based on the Resolution selected.
Default Folder – Rendered images are saved to this folder by default. If you do not choose a folder, rendered images are saved to your Documents folder.
Image
Export Object-ID, Material-ID, Depth Channel and Alpha Channel – Exports separate images for easy composition. The background (sky) in the rendered layers is always black.
Depth Range – Adjusts the maximum distance from the camera that is encoded as black in the depth image.
File Format – Specifies the image file format from PNG, JPG, EXR, or TGA.
Apply Alpha Channel – Exports the image with the alpha channel applied. The background (sky) is transparent. Only available for *. png, *. exr and *. tga.
Automatic Naming – When enabled, the default folder is used when rendering images; file name includes a timestamp.
Video
Compression Quality – A higher compression quality increases the file size but reduces compression artifacts in the video. The export time is unaffected by this setting. Available compression quality options are: Email, Web, BlueRay, Maximum, and Lossless.
Frames per Second – Specifies the frames per second. Takes proportionally longer to render, higher values yield a smoother video.
Panorama
Resolution – Adjusts the panorama resolution.
Low – The resolution is 2000×4000 px.
Normal – The resolution is 4000×8000 px.
High – The resolution is 8000×16000 px.

Output Tab