Enscape
Single Rendering
This page provides information on how to render an image or panorama with Enscape.
Last updated 1 September 2026
This page provides information on how to render an image or panorama with Enscape.
Overview
Click Start Enscape, and its viewport opens.
Enscape Toolbar in SketchUp

Enscape Toolbar in Revit

Enscape Toolbar in Rhino

Enscape Toolbar in ArchiCAD

Enscape Toolbar in Vectorwork

Once Enscape is open and running, the Enscape UI toolbar appears at the top of the window. This indicates that rendering has started.
Enscape Toolbar in the Enscape Viewport
If you don’t see the toolbar at the top of the Enscape viewport, then click the small chevron seen in the middle of the toolbar above, which is used for expanding/collapsing the toolbar.
If the Enscape window doesn’t open, check whether your system meets our recommended System Requirements.
Rendering
To render an image or panorama, choose the View. It can be the current Live view or a previously created View from the View Management feature.

Then, click the Render button in the Enscape toolbar ( ) . The Render dialog appears. Here you can determine the image mode - Image or Panorama; you can upload the image to render and be enhanced on Chaos Cloud; you can also batch render multiple views from the same scene.
Image
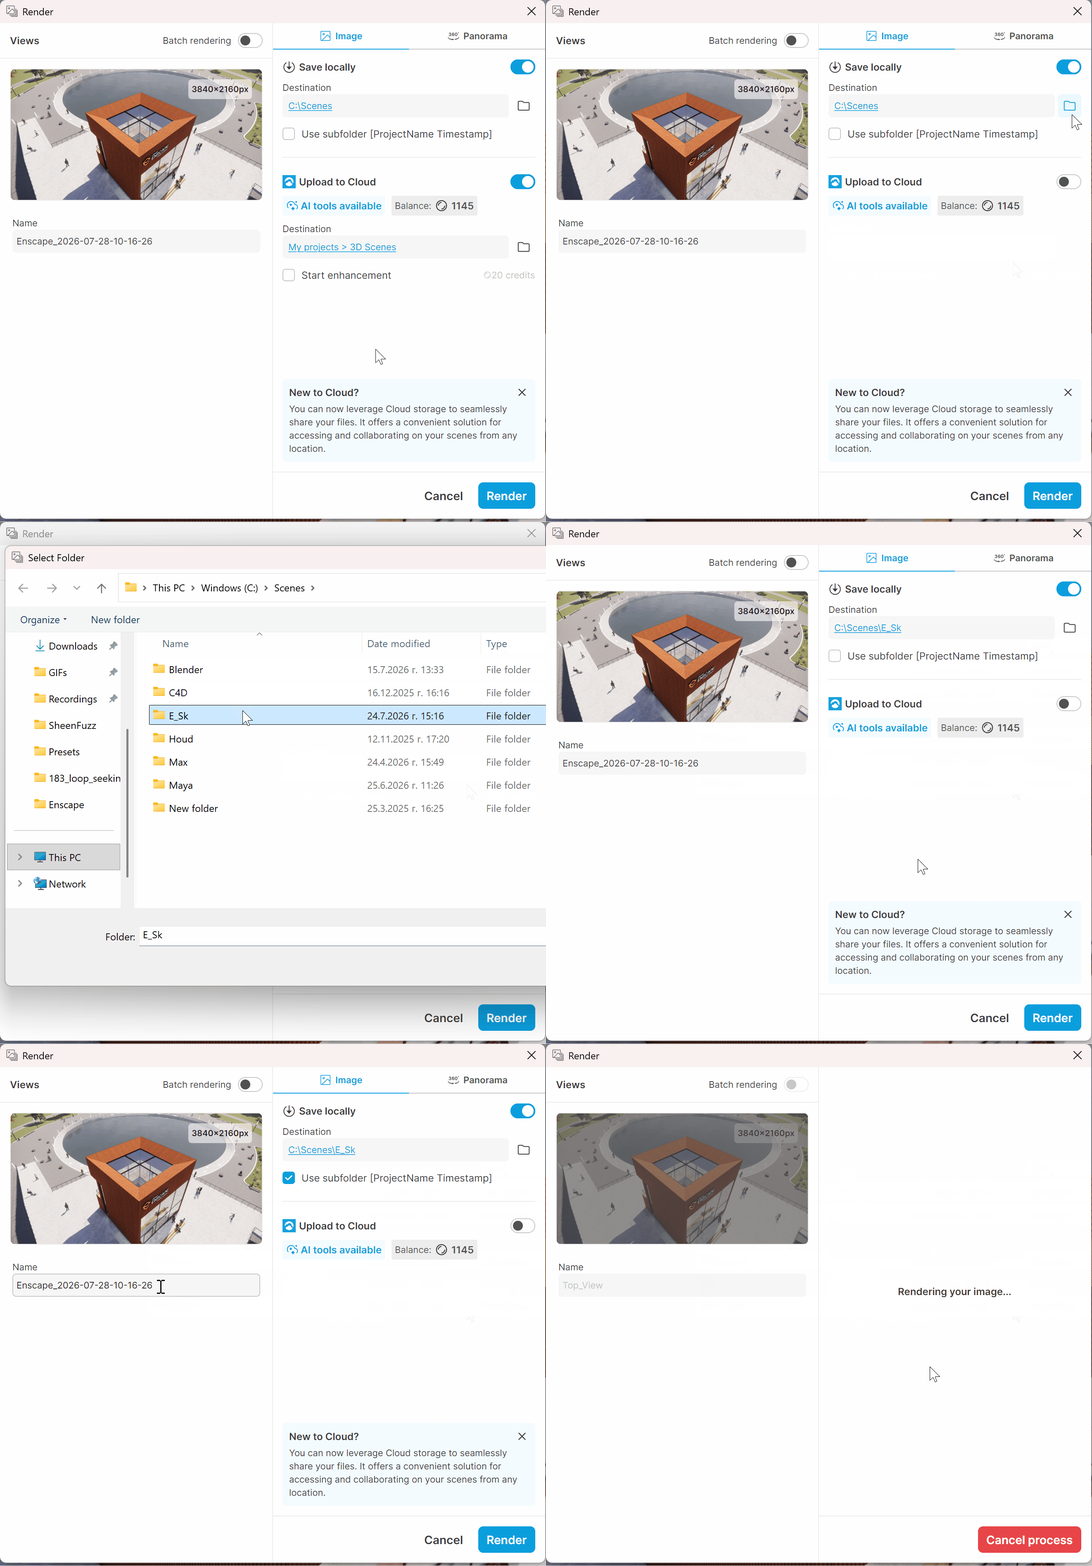
In the Render dialog:
Disable the Upload to Cloud option. Otherwise, the image is both rendered locally and sent to render on the Cloud. For steps on uploading an image to Chaos Cloud to share and collaborate, see the Cloud Export page.
Select the destination folder. This is where the render is saved when complete. Enabling the Use subfolder option creates a subfolder within the destination folder. The subfolder is named after the project and the start time of the render.
You can rename the output file from the Name field.
Once ready, press Enter on your keyboard or click the Render button.
Panorama
In the Render window:
Select the Panorama mode. Set the Panorama type to either Mono (single 360° panorama) or Stereo (dual offset panoramas to simulate depth in VR).
For more information on exporting Panoramas, see the Panorama and Cardboard page.

Batch Rendering
To enable Batch rendering, click on the Batch rendering toggle. This lists all of available views, including the current Live view. Select the views you want to render, set the Destination folder, toggle Upload to Cloud on or off, and click Render to start.
For more details, see the Batch Rendering page.

Adjusting Resolution
If different settings from the default are needed, go to the Visual Settings menu and choose the Output Tab.
The following Resolution options are available:
- Full HD (by default)
- Window
- 1024
- HD
- Ultra HD
- Custom
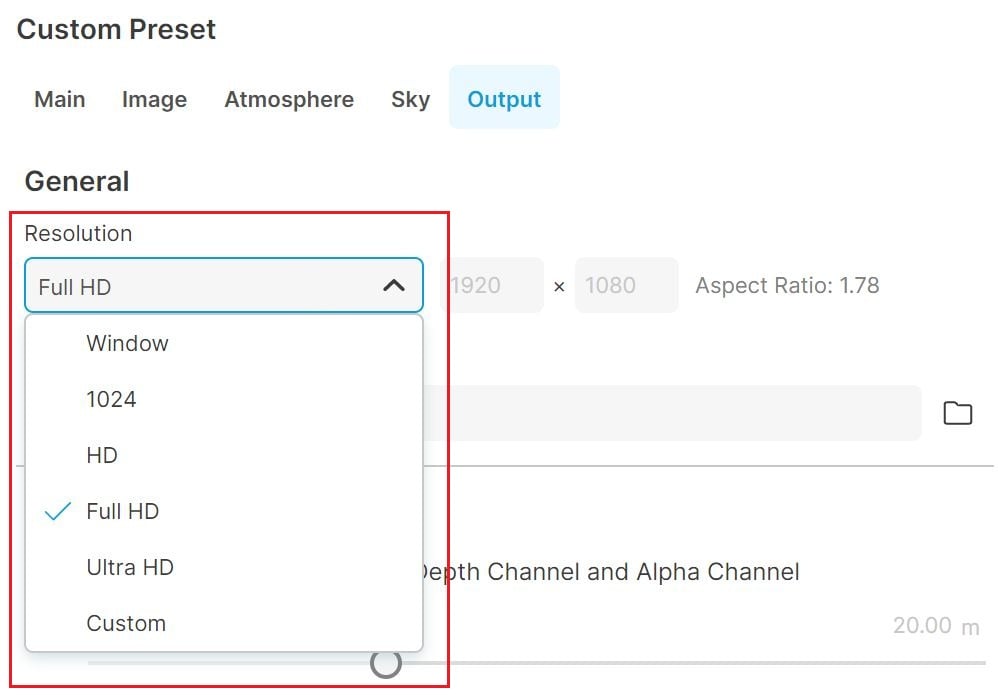
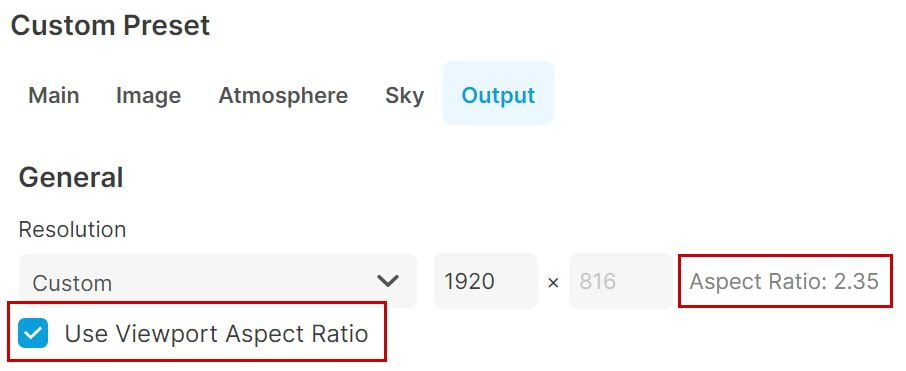
By choosing Custom Resolution setting, the Use Viewport Aspect Ratio setting becomes available.
This disables the height input field. Enter the desired width, and Enscape automatically calculates the height to match your SketchUp viewport's aspect ratio.
In addition to the Screenshot button, you can also use the hotkeys [SHIFT + F11] to achieve the same action. You can set your own hotkey in the Enscape Window Settings‘ Input options, under the Hotkeys option, by pressing a modifier key, [CTRL], [ALT], or [SHIFT] in combination with another key.

Render Image (into Document) in Enscape for Revit
In Revit is possible to render single images into the Revit project file itself via the Render Image (into Document) button. By choosing the Render Image (into Document) option, the rendered image appears in your Revit’s Renderings folder in the Revit Project Browser.
The Render Image (into Document) button for Revit is located in Revit UI toolbar and is only enabled when the Enscape window is open.

The Render Image (into Document) button in Revit
How do I Get the Best Quality in my Rendered Images?
At the bottom of the Main tab of Visual Settings menu, the Rendering Quality is shown.
- Draft
- Medium
- High
Setting Rendering Quality to High or even Medium is generally recommended when using Enscape in real-time to save on GPU resources. If required, Ultra can be used as well. If the program crashes when rendering images out to file from Enscape, try to lower both Resolution and Rendering Quality to FullHD and High respectively.
- Ultra
Setting the Resolution to UltraHD provides a high resolution image. But the combination of this and setting the Rendering Quality to Ultra, gives the highest quality image possible.

The Image tab of the Visual Settings menu includes two sections - Corrections and Effects.
Auto Contrast setting is disabled by default.
There Highlights, Shadows, Saturation and Color Temperature can be adjusted.
Enabling Auto Contrast disables Highlights and Shadows and applies optimal contrast to the image.
There are sliders to define the percentage of the applied Effects:
- Motion Blur
- Lens Flare
- Bloom
- Vignette
- Chromatic Aberration

Image Tab
Show Safe Frame
Enscape has a Safe Frame feature in its viewport toolbar.

Safe Frame enabled
Navigation through the project is possible when Show Safe Frame is enabled.
In the following screenshot, as an example, the Resolution is set to Custom: 500×2000.

Preview when Safe Frame is enabled
Export Object-ID, Material-ID and Depth Channel
For post-processing purposes, enable the Export Object-ID, Material-ID, and Depth Channel checkbox in the Output tab of the Visual Settings menu.
When active, Enscape exports five images for each image or View – the rendered image as seen in the Enscape window itself, a second image that’s graded from white to black, depending on the distance from the camera (Depth Channel), third and fourth renderings that assign a distinctive color to each object (Object-ID), material (Material-ID), and the alpha channel.

From left to right: the normal image render, the Depth (or Alpha Channel) render, the Material-ID render, and the Object-ID
Instead of having to reopen and recreate everything, using Object-ID and Material-ID images, you can create a mask for that specific color, allowing you to post-process only that part of the image.
Additionally, the black background can serve as an Alpha channel to easily extract your model and place it in a photograph.
The Depth Map can be used to apply depth-related effects to the rendering.
All of these actions can be performed in many advanced image-editing software programs – Enscape only delivers renderings.
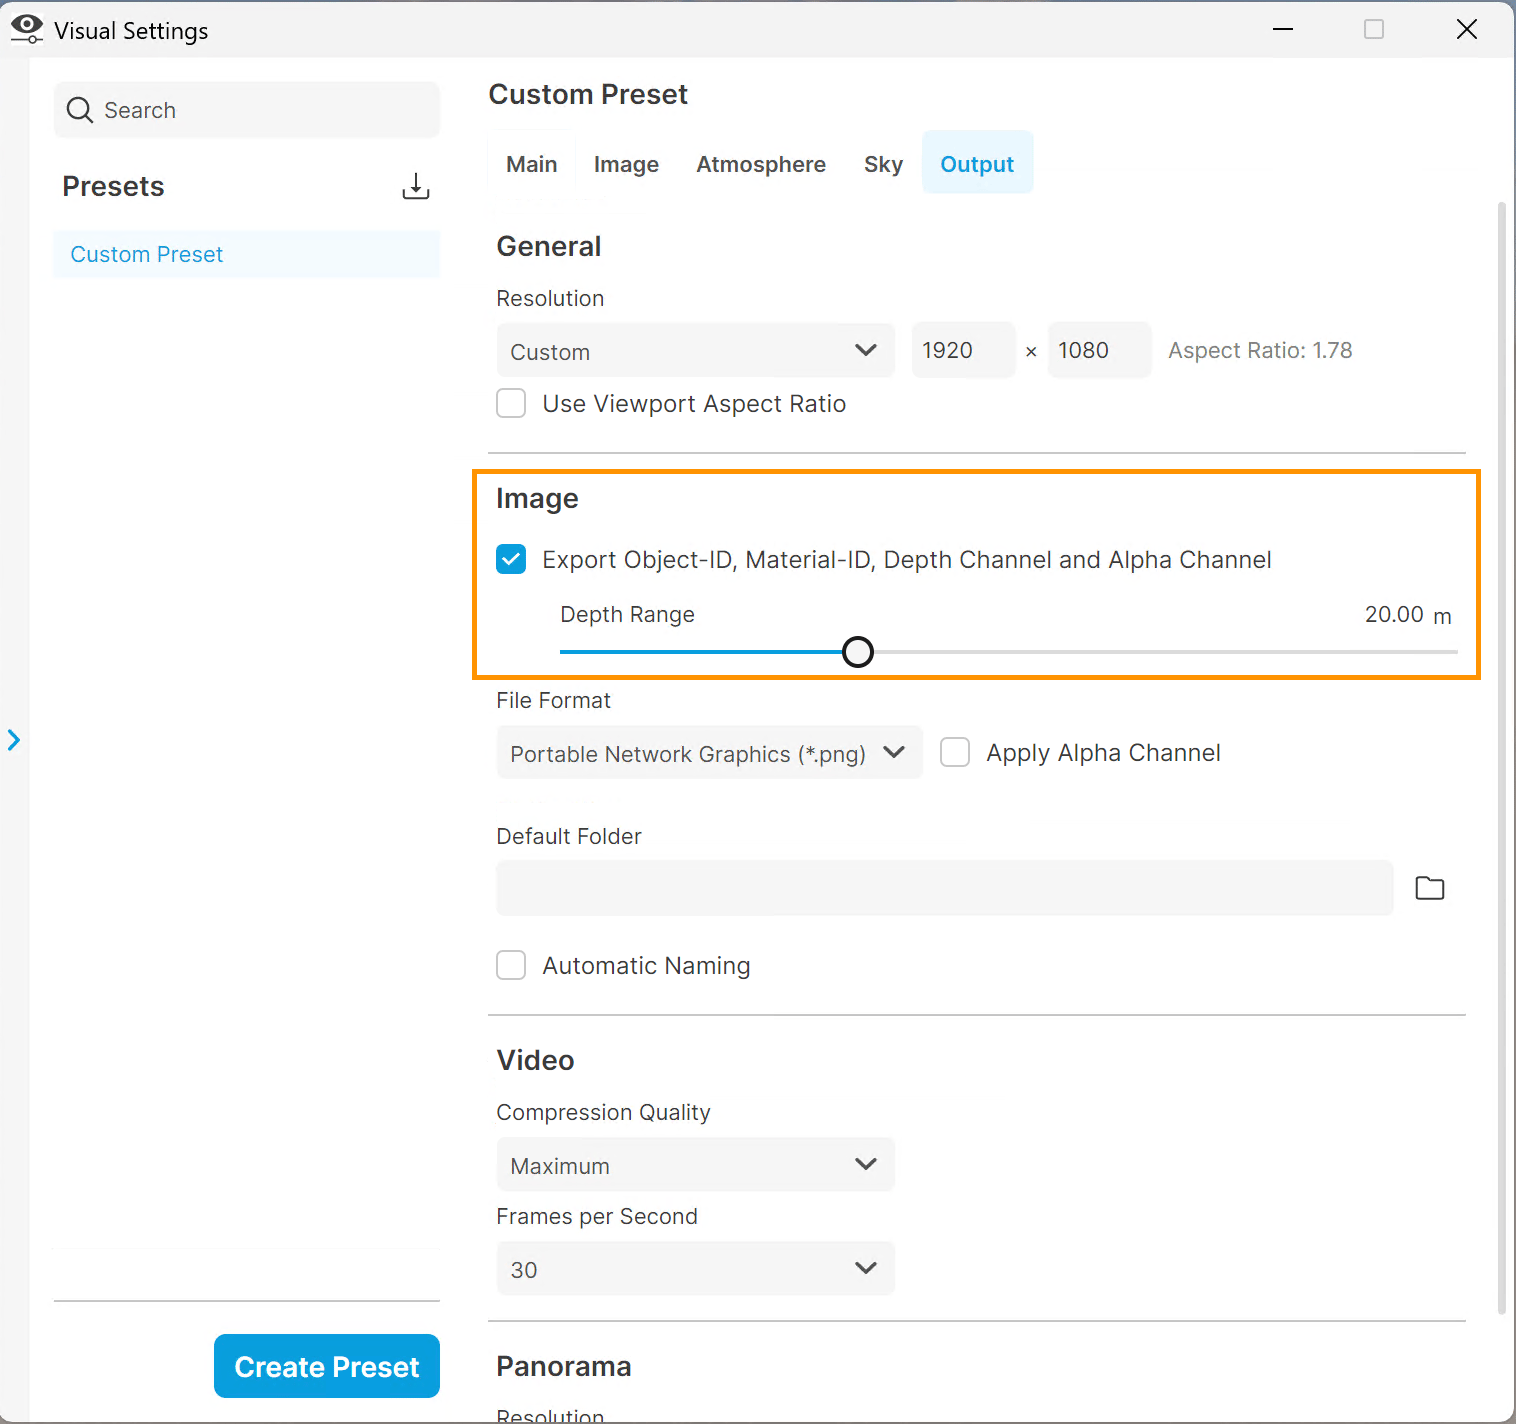
Export Object-ID, Material-ID and Depth Channel
Alpha Channel Export
Images can be exported with an embedded Alpha Channel by enabling Apply Alpha Channel checkbox.
The Alpha Channel export also includes information for transparent and semi-transparent materials.
This means that if the sky is visible behind a semi-transparent surface, the background (sky) will be removed without losing the reflections of objects located in front of the surface.

Apply Alpha Channel

ON

OFF
Default Folder and Automatic Naming
After specifying a Default Folder location in the Visual Settings’ Output tab, using the Screenshot opens the Save Screenshot dialog at that specified location.
Enabling Automatic Naming renames the file, appending the date and time to the filename for single images.
When Batch Rendering, the image names additionally append the name of the views, with or without automatic naming applied:
Batch render of multiple views:
filenames include date, time and name of views.
Batch render of a single view with automatic naming:
filenames include date, time and name of views.
Batch render of single view without automatic naming:
user is prompted for a filename, the suggested name is however the same as above.

Default Folder and Automatic Naming