Use the Light Cache GI Engine settings in V-Ray for SketchUp to control lighting samples and caching.
Overview
Light caching approximates global illumination in a scene. Older versions of V-Ray call it "light mapping". Chaos developed this method for the V-Ray renderer.
These settings are available only when you select Light Cache as the Primary Rays or Secondary Rays GI engine in Global Illumination Settings.
Settings path
||V-Ray Asset Editor|| > Settings > Global Illumination > Light Cache
(Available when Light Cache is the Primary or Secondary Rays engine.)
Parameters
These parameters affect the light cache calculation phase. They do not affect the final rendering.
Subdivs controls how many paths V-Ray traces from the camera. The number of paths is the square of the subdivisions. The default 1000 subdivs traces 1 000 000 paths from the camera. See the Subdivisions example below.
Sample Size controls the spacing between light cache samples. Smaller values place samples closer together and preserve sharp lighting details, but add noise and use more memory. Larger values smooth the light cache but lose detail. You can set this value in world units or relative to the image size. See the Sample Size example below.
Screen Space uses fractions of the final image. A value of 1.0 makes each sample as large as the whole image. Samples closer to the camera are smaller, while those farther away are larger. The units do not depend on image resolution. Use this setting for stills or animations that need a new light cache calculation for each frame.
World Units keeps sample sizes fixed in world units throughout the scene. Samples close to the camera are sampled more often and appear smoother. Samples farther away are noisier. This setting may work better for fly-through animations because it keeps the sample density constant throughout the scene.
Retrace improves global illumination precision where the light cache would otherwise produce large errors. This is most noticeable with Use light cache for glossy rays, or near corners where interpolation may cause light leaks. For glossy reflections and refractions, V-Ray decides whether to use the light cache based on surface glossiness and distance from the surface. This reduces light cache errors but may increase render time. See the Retrace Parameter example below.
Use Camera Path calculates GI samples for the entire camera path rather than the current view. This option is available only when your project has an animation set up.
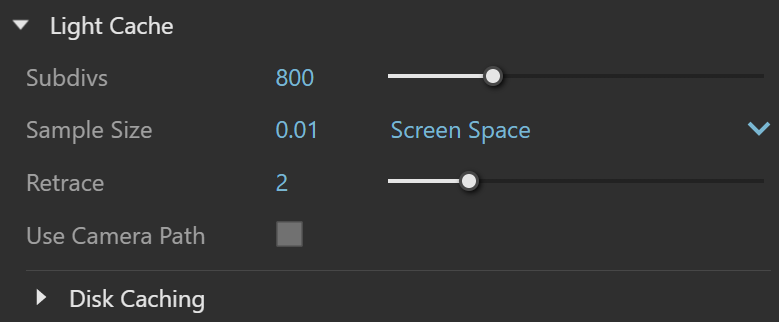
Example: the Subdivs parameter
Subdivs controls how many rays V-Ray sends into the scene and the noise level of the light cache samples.
These images show the same scene rendered with different Subdivs settings. All other settings stay the same. More samples reduce noise but increase render time. Doubling Subdivs makes the light cache take approximately 4 times as long to calculate.
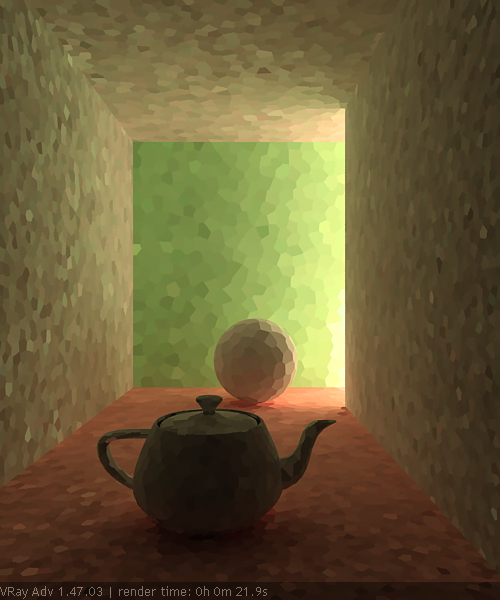
Subdivisions = 500
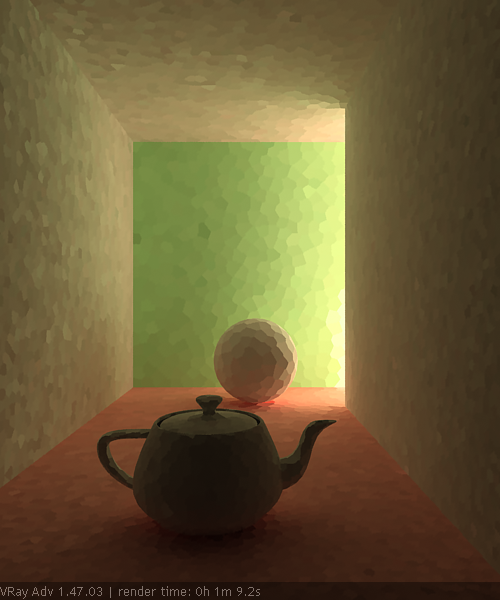
Subdivisions = 1000

Subdivisions = 2000
Example: the Sample Size parameter
Sample size controls the size of individual light cache samples. Smaller values produce more detailed lighting but add noise and use more RAM. Larger values produce less detail, use less RAM and may calculate faster.
These images show the same scene rendered with different Sample size values. All other values stay the same. In the last image, light leaks through the wall on the right. Screen Scale makes samples on the other side of the wall large enough for V-Ray to use them on the side facing the camera. Compare this with World Scale in the example above. Also compare the noise levels between the samples.


Example: the Retrace parameter
The first set of images shows how Retrace reduces light leaks caused by light cache interpolation. The scene is an interior with parts of the exterior visible. Bright exterior light cache samples blend with darker interior samples when V-Ray calculates the irradiance map. This causes light leaks. Without retracing, bright exterior samples also mix with dark exterior samples and cause light leaks. Enabling Retrace at the default value of 1.0 removes the leaks but slightly increases irradiance map calculation time.


Disk Caching
Disk Caching is available only in advanced mode of the Global Illumination rollout.
Mode controls the irradiance map mode:
Single Frame keeps the last calculated GI map in memory after rendering finishes.
From file loads the photon map from a file instead of calculating it. Select Browse on the right to choose the file name.
Keep File keeps the photon map in memory after rendering finishes. When you disable it, V-Ray deletes the map and frees its memory. Enable it to calculate a scene's photon map once and reuse it for later renders.
Auto-Save File automatically saves the caustics photon map to the specified file when rendering finishes. Set the file location where V-Ray saves the map.
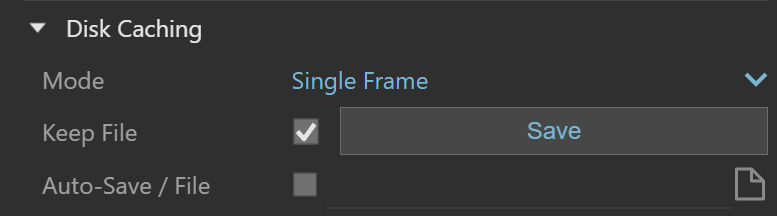
Notes
- Avoid perfectly white or near-white materials on most objects in your scene. They cause excessive render times because reflected light decreases slowly, so the light cache must trace longer paths. Also avoid materials with any RGB component set to the maximum (255) or above.
- You cannot distribute the Light Cache calculation across several machines for distributed rendering.
- When you use the camera's Auto Exposure/Auto White Balance options, select Light Cache as a secondary GI engine. Light Cache Disk Caching mode is not supported. Use Single Frame mode.