KeyShot Studio
Curve Fade
The Curve Fade animation node allows you to add changing parameters of any of your numerical properties within your custom material. To see the which parameters you can change for a specific node, connect the Curve Fade animation node to the + socket.
Last updated 3 August 2026
The Curve Fade animation node  allows you to add changing parameters of any of your numerical properties within your custom material. To see the which parameters you can change for a specific node, connect the Curve Fade animation node to the + socket.
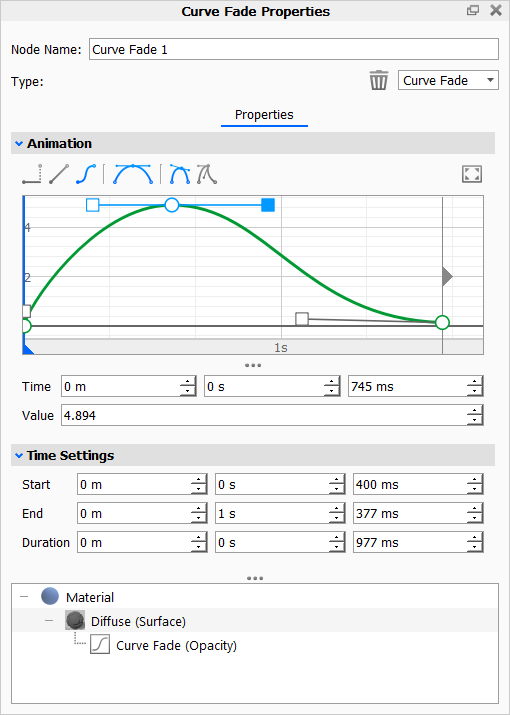
Animation Here you can set the value of the parameter on any time during the animation duration. Setting the value: Select a point (keyframe) on the curve and add the time and the value of it below the grid or simply drag it in the curve editor. Hold Shift to restrict to horizontal movement (adjusting time only). Adding a keyframe: Double click in the grid or right-click and select Add Key to add a keyframe. Determining the flow between keyframes: Each keyframe determines the interval from the keyframe til the following keyframe. By default all keyframes will be curve points when you add them, but you can easily change the type:
|
 Stepped:
 The stepped keyframe will by default not have a tangent handle opposite the stepped section, but you can add it via the Tangent handle icon. This way you can ease into/out from a stepped
 Use the value at the end of the interval.
 Curve:
 Keep tangent handles locked opposite to each other.
 Unlock tangent handles.
 Straight:
Adjusting the curve: Drag the tangent handles to adjust the ease-in/out of a key. Hold Shift to restrict to horizontal movement.
Deleting a keyframe: Select a keyframe and press the Delete key or right-click the keyframe and select Delete
Time indicator and work area: The curve editor has the same Time and Work Area indicators as the regular Animation timeline, enabling you to scrub through the timeline and limit the animation from the curve editor.
Move the Grid: Click and drag inside the grid to move the timeline.
Zoom in the grid: Click in the grid and use the scroll wheel or Ctrl +/- (Win) Cmd +/- (Mac) to zoom in/out.
Zoom to fit: You can fit the current curve in the curve editor simply by clicking the Zoom to Fit button above the grid.