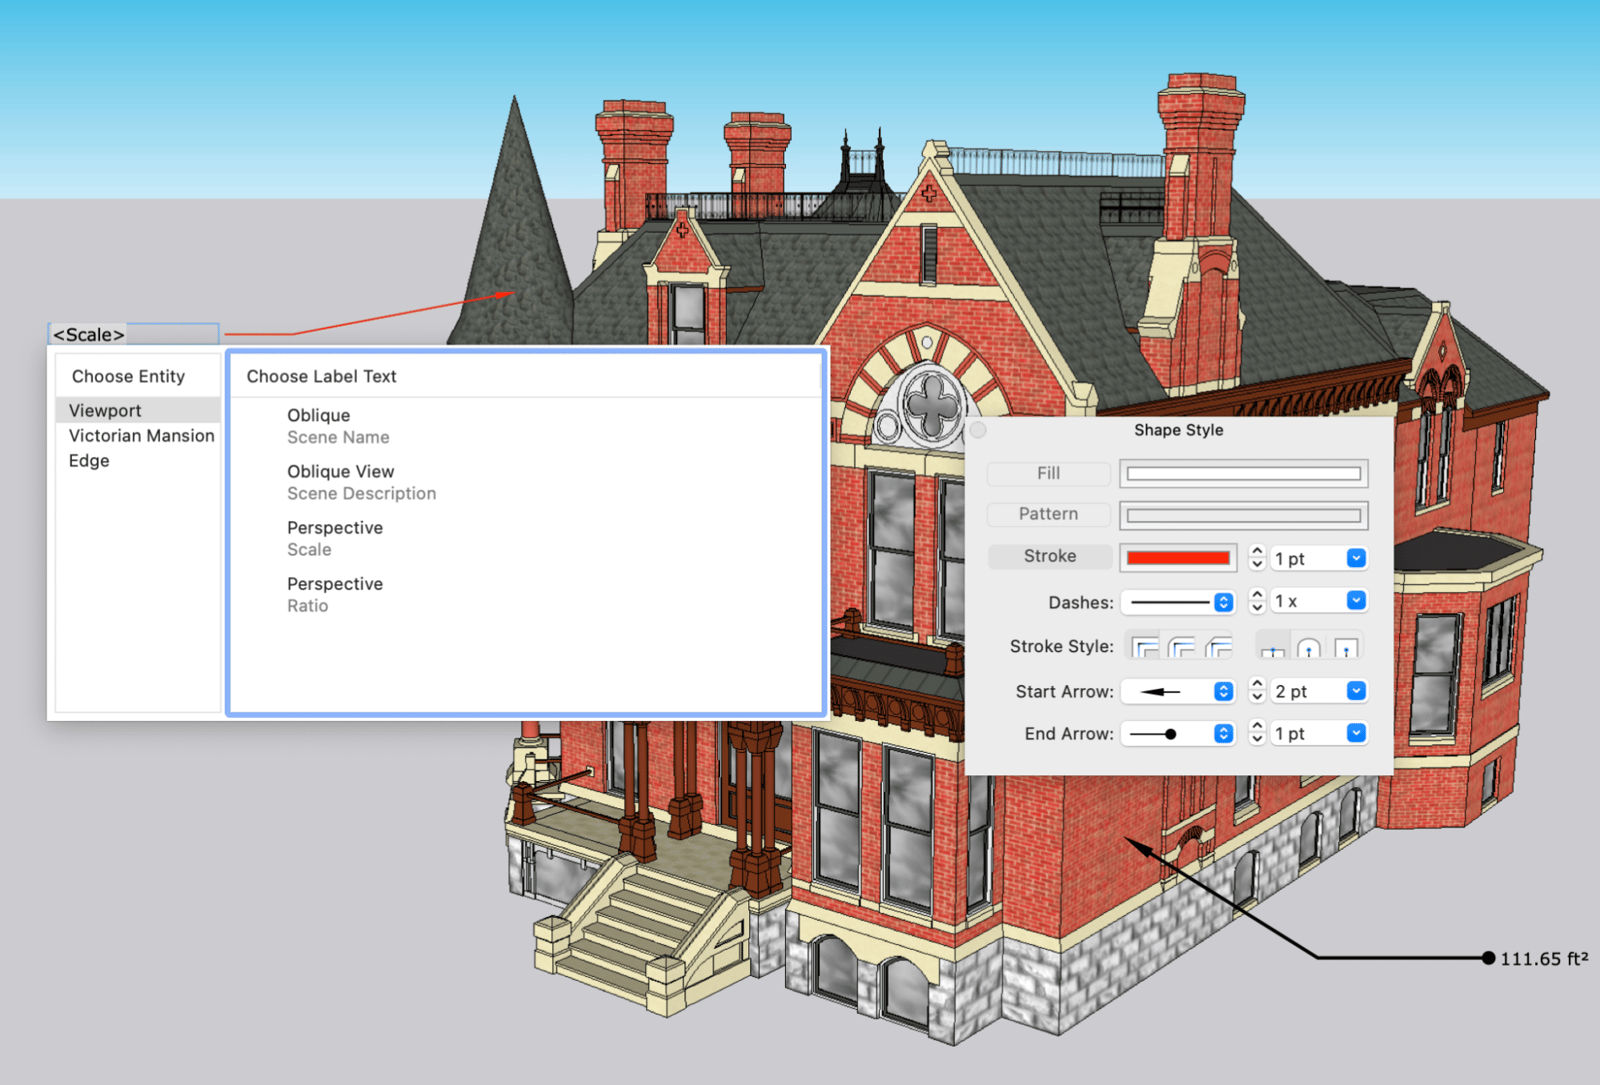
Use LayOut's Label tool ( ) to label items in your drawing. Each label has a text box, a line called a leader, and an arrow or endpoint pointing to an item. The following figure shows ways to customise labels:
- Change the line's colour, width, shape and style.
- Choose an arrow or endpoint style.
- Format the label text.
- Insert Auto-Text tags imported from SketchUp.
- Type your own text or combine it with Auto-Text.
Create a label
Select the Label tool () on the default toolbar or select Tools > Label. Use the following instructions to place the leader and add label text.
Labels have two components: the label and the leader. The leader connects the label to a specific component. With the Label tool selected, click to place the leader's starting point, then choose one of the following:
- Click to place an elbow in the leader line, then click again to place its endpoint.
- Double-click to place the leader's endpoint without an elbow.
- For a curved line, click and drag clockwise or counter-clockwise to create the curve, then click to place the leader's endpoint.
After placing the leader, type the label text. If the label points to a SketchUp model entity, you can click the blue down arrow to open the Auto-Text menu, then select and insert an Auto-Text tag. Click outside the label to finish.
Auto-Text labels
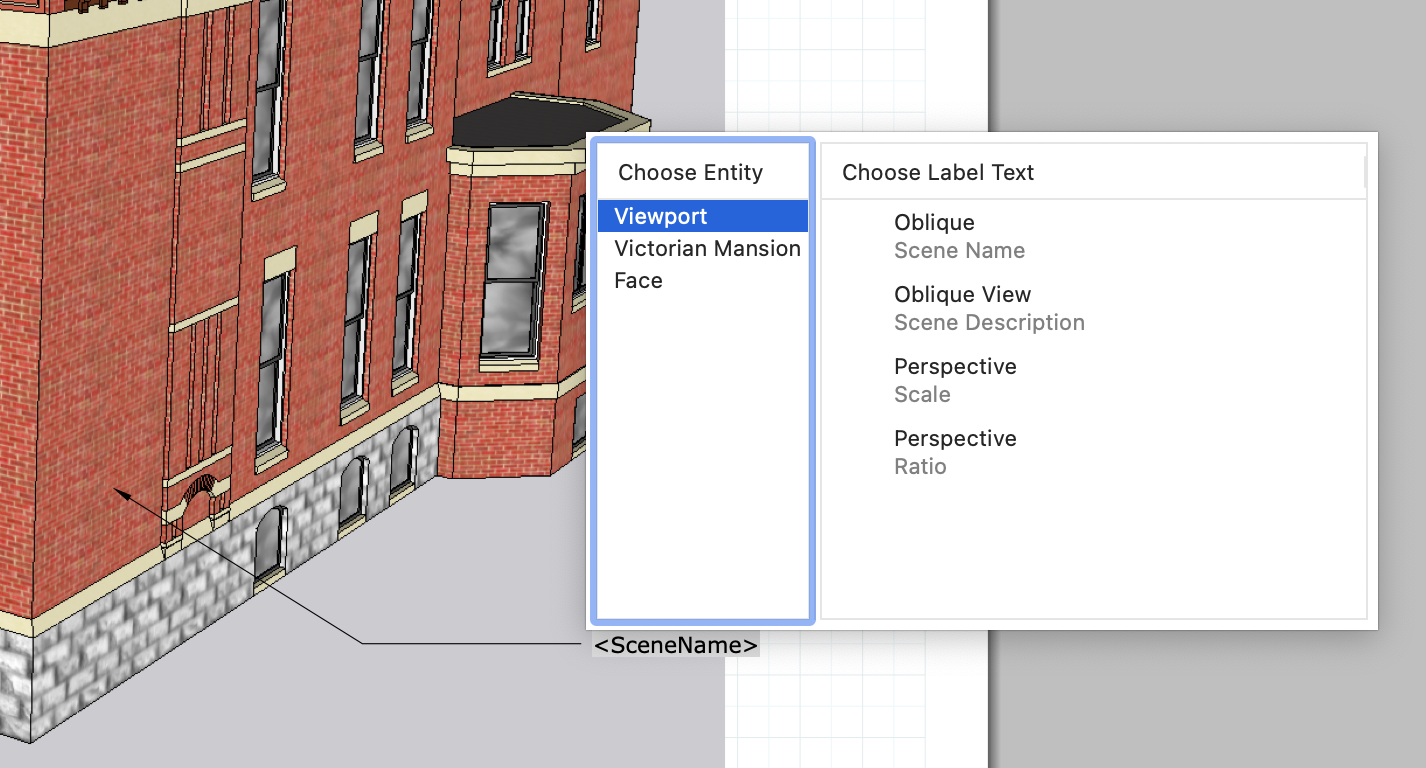
Auto-Text labels use information from SketchUp entities in your drawing. When you create a label for an entity with available Auto-Text labels, a blue drop-down arrow appears. Click it to open a window with these Auto-Text options:
- Viewport options describe how the imported model displays in LayOut. They include:
- Scene Name displays the model name defined in SketchUp's scene panel.
- Scene Description displays the model description defined in SketchUp's Scenes panel.
- Scale displays the viewport's orthographic scale as a unit translation.
- Ratio displays the viewport's orthographic scale as a ratio. For example, <Ratio> might display "1:10". Add a parameter to change the format: <Ratio( to )> displays "1 to 10".
- Component or Group tags display group and component names, component descriptions or solid volumes.
- Edge and Face tags display properties of the edges and faces the leader points to. These can include length, area and coordinates.
You can also type a tag name directly into the label text. For example, to display 'Oblique' as shown in the image above, create a label and type <SceneName>. Use this method to create label templates you can copy and reuse across multiple viewports.
Select a label entity
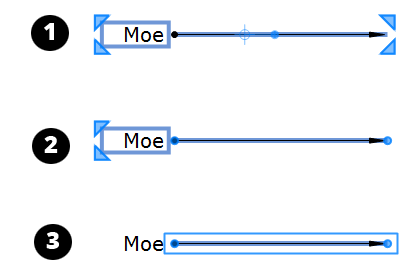
A label entity's blue selection box has three selection states. Each state lets you move or edit different parts of the label:
- Click a label entity to show the selection box in Callout 1. You can change the text and style, and move certain elements.
- Double-click a label entity's leader line to show the selection box in Callout 2. You can edit the leader line's properties and move its elements.
- Double-click a leader line and then double-click the leader line again to select only the leader line, as shown in Callout 3. You can move and modify its points.
Move a label or its parts
Use the Select tool ( ) to move a label or its parts. The leader line may shift as you move it, especially if it has an elbow. Where you click determines what moves. Watch the Select tool cursor to check what you are selecting.
The following table shows how to move each part of a label.
To Move This… | Mouse Like This… | At the Right Spot, the Select Tool Cursor Looks Like This… |
|---|---|---|
The entire label | Click the label, then click and drag the leader line. |
|
The label text | Click the label, then click and drag the text box. The leader line moves with it. |
|
The label text and elbow | Click the label, then click and drag the horizontal segment. |
|
Any point on the leader line to change its shape | Double-click the leader line, then click and drag any point. Hold Alt (Microsoft Windows) or Option (Mac OS X) to move a point without constraints. The next row shows another method. |
|
Points on the leader line without constraints | Double-click the leader line, then double-click it again. Click and drag any point. |
|
The endpoint's snap position on the text box | Double-click the leader line, then click and drag its endpoint. |
|


You can also make these changes to a label:
- Rotate the label. Click the label entity, then click and drag the rotation handle.
- Change the entity to which the label is connected. Double-click the leader line and move its endpoint to another entity. For example, moving the endpoint from an image to a SketchUp model entity connects the label to that model entity. This can make Auto-Text options available.
- Resize the label text box. Double-click the leader line to show a resize box around the text box. Click and drag the text box's corners or edges to resize it.
Style the leader line, arrows and endpoints
To change a leader line's width, colour, style or endpoints, click the label entity and choose your options in the Shape Style panel.
You can change the number of leader line segments or convert between a line and a curve. Context-click the label entity to choose from two of these options. The current state is unavailable because the leader line is already in one of the three states:
- Convert to One-Segment
- Convert to Two-Segment
- Convert to Curve
Edit labels
Select a label, then use the Text Style panel (Microsoft Windows) or Fonts dialog box (MacOS) to change its font, typeface, colour, size and other text attributes. See Formatting Text for details. Use the Shape Style dialog to change the label's leader formatting and arrow styles, as shown above.
You cannot scale labels using scale grips. You can scale a label attached to LayOut or SketchUp geometry. The relationship between its text and leader line stays consistent.
To change label text, double-click the text box and type the new text. If the label uses an Auto-Text tag, double-click the text box, then click the blue drop-down arrow to open the Auto-Text options.
Fix label connections
A label highlighted in red means its connection to the model viewport may be incorrect.
To fix a label connection marked with a red alert, follow these steps:
- Double-click the label with the alert. A red dot shows where it connects to your model in the model viewport, as shown in the following figure.
- Click and drag the red dot away from your model, then back to the position you want in the model viewport.
- Click outside the label to exit editing mode.
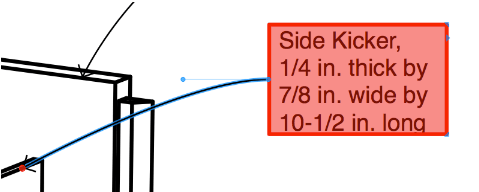
Red alerts usually appear after you change model geometry in SketchUp and LayOut cannot resolve the changes. These changes can affect label connections:
- Exploding a component into separate entities
- Deleting the geometry the label is attached to
- Turning geometry into a component, then moving it before updating the model reference in LayOut